Photography is not a hobby anymore; it has become much bigger than that. Photography is a form of art through which an artist tries to communicate with his or her audience. They can convey thousands of thoughts without uttering a single word. This is how much powerful and impactful photography can be.
Photos are used to sell services, promote businesses, and showcase products to a wider audience.
With the growth in virtual marketing, every company or organization wants to show its online existence through some digital media, which is mostly consistent with photos of their businesses and products. This has led to a boom in professional photography globally.
Global Photography Market
Commercial photography has become an attractive career path for many individuals. In recent years, this market has experienced a substantial amount of growth that has made professional photography a viable career option for individuals.
A large industry has spawned based around professional photography, and the number of people trying their hands on this field has seen a rapid increase because of this. A study carried out by experts in this industry came up with some interesting numbers.
It was calculated in the study that the online digital photography market globally was around 45 billion USD last year. This is estimated to increase in the coming decade, and it’s predicted to pass the 55 billion USD threshold by the beginning of the new decade.
Around 30% of the total photography market worldwide is captured by commercial photography, according to last year’s study. Since 2017, the photography market has been experiencing a growth rate of 1.7-1.8% per year and will continue to grow.
This kind of number and growth helps us understand the potential of this industry and the opportunities and chances that are up for grabs to work as a photographer.
Why Do You Need to Stand Out?
As I’ve discussed earlier, with the growing number of individuals who are entering the market every year to see themselves become professional photographers, the competition to provide quality photography to clients has also become much more challenging.
Everyone wants to make a splash and grab viewers’ attention with their work. As there are so many quality photographers available to potential customers, they are all trying their best to maintain a positive reputation in the market.
All of this is not an easy task always. At times the photographers have to go through a gigantic mountain to keep up with everything.
A good photographer should always keep a few tricks and tips to themselves that they can apply to stand out from the rest when necessary. This will grab the attention of their potential clients as people always look for uniqueness and are willing to spend on it. These hacks will also increase their exposure. There’s a saying,
A picture tells more than a thousand words.
This is also true when you are trying to stand out from the rest and create your space in this market. You must be able to take eye-catching pictures to create a buzz around your work to survive in this cutthroat industry.
Why does a Photographer need to Know Face and Skin Smoothing?
Capturing the perfect photo is not a simple task for a photographer. While taking photos, everything will not be perfect despite your efforts. Taking the same photo repeatedly is not the solution, as it requires both time and effort. In such instances, knowing how to touch up a photo comes in handy.
There are so many factors you need to take into account when you are trying to click the perfect snap. So many things are going through the mind, and so much time is invested in this. So any assistance in such a situation is like a blessing. Photo editing is a blessing for you, which can get rid of much of your stress during photo shoots.
Photoshop Face smoothing and editing is usually a post-processing procedure through which you can remove the imperfections of your picture that occurred during the photo session. Not only that, but you can also make some additional changes to your image to further enhance the quality of your photo.
For all these reasons stated above, it has become so significant for a photographer now to know how to implement these features to a picture for better quality. Picture face and skin smoothing will do wonders for your images and will also reduce your workload. It will save you valuable time. Photoshop Face smoothing will give that extra edge to your photos that will help them look more amazing.
Face Smoothing in Adobe Photoshop
Now that you’ve understood the necessity of face and skin touchups in professional photography, the next question that will surely come to your mind is, “How can I perform these edits?” Using various computer software programs during the post-processing session, you can perform all these edits that will assist you in this journey.
There are so many tools that can be used to smooth your images. They all have their own advantages and disadvantages. In this article, I’m going to be specifically talking about Adobe Photoshop, as it is one that is widely used globally for editing and retouching photos by experts.
Adobe Photoshop
Adobe Photoshop is one of the more familiar software programs and is used globally for editing and retouching. You can use Photoshop to perform different additional edits in your image to make them stand out.

In this article, I’ll be providing you with some simple steps that will guide you to smooth the faces and skin of an image using Photoshop. So I’d recommend you to go through this article, and at the end, you will also be able to perform these on your photos also.
How to Smoothen Face Using Photoshop
Step 01: Pre-Editing Steps
Before even starting the post-processing, you can take care of some things during the photo session first. These points will help reduce the workload during editing. Always remember that “It is always better to make things right when you have the chance to do so.” The points you should remember before or during the photo session
-
Selecting the right attire
-
Creating a separation from the background
-
Appropriate positioning of the model
-
Getting the right expression
-
Adequate lighting on the set
-
Sufficient amount of makeup where necessary
If you can keep these things in mind while taking the photo, there will be fewer things you need to think about once you are in the post-processing session.
Step 02: Open the Photo in Photoshop
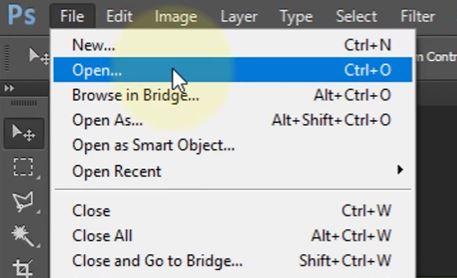
The first thing you need to do is open Adobe Photoshop on your computer. Once you have opened it, select ‘File’ and again select ‘Open’. This will take you to select the image you want to edit. Now choose the image and it will appear on the Photoshop Canvas. An alternate way of doing this is to drag and drop the image into Photoshop Canvas. It is a much faster and more efficient process.
Step 03: Unlock the Background Layer of the Photo
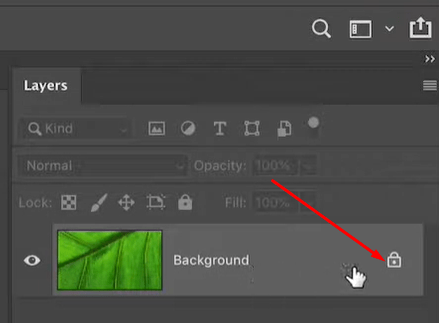
After you’ve opened the image in Photoshop, you will see that there’s a Background layer on the right-hand side. Right-click on the layer to select ‘Layer from Background.’ Then a tab will be opened. Now click ‘OK.’ You can also rename the layer before clicking ‘OK’ if you want to.
Step 04: Duplicate the Background Layer

Here, you need to make a duplicate of the background layer. This is done to prevent the image from getting damaged by chance during the processing sessions.
Right-click on the background layer. Now choose “Duplicate the layer” and give it a name that you find suitable. I’ve named it ‘brightness.’ It’s always recommended to give these layers relevant names.
Step 05: Adjust Brightness and Contrast
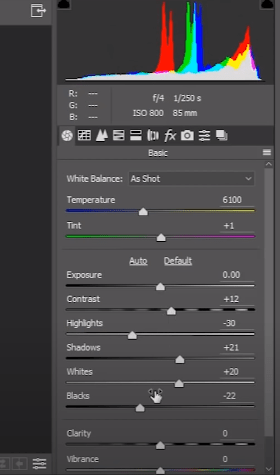
After you’ve created a duplicate of the background layer, you need to adjust the brightness and Contrast of your image. You can enhance the quality of the image by applying proper brightness and contrast to it. It is much easier to find imperfections in a photo with improper brightness.
Set a proper value for Brightness and Contrast. This will vary from image to image. Experiment with it with different values and settle on the one you think is the most appropriate.
Go to ‘Image,’ select ‘Adjustments,’ and again select ‘Brightness/Contrast.’ This can also be done from the ‘Create new fill or adjustment layer button.’ This is located below the layers panel.
Step 06: Get Rid of Spots & Impurities
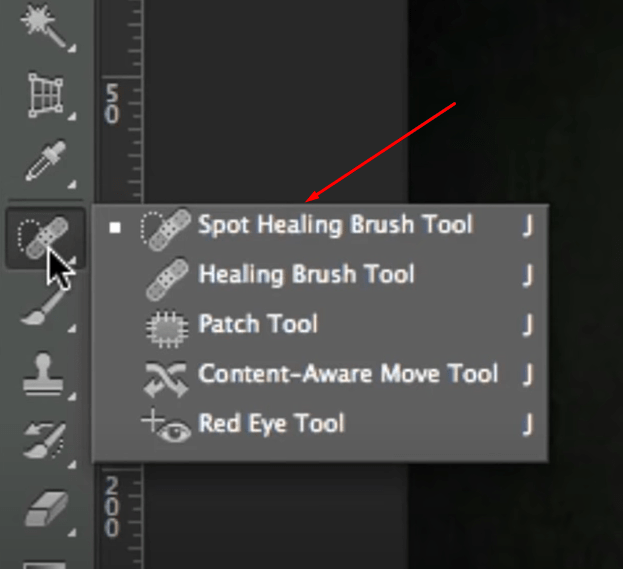
The picture you have taken may have some spots and impurities in multiple areas of the face. This can be removed using Photoshop. This would make the picture look more appealing to the viewer.
To remove them, you can either use the Healing Brush Tool or the Clone Stamp Tool. I personally prefer the Healing Brush Tool, as it gives me the freedom to choose my sample area from wherever I want.
Before starting, make a duplicate layer of the ‘brightness’ layer and name it ‘healing.’ You will perform the healing on this layer.
Press and hold Alt and select the area of your choice. Remember to choose an area that has the same skin tone as the area that has the spots. Brush over the area with spots, and you will be able to remove the impurities.
An important thing to remember As you retouch the skin is that while it’s allowed to remove temporary or minor problems like acne or other skin issues that the model may have, it’s strictly not recommended to remove permanent features of the model such as moles or even certain scars.
Removing these things would make them unrecognizable since these are part of what makes someone who they are. Always remember that your goal in photo editing is to assist people to look their best, not to make them look like someone else.
Step 07: Apply High Pass Filter on Photo
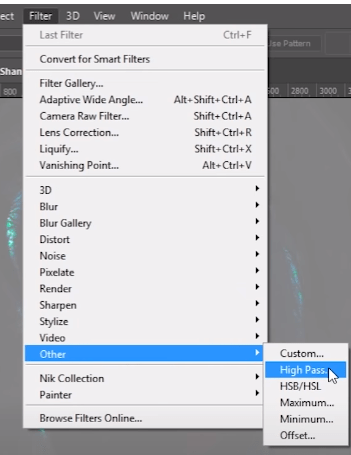
High Pass Filter is a very familiar tool in Photoshop primarily used to sharpen the image. Here you will use it to smooth skin, not to sharpen it. The application steps are fairly similar for both cases.
The High Pass Filter searches for edges in the image and marks them. The High Pass Filter fills the areas that are not considered to be an edge with neutral gray.
In image sharpening, the High Pass Filter allows you to sharpen the edges without impacting the skin. But for smoothing skin, you will use High Pass Filter in reverse. What I’m saying is that you’ll detect the edges not so you can sharpen them, but so you can smooth and soften everything apart from the edges.
Before applying this filter, duplicate the ‘healer’ layer and name it the ‘highpass’ layer. The filter will be applied to this layer. Now, go to ‘Filter’ from the menu on the top and select ‘Other.’ From there, select High Pass.
Step 08: Apply Gaussian Blur Filter
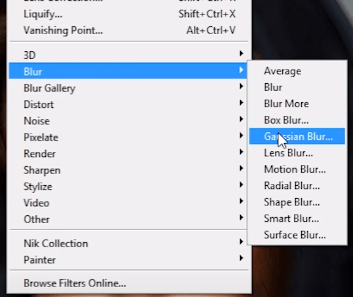
Gaussian blur is a frequently used filter in Photoshop. It’s quick and very easy to use that can help you in different situations. This reduces noise and grain considerably. You can use a Gaussian filter to soften the image and also to control what should be in focus and what should not.
Before applying this filter, duplicate the ‘highpass’ layer and name it the ‘gaussian’ layer. The filter will be applied to this layer.
Go to Filter and select Blur. From there, again, select Gaussian. This will take you to another tab where you can choose the amount of blur you want to apply. You should be applying a blur level that matches the skin tone.
Step 09: Apply Proper Blending Mode
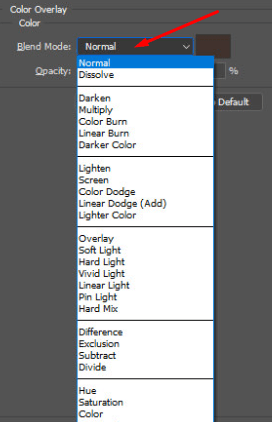
Blending Modes are nothing but a few mathematical equations used to blend layers based on their hue, saturation, luminosity, or a combination of these elements.
They are an effective method for creating non-destructive effects. The Blend Modes only change the visual output and not the pixels. They can be used without worrying about changing the image.
First, you need to perform ‘Apply Image’ on the photo. Afterward, you need to change the blending mode to see its effects on the photo. Change the Blending Mode from ‘Normal’ to ‘Linear Light.’ This will provide you with better results.
You can see how the overall picture looks and compare it to your results. You can also experiment with different blending modes to see their effects.
Step 10: Painting on the Face Using Brush Tool
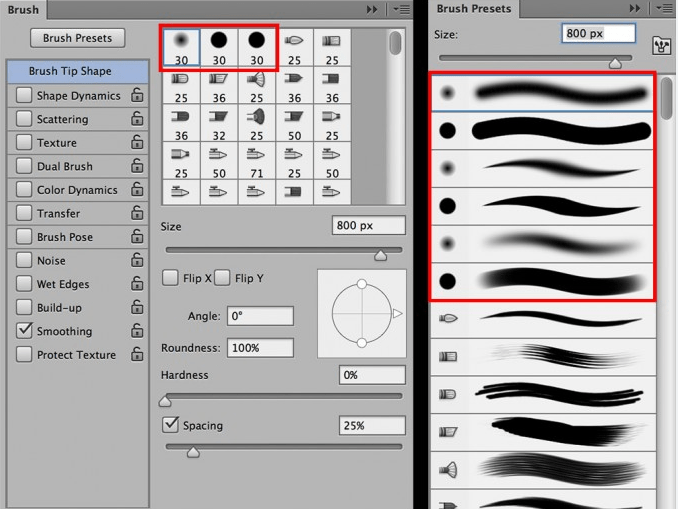
Brush Tool presents a soft or dim look on the edges of your image. In this step, you would want to paint the face of your image with this tool.
Create a layer mask on top of the ‘gaussian’ layer. You’ll use this layer to give that smooth effect on the skin of the image.
Make white your foreground color before beginning this step. You can see your current foreground and background colors in the color swatches near the bottom of the Toolbar. The swatch in the upper left is the foreground color. You can set it white quickly by pressing the ‘D’ keyboard shortcut that reset the colors to their defaults.
Now, paint over the face to reveal the smoothing effect. A soft-edge brush will do wonders here. You can start with the forehead and then slowly shift to other parts, such as the nose, cheeks, and under the eyes. Lastly, you can finish the painting after going around the mouth and chin.

Now that you’ve followed all these steps, you have to save the picture on your computer, and your editing is complete. And if you haven’t followed them along the article, edit a picture before continuing to read the rest on how to smooth skin in Lightroom.
Closing Thoughts
Now that I’ve talked to you in detail about touching up your images easily so that you can smoothen the face and skin in Photoshop, it is safe to assume that you have a very good idea about these concepts. You can now follow these steps to get that perfect photo with a smooth face that will instantly catch the eye of the viewers.
You have to remember that you don’t have to use all the steps in a photo. Some images may require them all; some may not. So use your own discretion when working with your picture.
I’m again telling you that this is not the only way to smoothen the face in your photos. If you look online, you will find that there are hundreds of different methods to do this same thing. But if you look closely, more than 90 percent of the steps that are used are similar to the steps discussed in this article.
So if you can follow through with these steps that I’ve talked about, I can assure you that you will come back with some fabulous photos that will grab people’s attention. This will help you to grow a portfolio that will land you huge success in the long run.
Why Should You Choose ‘Clipping Path CA’ for Photoshop Face Smoothing Services?
Clipping Path CA is a professional photo editing and retouching company. They have 120+ expert designers of their own. They can provide photo touch-up services like face and skin smoothing to clients who have difficulty with their photos. Clipping Path CA is a photographer-friendly platform that provides its services at a reasonable price and with a quick turnaround time. Client satisfaction is always kept in mind.
Photo Retouching, which includes Face Smoothing, is a service that helps to create images that look perfect and flawless. It makes them attractive with the Photoshop Service by smoothing the skin and face in the photos. It is one of the most demanding services in photo editing services. Images become more appealing and focused with the addition of face smoothing.
Questions and Answers for Face Smoothing in Photoshop
Is there any tool to make faces look smooth in Photoshop?
Yes, there is. It is called Blur Tool. The easiest way to smooth skin in Photoshop is to use the Blur tool. This tool looks like a water drop in the toolbar. This tool smoothens skin, but it doesn’t allow you much control over the smoothing effect.
How long does it take to smoothen the face of an image?
When you are new to this type of editing, it may take time to smoothen the face of a single image (around 10-15 minutes). But once you’ve had some experience, you can work very quickly (7-8 minutes). Sometimes some images will take more time than usual if they have more edges and impurities.
Is there any app to smoothen the face in an Image?
Yes, there are apps that can do this for you. Some of these apps are:
✔️ YouCam Makeup
✔️ Facetune Editor
✔️ Picsart
✔️ Adobe Lightroom
How can I make my face look better in an Image?
Here are some tips you can follow:
✔️ Be comfortable with your expression and position
✔️ Have proper rest before the photo session to look fresh
✔️ Ensure proper lighting
✔️ Use a tripod or a camera stand
✔️ Have a proper background
✔️ Use additional make-up where necessary.


