Photoshop is a powerful and versatile tool for photo editing and graphic design. If you’re a Mac user, you’re in luck because Photoshop is available for macOS. In this step-by-step guide, we will walk you through the process of how to Photoshop on Mac, from installation to basic editing techniques. Whether you’re a beginner or have some experience with Photoshop, this guide will help you get started and enhance your skills.
Why use Photoshop on Mac?
Photoshop is a powerful image editing software that can be used for a variety of tasks, such as photo editing, graphic design, and web design. It is available for both Mac and Windows, but it is generally considered to be more stable and performant on Mac.
Here are some of the reasons why you might want to use Photoshop on Mac:
- Stability and performance: Photoshop is known to be more stable and performant on Mac than on Windows. This is because Mac computers come with a number of built-in features that are optimized for Photoshop, such as Metal and Grand Central Dispatch.
- High-quality display: Mac computers are known for their high-quality displays, which is important for working with images in Photoshop. A good display can help you to see the details of your images more clearly, and it can make it easier to edit them accurately.
- Built-in features: Mac computers come with a variety of built-in features that can be useful for Photoshop users, such as the ability to take screenshots and record videos. You can also use features like Quick Look to preview images without having to open them in Photoshop.
- Large community: There is a large community of Photoshop users on Mac, which means that there are plenty of resources available to help you learn and use the software. You can find tutorials, support forums, and other resources online and in libraries.
In addition to the above reasons, Photoshop on Mac also offers a number of other benefits, such as:
- Tight integration with other macOS apps: Photoshop is tightly integrated with other macOS apps, such as Finder, Preview, and Mail. This makes it easy to share images between apps and to use Photoshop features from other apps.
- Support for macOS features: Photoshop supports a number of macOS features, such as Dark Mode, Continuity, and Handoff. This makes it easy to use Photoshop on your Mac and other devices.
- Regular updates: Adobe regularly releases updates for Photoshop on Mac, which include new features and bug fixes. This means that you can always be sure that you are using the latest and greatest version of Photoshop.
There are numerous benefits to using Photoshop on a Mac. It has a big user base, a high-quality display, and is a reliable and efficient platform. Further advantages of Photoshop on Mac include frequent upgrades, compatibility for macOS features, and close integration with other macOS software.
Therefore, I hope you understand why you should use Photoshop on a Mac at this time. Now, let’s talk about another crucial aspect of installing Photoshop on your Mac.
Installing Photoshop on your Mac
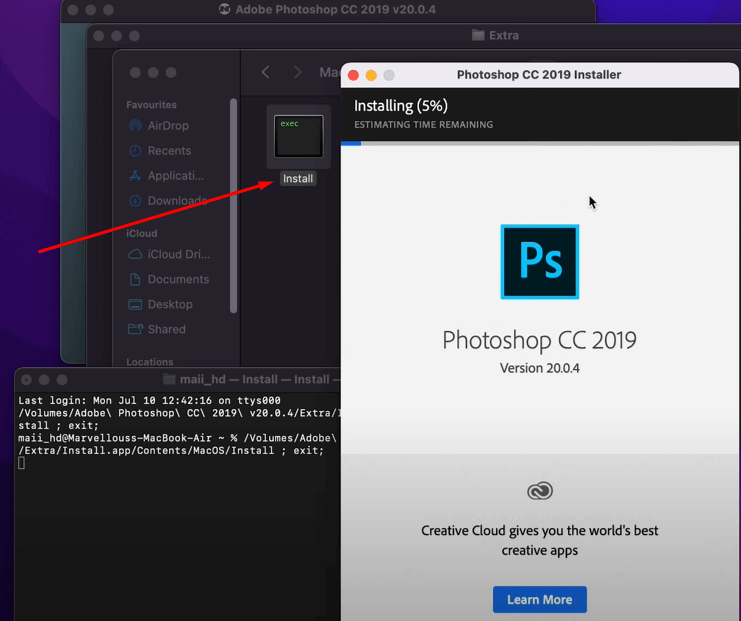
Before you can start using Photoshop on your Mac, you need to install it. Follow these steps to install Photoshop:
- Visit the official Adobe website and navigate to the Photoshop product page.
- Choose a subscription plan that suits your needs and click on the “Download” button.
- Once the download is complete, locate the installer file in your Downloads folder and double-click on it.
- Follow the on-screen instructions to complete the installation process.
- After the installation is finished, you can find Photoshop in your Applications folder or search for it using Spotlight.
Getting Familiar with the Photoshop Interface
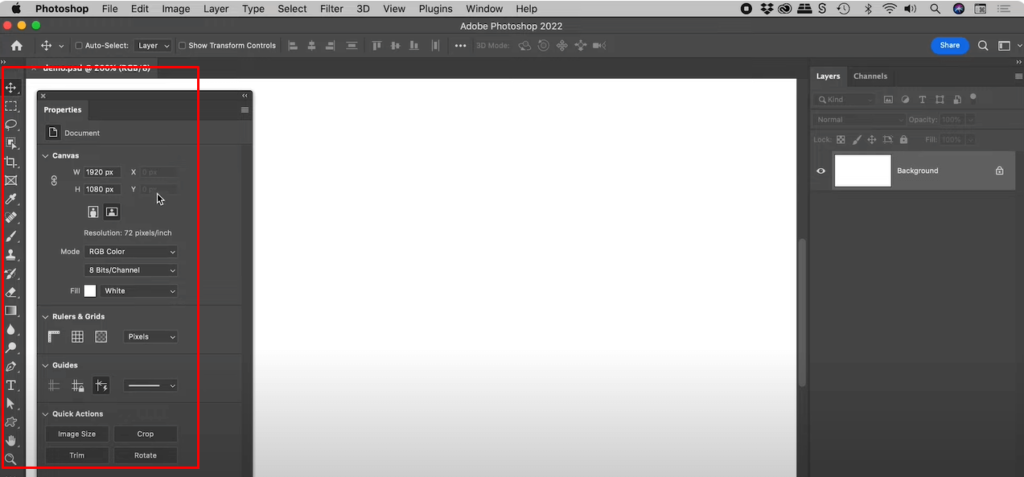
Upon launching Photoshop on your Mac, you will be greeted with the Photoshop interface. Let’s take a quick tour of the main components of the interface:
- Menu Bar: The menu bar contains various menus such as File, Edit, Image, and more. These menus provide access to different commands and functions in Photoshop.
- Toolbox: The toolbox is located on the left side of the interface and contains a variety of tools for editing and creating images. Some commonly used tools include the Move Tool, Brush Tool, Eraser Tool, and Text Tool.
- Options Bar: The options bar is located at the top of the interface and displays the options and settings for the currently selected tool. The options bar changes dynamically based on the selected tool.
- Panels: Panels are dockable windows that provide access to different features and functions in Photoshop. Some commonly used panels include Layers, Adjustments, and History.
Opening and Importing Images
To start editing an image in Photoshop on your Mac, you need to open or import the image into the application. Here are a few ways to open or import images:
- Open an Image File: Go to File > Open and navigate to the location of the image file on your Mac. Select the file and click on the “Open” button.
- Import from Camera or Device: If you have a camera or device connected to your Mac, you can import images directly from it. Go to File > Import and choose the camera or device from the list. Follow the on-screen instructions to import the images.
- Drag and Drop: You can also simply drag and drop an image file from your Mac’s Finder directly into the Photoshop workspace.
Basic Editing Techniques
Now that you have an image open in Photoshop on your Mac, let’s explore some basic editing techniques you can use to enhance your photos:
✔️ Adjusting Image Size and Resolution
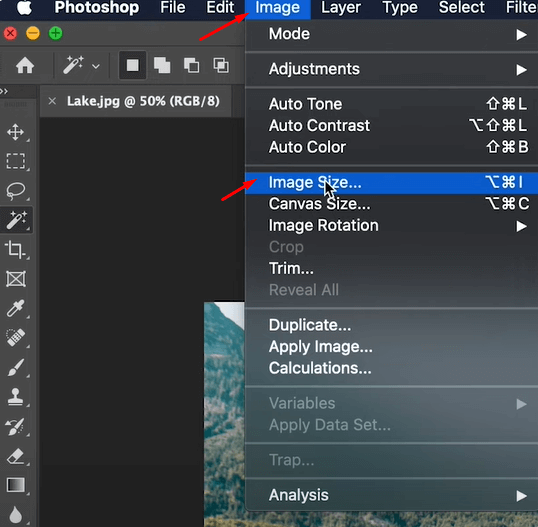
- To adjust the size of an image, go to Image > Image Size. In the Image Size dialog box, you can enter new values for width and height. Make sure to select the appropriate units (pixels, inches, or centimeters) and choose the resampling method.
- To change the resolution of an image, go to Image > Image Size. In the Image Size dialog box, enter a new value for the resolution. Keep in mind that changing the resolution may affect the overall quality of the image.
✔️ Cropping and Straightening Images
- To crop an image, select the Crop Tool from the toolbox. Click and drag on the image to define the crop area. Adjust the crop area by dragging the handles or entering precise values in the options bar. Press Enter or Return to apply the crop.
- To straighten an image, select the Ruler Tool from the toolbox. Click and drag along a horizontal or vertical line in the image that should be straight. Go to Image > Image Rotation > Arbitrary to rotate the image based on the ruler line.
✔️ Adjusting Brightness, Contrast, and Color
- To adjust the brightness and contrast of an image, go to Image > Adjustments > Brightness/Contrast. In the Brightness/Contrast dialog box, use the sliders to adjust the levels to your desired outcome. Click OK when you’re satisfied.
- To adjust the color balance of an image, go to Image > Adjustments > Color Balance. In the Color Balance dialog box, use the sliders to adjust the levels of the different color channels. Click OK to apply the changes.
✔️ Removing Blemishes and Imperfections
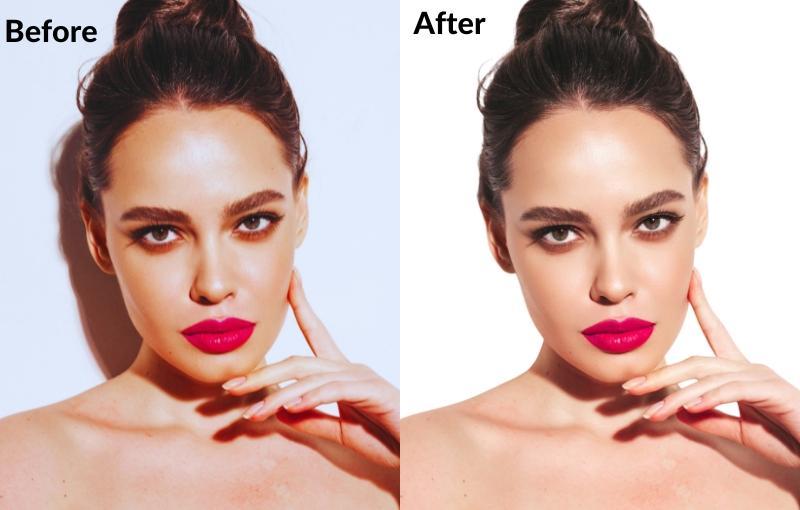
- To remove blemishes or imperfections from an image, select the Spot Healing Brush Tool from the toolbox. Adjust the brush size and hardness as needed. Simply click on the blemishes or imperfections to automatically remove them.
- For more precise retouching, use the Clone Stamp Tool. Option-click on an area of the image you want to clone, then click and drag over the blemish or imperfection to replace it.
✔️ Adding Text and Graphics
- To add text to an image, select the Text Tool from the toolbox. Click on the image to create a text box, then type your desired text. Use the options bar to customize the font, size, color, and other text properties.
- To add graphics or shapes to an image, select the Shape Tool from the toolbox. Choose a shape from the options bar, then click and drag on the image to create the shape. Use the options bar to customize the fill color, stroke color, and other properties.
✔️ Fix Common Computer Issues
- You will also need to know how to navigate around common software and general computer glitches that might crop up as you edit your photos. Imagine a scenario where your laptop or desktop breaks down or fails to work optimally as you are editing your photos. In that case, it is always good to know how to fix common issues yourself.
- For instance, you are using a Mac, you should be wary of file-related issues like a corrupt file, accidental deletion and issues like error code 43 which typically indicates a problem with file or folder operations. Here is a nice guide where you can learn more on what is error code 43 on mac and educate yourself on the steps you could follow to get yourself out of a fix.
✔️ Saving and Exporting Images
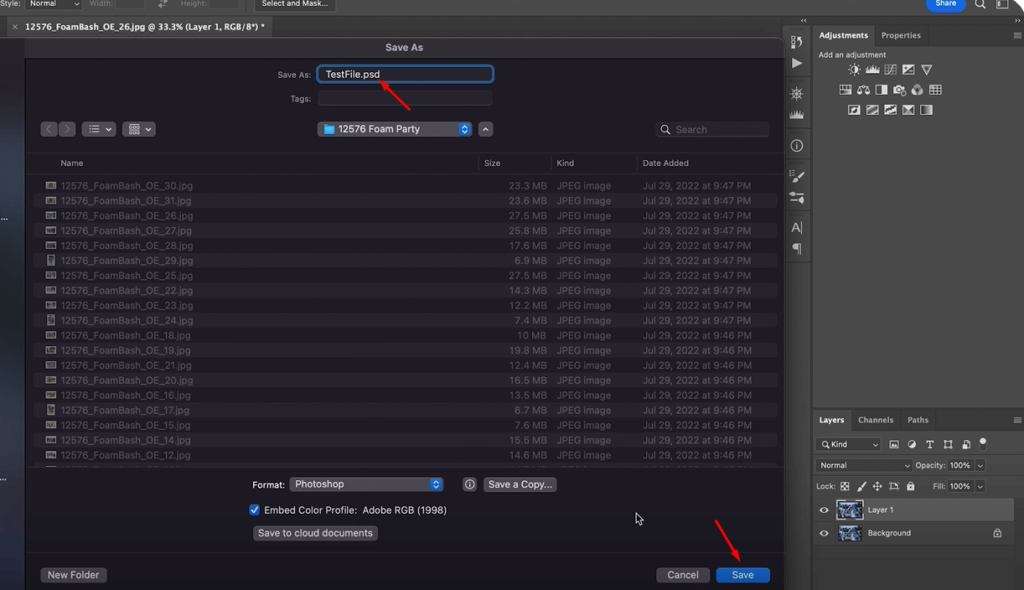
Once you’re done editing an image in Photoshop on your Mac, it’s time to save or export the final result. Here are a few ways to save or export your edited images:
- Save as PSD: To retain all the layers and editable properties of the image, go to File > Save As. Choose a location on your Mac to save the file, enter a file name, and select Photoshop (*.psd) as the file format. Click on the “Save” button.
- Export as JPEG or PNG: To save or export the edited image in a common web format, go to File > Export > Export As. Choose a location on your Mac to save the file, enter a file name, and select JPEG or PNG as the file format. Adjust the quality settings if needed, then click on the “Export” button.
Conclusion
Congratulations! You are familiar with the fundamentals of using Photoshop on a Mac. You may easily start editing and improving your images with these basic methods. Always keep in mind that practice makes perfect, so keep experimenting and discovering all that Photoshop has to offer.
Oh, and I could have forgotten to mention one or two aspects that are currently raising questions in your mind. In this instance, simply put your comments in the space provided below or simply thank us if you found this article to be useful. Happy editing!
Frequently Asked Questions
Q: How to edit an image on Mac?
A: To edit an image on Mac, you can use various applications, including Photoshop. Follow the steps outlined in this guide to learn how to edit images using Photoshop on your Mac.
Q: Can I use Photoshop on Mac for free?
A: Photoshop is not available for free, but Adobe offers a free trial period for new users. After the trial period, you will need to purchase a subscription to continue using Photoshop.
Q: Are there any alternatives to Photoshop for Mac users?
A: Yes, there are several alternatives to Photoshop for Mac users, including Affinity Photo, GIMP, and Pixelmator Pro. These applications offer similar features and functionality at a more affordable price point.
Q: Can I use Photoshop on Mac for professional purposes?
A: Absolutely! Many professional photographers, graphic designers, and digital artists use Photoshop on Mac for their work. It is a powerful and industry-standard tool for photo editing and graphic design.
Q: Where can I find advanced tutorials for Photoshop on Mac?
A: You can find advanced tutorials for Photoshop on Mac on various online platforms, including Adobe’s official website, YouTube, and online learning platforms such as Udemy and Lynda.com. These tutorials will help you explore more advanced techniques and features of Photoshop.
Q: Can I collaborate with others using Photoshop on Mac?
A: Yes, Photoshop on Mac supports collaboration features that allow you to work on projects with others in real-time. You can share your work with others, collaborate on projects, and even sync your work across different devices using Adobe Creative Cloud.
Q: Is it possible to automate tasks in Photoshop on Mac?
A: Yes, Photoshop on Mac supports automation through actions and scripts. You can record a series of steps as an action and apply it to multiple images, saving you time and effort. Additionally, you can create or download scripts to automate specific tasks or workflows in Photoshop.
Q: Can I use Photoshop on Mac to create web graphics?
A: Yes, Photoshop on Mac is widely used for creating web graphics such as banners, buttons, icons, and website layouts. It provides powerful tools and features that enable designers to create visually appealing and optimized graphics for the web.
Q: Can I use Photoshop on Mac to edit videos?
A: Yes, Photoshop on Mac has basic video editing capabilities. You can import video clips, trim them, apply effects and filters, add text and graphics, and export the edited video in various formats. However, for more advanced video editing tasks, dedicated video editing software like Adobe Premiere Pro is recommended.
Q: What are the system requirements for Photoshop on Mac?
A: The system requirements for Photoshop on Mac may vary depending on the version and the specific features you plan to use. Generally, you will need a Mac with a compatible operating system, sufficient RAM, storage space, and a capable graphics card. Check Adobe’s official website for the detailed system requirements for the version of Photoshop you intend to use.


