When we work with Photoshop, we need to outline an image most of the time. It helps us to make our target object look clean and the main focus. On top of that, outlining an image makes the photo easy to see on any background. But how to outline an image in Photoshop?
Honestly speaking, it is not a very hard nut to crack. We can easily do this important task in Photoshop with very simple steps. To help you out, we will show you every simple way to outline an image in Photoshop, explaining every step. Just keep on reading.
What is Image Outlining?
In simple words, image outlining is the process by which we create a clear border around a subject in an image. You can use this border to separate the subject from the background and highlight important details.
You can apply this outlining process to photos, illustrations, or text. Moreover, it can be soft, sharp, colored, or creative. That totally depends on your design purpose. That means image outlining essentially makes the subject more visible and visually appealing.
What You Can Do With Image Outlines?
Actually, image outlines can be very useful in Photoshop. However, here are a few common things you can do with them. Check it out below.
1. Make your subject the main focus
When you add an outline in the image, your main subject becomes easier to see. You can say the outline works like a border that lifts the subject against the background. Plus, it is great for YouTube thumbnails. That is because people can spot the person or object even when the thumbnail is very small.
2. Highlight products for online stores
That is nothing new to mention that online stores require clear photos to enhance sales. And here, a small outline can make the product look sharp and bright. Moreover, it helps the product to get more attention from customers on online stores like Amazon or eBay.
3. Create fun stickers
You can also create fun stickers with image outlining. Here, you can add a thick white outline to any photo and turn it into a sticker. You will see this technique in TikTok edits, Instagram stories, as many people use it. It gives a fun and cartoon-like look that generally people love.
4. Make clean and bold logos
You can also make clean and bold logos with image outlining. You may know that logos need to be simple and easy to read. If you outline the shapes or icons, it gives the logo a sharp edge. It also keeps the logo visible on dark or bright backgrounds. Ultimately, it helps brands use the same logo everywhere without losing clarity.
5. Improve social media posts
If you want your photo to be noticed in a busy feed, an outline can help you out. It adds a modern style and makes your picture more eye-catching. Many creators use outlines to add personality to selfies and product photos.
6. Add focus when the background is busy
Sometimes your photo may have a lot of clutter in the background. Ultimately, it can make the main subject hard to spot for the viewer. In such cases, a clean image outline ensures to separate the subject is separated from the messy background. It is somehow like telling the viewer, “Look here.”
7. Prepare images for printing or cutting
You can prepare images for printing or cutting with an image outline for many print shops. On top of that, many sticker companies or label makers use image outlines to guide their machines. It makes the final print look clean.
What Do You Need To Do Before Outlining An Image In Photoshop?
Well, first we need to prepare some things before we start outlining the image in Photoshop. It will help us ensure the final result of our image outlining is professional. Check it out below.
1. Make sure you have the right Photoshop version
First of all, we need to make sure we are using the right Photoshop version for image outlining. Well, most versions of Photoshop allow you to add outlines. It includes Photoshop CC, CS6, and Photoshop Elements. However, if you are using an older version, some menus may look slightly different. But don’t worry! The main steps will still work.
2. Choose the right file type
Now we have to choose the right file type for better image outlining. For instance, we can choose PNGs as they support transparent backgrounds. So, it can be the best choice for image outlining. You can also work with JPEGs. However, keep in mind that they always include a background. So you may need to remove it first.
3. Make sure your subject is selected cleanly
Photoshop will outline whatever you select. So, we need to ensure a clean selection to ensure a neat outline. As a beginner, you can use the Quick Selection Tool to paint over the subject. Photoshop will automatically detect the edges. You can also use the Select Subject option. That is because it can automatically pick the main object. However, if you want very precise edges, you can go for the Pen Tool or the Lasso Tool. Learn more about How to Quickly Remove Backgrounds from Images in Photoshop: Step-by-Step Guide 2026
4. Decide what kind of outline you want
Now we have to think about the style of the outline before starting. Like, do we want a simple border or a bold white outline for a YouTube thumbnail? If we know the styles ahead of time, it will help us to pick the best method.
5. Save a backup copy
You should always save a copy of your original image before editing. You can save it as a PSD to keep layers intact or as a PNG for transparency.
Here is a quick overview of what you need to do before starting image outlining in Photoshop.
| Step / Requirement | Why It’s Important |
| Photoshop Version | Ensures all features work |
| File Type | Clean outlines depend on the file type |
| Unlock Background Layer | Needed to apply edits & outlines |
| Clean Subject Selection | Outlines follow the selection |
| Refine Selection | Removes extra background & smooths edges |
| Outline Style | Determines method & look |
| Layer Organization | Keeps the file clean and editable |
| Backup Copy | Prevents loss of original image |
How To Outline An Image Using Layer Styles?
It is the easiest way to add an outline in Photoshop. It is fast and editable. On top of that, it does not change your original image. That means you can try different colors or sizes anytime without losing your work.
Here is how you can do so.
Step 1. Open your image

First, you have to open your image in Photoshop. Make sure your layer is unlocked. That is because a locked background layer can stop some outline effects from working.
Step 2. Select the layer
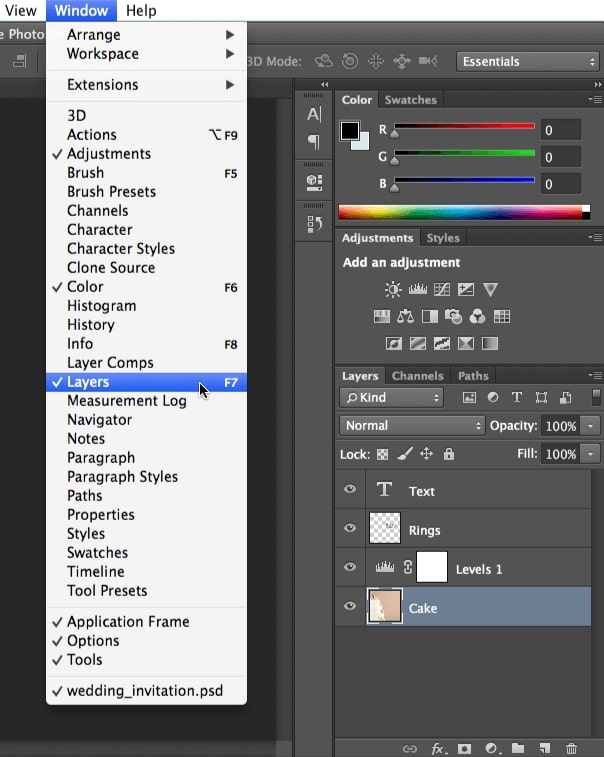
Now, we have to click on the layer that we want to outline in the Layers panel. It tells Photoshop exactly where to apply the stroke. If you have multiple layers, you need to select the correct one to ensure your outline appears around the right subject.
Step 3. Open layer styles
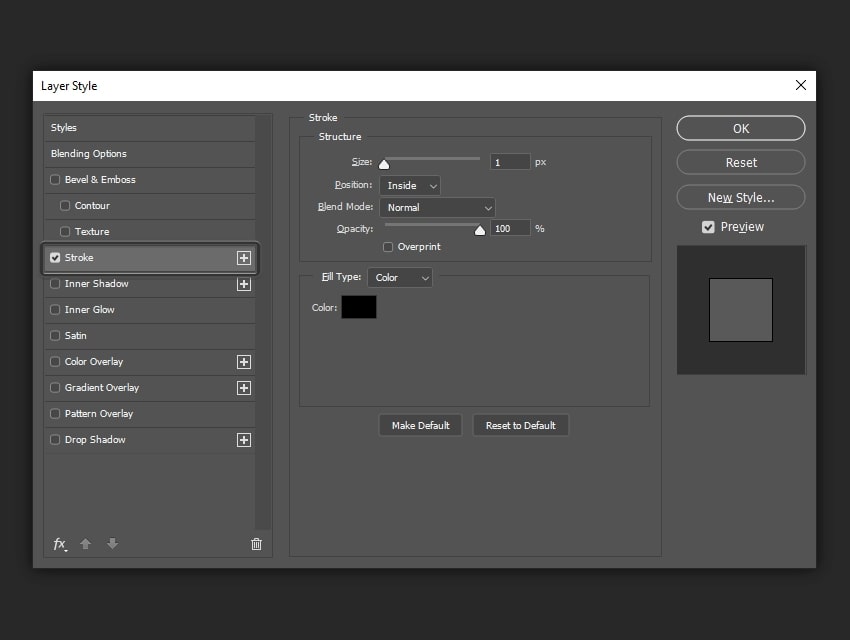
Next, we have to open the layer styles. For this, we have to click the “fx” icon at the bottom of the Layers panel. Then select “Stroke” from the list. It will open the Stroke options, where you can adjust all the settings.
Step 4. Adjust stroke settings
Now we will adjust the stroke settings in Photoshop according to the image and the requirement. Here is the main setting that we need to know.
| Setting | What It Does | Recommended Use |
| Size | It determines the thickness of the outline | Small: 2–5px for subtle outlinesMedium: 5–15px for normalLarge: 15–50px for thumbnails or bold outlines |
| Position | Where the stroke appears relative to the layer | Outside: most common and looks cleanInside: good for sharp shapesCenter: splits the stroke inside or outside |
| Blend Mode | How the stroke blends with the layer | Usually Normal for full visibility |
| Opacity | It makes the stroke transparent or solid | 100% for solid linesLower it if you want a subtle effect |
| Fill Type | Stroke color or pattern | Use Color for a solid outlineGradient for a multi-color effectPattern for creative designs |
Step 5. Choose your stroke color
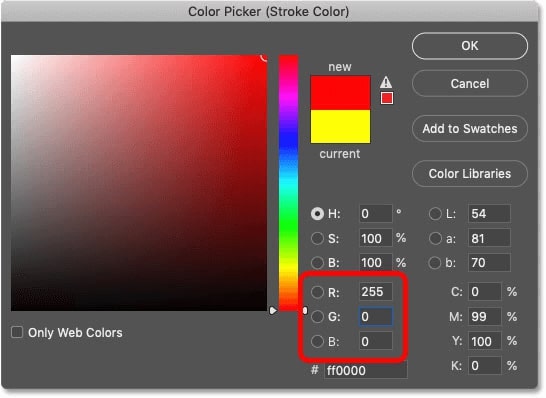
Now we have to pick a color that contrasts with your background. For example, a white stroke works well on dark backgrounds. In contrast, black or dark strokes work well on light backgrounds. You can also use the Eyedropper Tool to match colors from your image.
Step 6. Preview and fine-tune
It is wise to preview your outline on the image before applying. You can adjust the size or position until it looks right. If your subject has thin lines, you can use a slightly thicker stroke. It will make it more visible.
Step 7. Apply the stroke

After your settings are totally done, click OK. Your outline will be applied immediately. Here, the best thing about this method is that the outline is fully edible. That means if you want to change the color or style, you can do so very easily. Just double-click the “Stroke” effect in the Layers panel and adjust it anytime.
How to Outline Text in Photoshop
Step 1. Type your text

First of all, we need to choose the Type Tool (T) and type the text we want to outline. We also pick a font that fits our design. That is because the outline will follow the exact shape of our letters. You can choose bold or thick fonts for outlines. That is because they give the stroke more space to sit on the edges. If you aren’t sure about the size, choose a bigger font.
Step 2. Open the layer style panel
Now double-click on the text layer in the Layers panel. It will open the Layer Style window. Here you will be able to see all the styling options. It includes outlines, shadows, glows, and other visual effects.
Step 3. Add the stroke effect
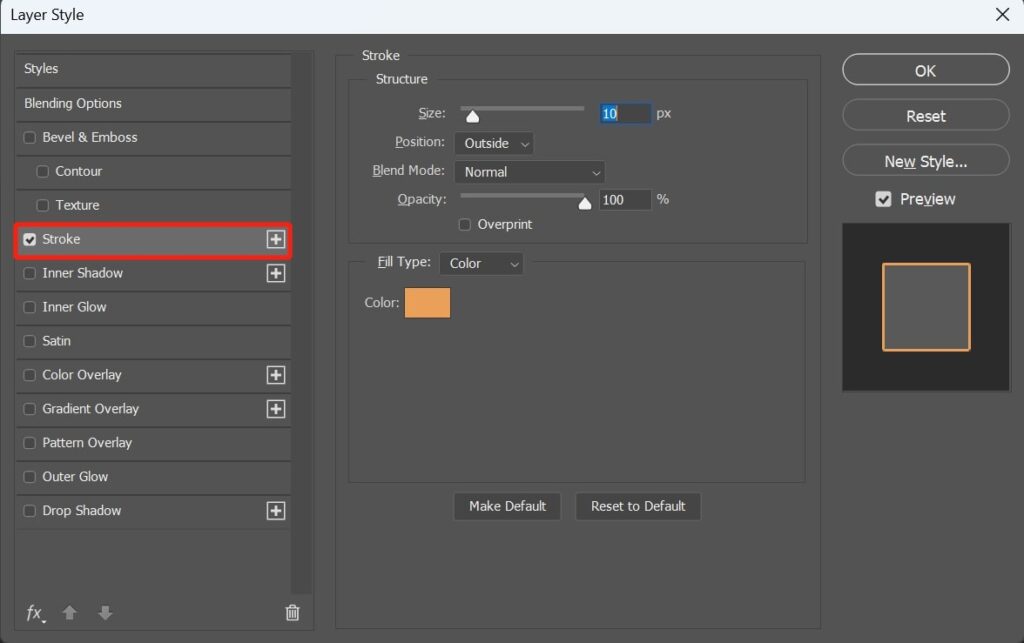
Now, click on Stroke inside the Layer Style panel. It controls every part of your outline. You can set how thick the outline looks and what color it should be. Photoshop updates the effect in real time. That means you will see changes as you adjust the sliders.
Here is a quick stroke setting guide for your assistance.
| Setting | What It Does |
| Size (1–50 px) | It controls how thick or thin the text outline is. Small values = subtle outline. Large values = bold and strong outline. |
| Position: Inside | Outline stays inside the edges. |
| Position: Center | Stroke sits half inside and half outside. |
| Position: Outside | It creates clean outlines without affecting letter shapes. |
| Blend Mode: Normal | It makes the outline fully solid. It is good for logos and headings |
| Opacity (0–100%) | It controls how visible the outline is. |
| Fill Type: Color / Gradient / Pattern | It lets you use solid colors or gradients to create creative outlines. |
Step 4. Choose the best stroke color
Next, we have to pick the right color. That is because it affects how readable our text will become. If your background is dark, you should choose a light outline. If the background is bright, you should use darker outlines.
Step 5. Add extra effects to enhance the look
You can also improve the text by adding other Layer Styles. For instance,
- Drop Shadow,
- Outer Glow, or
- Inner Glow.
These effects make the outline look more professional.
How To Outline Soft Objects And Complex Edges
Well, as you see, you can very easily outline the simple shapes. However, it can be a little challenging to outline hair, fur, smoke, fabric fibers, feathers, and other soft edges. As you know, these subjects have tiny details and soft transitions. That is why we can’t just use a basic selection tool to outline clearly. For such cases, you can use the following method.
Step 1. Start with a high-quality selection
First of all, we need to make a clean and accurate selection. That is because the quality of the outline depends on it. At first, you can use the Quick Selection Tool or Select Subject. Then you can refine the selection carefully. Moreover, you should zoom in and check whether the selection follows the tiny strands for the hairs.
Step 2. Use the “Select and Mask”
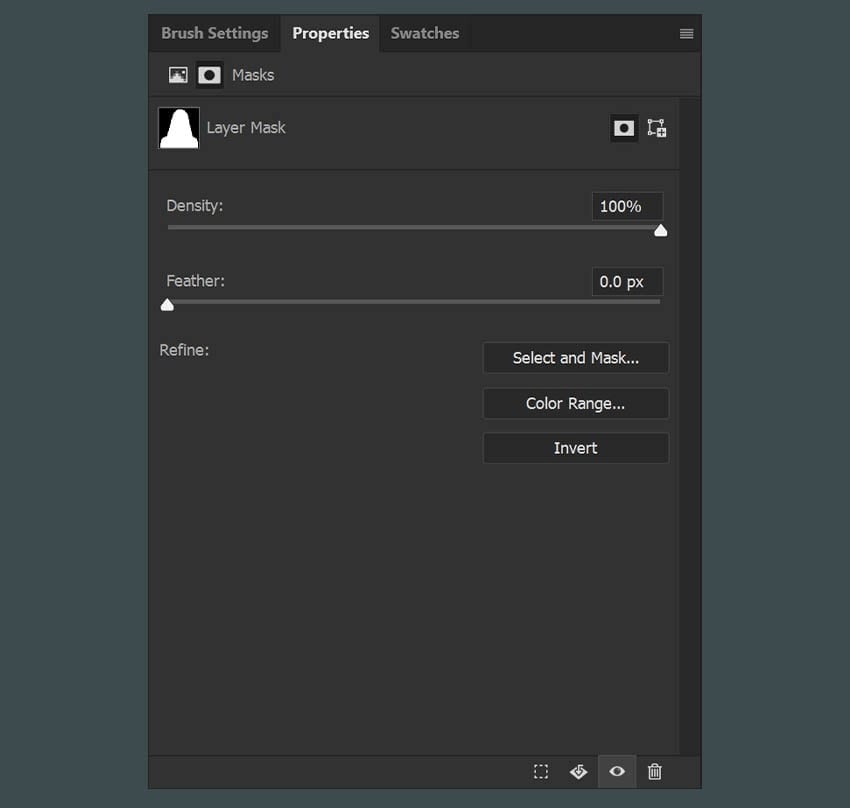
Now you have to enter the Select and Mask panel. This workspace is meant to handle soft edges better than the regular selection tools. Here, the Refine Edge Brush automatically detects thin strands and preserves natural softness.
You just need to move the brush over messy areas. Then Photoshop will rebuild a cleaner and more realistic edge.
Here is a quick overview of the Select and Mask settings. It will help you to better understand the workspace.
| Setting | Recommended Range | What It Helps With |
| Radius | 1 to 5 px | It improves the detection of small hair strands and soft edges. |
| Smooth | 0 to 10 | It reduces jagged edges without losing detail. |
| Feather | 0.5 to 2 px | It softens the transition for natural-looking outlines. |
| Contrast | 10 to 30% | It sharpens edges after feathering so they don’t look blurry. |
| Shift Edge | –5% to –15% | It pulls the selection slightly inward to avoid halos |
Step 3. Output your selection as a layer mask
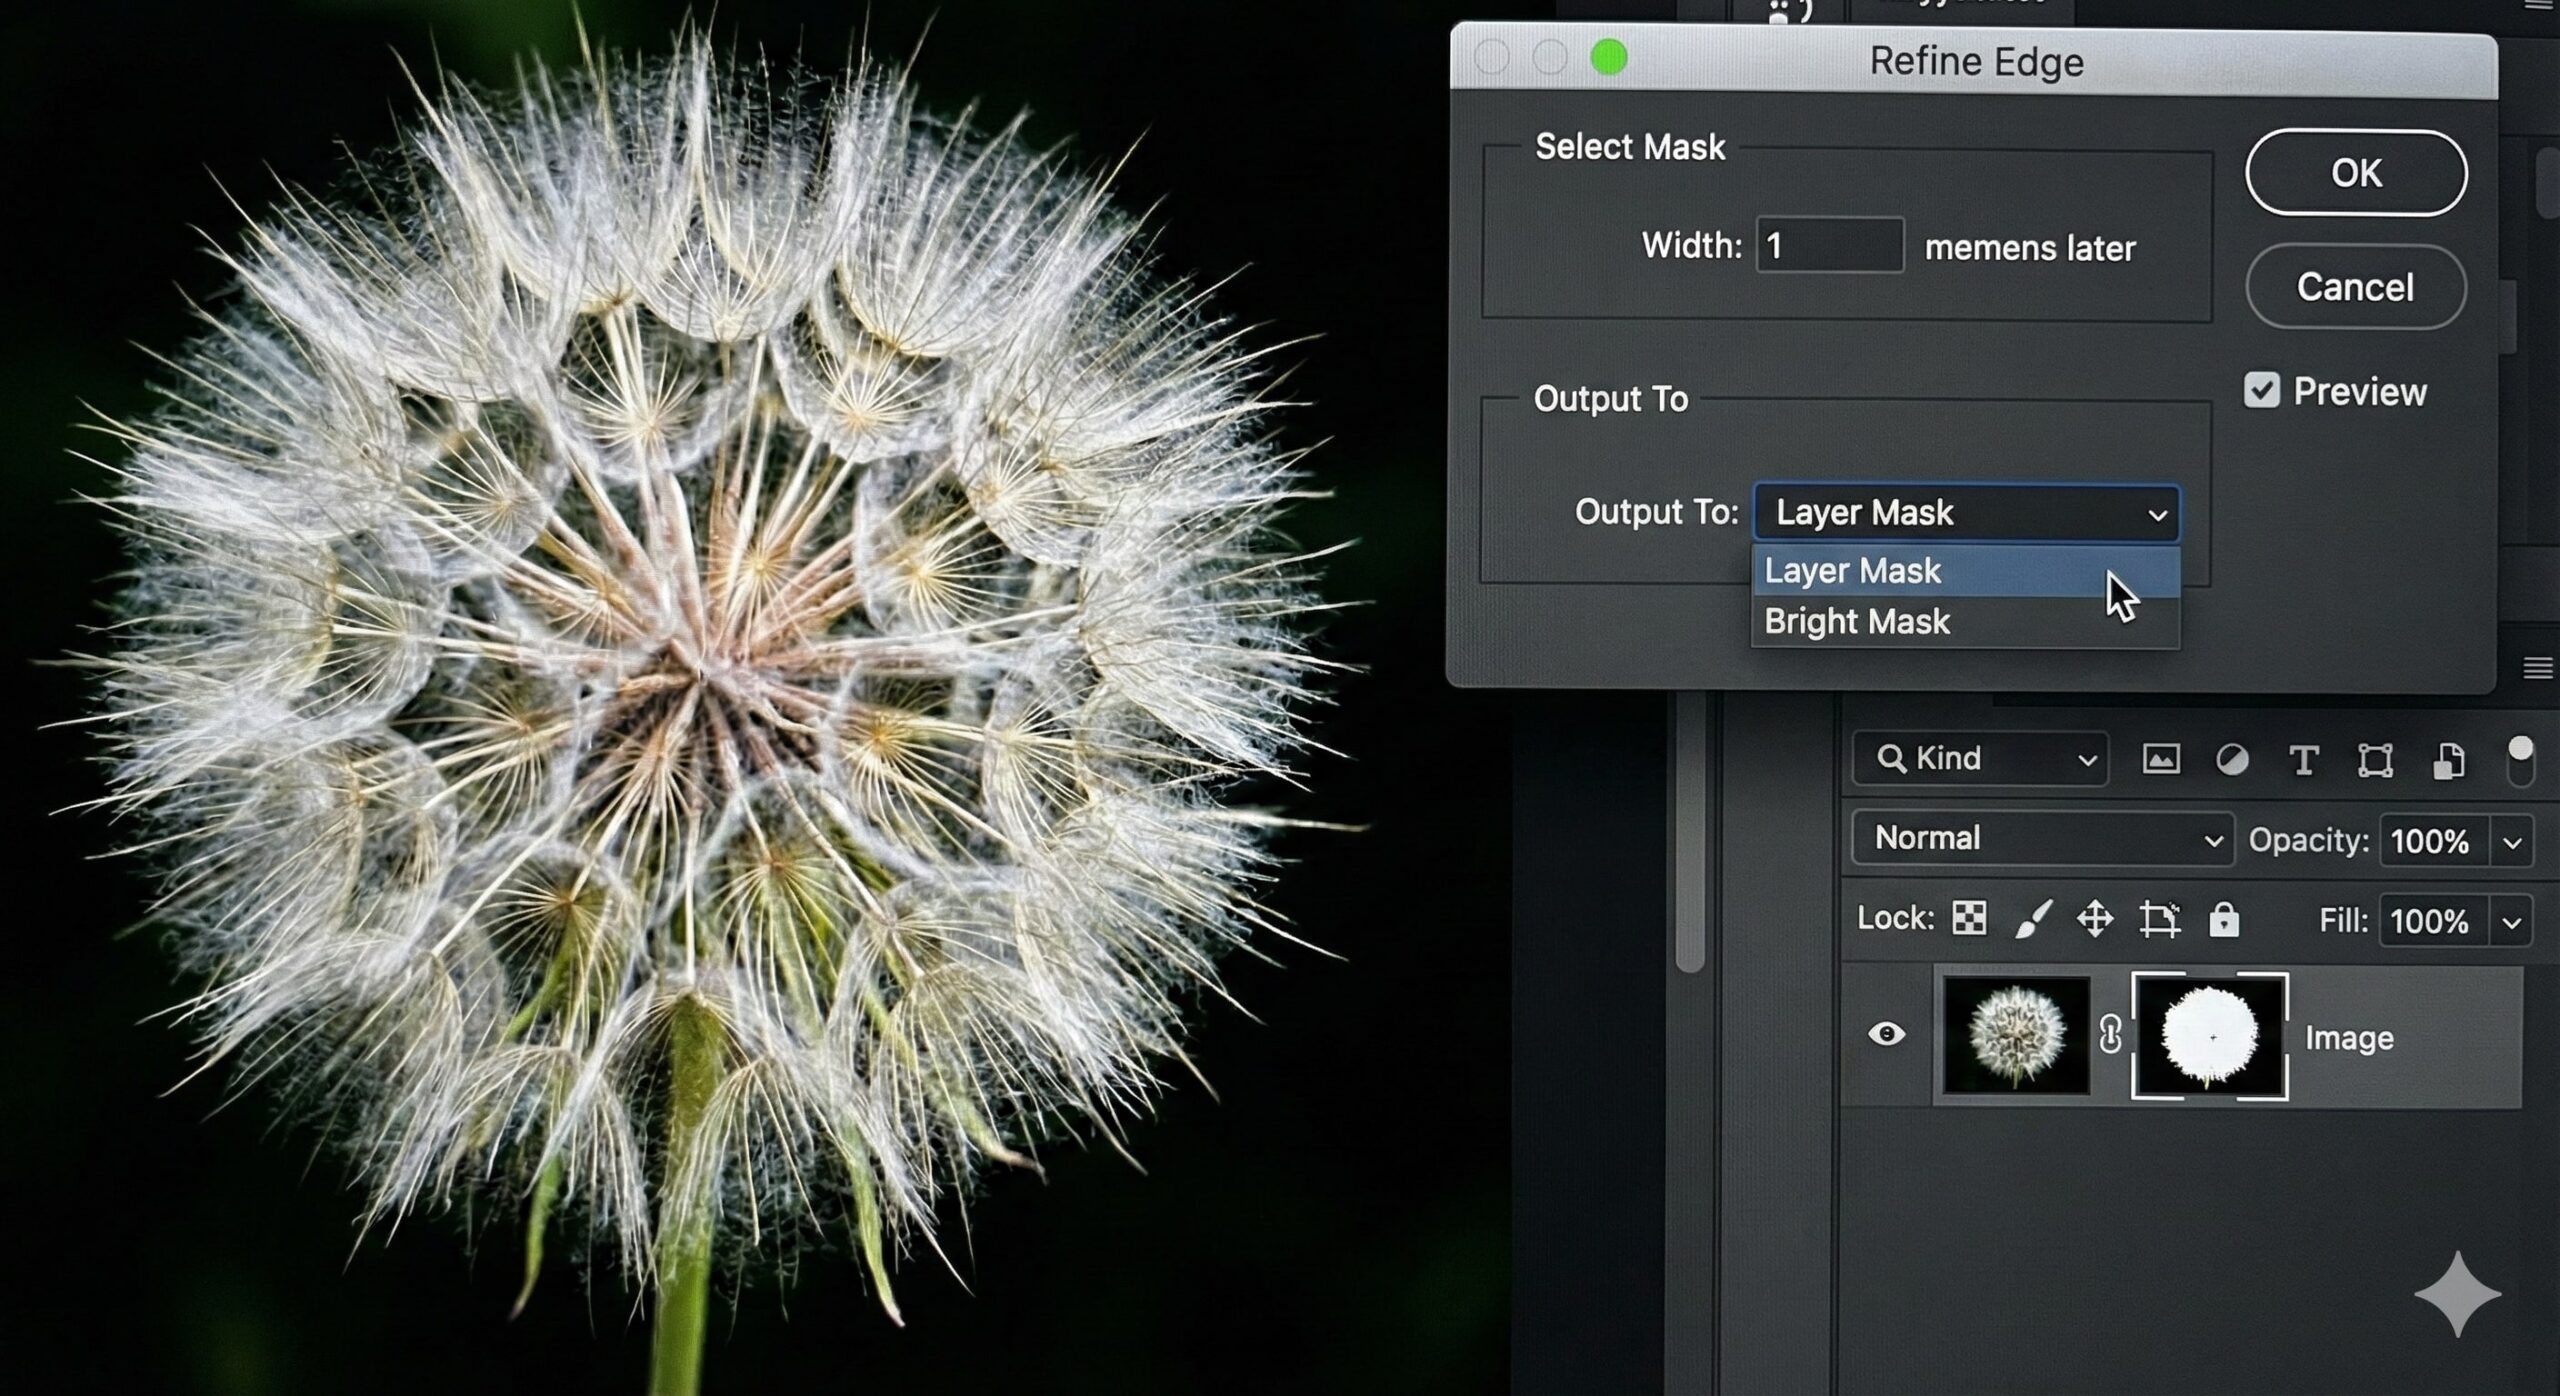
Now you have to export the selection as a Layer Mask. Layer Masks also allow us to hide or reveal small areas using a soft brush. It is perfect for cleaning stray hairs or fixing minor mistakes around soft edges.
Step 4. Add a stroke on a separate layer
Now we have to create a new blank layer above our masked subject to create a clean outline. Here, you have to apply the Stroke effect to this new layer instead of directly on the masked one. It will help you to keep the outline clean and the hair edges soft.
Step 5. Adjust the stroke to match soft edges
As for the next step, we need to fine-tune the strokes. That is because soft objects look strange with a hard outline. That is why we need to switch the stroke Position to Outside. It will keep the outline visible. If the stroke feels too harsh, you can slightly reduce the opacity.
Step 6. Clean up the outline manually

If some parts of your image still look uneven, you can use a soft black brush on the mask to hide any unwanted outline. This simple step will help you to get the realistic and natural outline you want.
What Are The Different Outline Settings to Use?
You will need to use different outline styles for different design tasks. That is why here is an overview table. You can follow it for the most common design needs in Photoshop.
| Purpose | Stroke Size | Stroke Position | Color Style |
| YouTube Thumbnails | 8 to 25 px | Outside | White or high-contrast colors |
| Logos & Icons | 2 to 8 px | Center or Inside | Solid brand color |
| Social Media Posts | 5 to 15 px | Outside | Solid brand color |
| Posters & Flyers | 4 to 12 px | Outside | Black/white or theme colors |
| Portraits (with hair) | 3 to 10 px | Outside | Soft colors that don’t overpower |
| Product Photos | 1 to 6 px | Inside | Neutral colors |
| Cartoon or Comic Effects | 8 to 20 px | Outside | Black or bold colors |
| Neon Effects | 10 to 30 px | Outside | Neon colors with glow |
| Minimal Designs | 1 to 4 px | Center | Subtle colors or a thin black line |
| Text Headlines | 6 to 20 px | Outside | White, black, or themed colors |
| Double Outline Effects | 1st: 6 to 12 px2nd: 15 to 40 px | Outside | Contrast or layered colors |
| Sketch/Artistic Effects | 2 to 8 px | Center | Dark gray or black |
Common Mistakes to Avoid When Outlining Images in Photoshop
Well, outlining images is not a very hard task. But some common mistakes can make the final result look unprofessional. Here is the list of common mistakes that most editors make.
- Using hard edges on soft subjects makes the subject look cut out or unnatural.
- Ignoring selection refinement that creates jagged or uneven outlines.
- Applying strokes directly on the original layer
- Using too thick or too thin strokes
- Poor color choices make the outline ineffective.
- Forgetting about image resolution
- Overcomplicating with multiple methods. It can create messy edges.
Here is how you can avoid those common mistakes.
| Mistake | How to Avoid It |
| Hard stroke on soft edges | You should use feathering, soft brushes, or Select & Mask refinement |
| Skipping selection refinement | You should always refine selections for hair, fur, or soft objects |
| Applying the stroke directly on the original layer | Duplicate the layer or use Layer Styles/masks |
| Stroke too thick or thin | You should match stroke size to subject/text size for balance |
| Poor color contrast | You should choose colors that stand out against the background |
| Low-resolution images | You should work with a higher resolution for clean outlines |
| Overcomplicating methods | You should stick to one method or keep layers organized and editable |
Some Advanced Tips to Make Outlines Stand Out
| Purpose / Effect | Stroke Size | Opacity or Blending | Additional Notes |
| Double outline for depth | 6 to 15 px (top) or 12 to 30 px (bottom) | 100% | The top stroke is smaller, and the bottom stroke is thicker for contrast |
| Outer Glow for soft edges | 3 to 10 px | 50–80% | Use a matching or complementary color to outline |
| Drop Shadow for pop | 2 to 8 px | 40–70% | Soft shadow with low distance for subtle lift |
| Feather for hair/fur | 1 to 2 px | 100% | It keeps a soft edges that look natural |
| Neon effect | 8 to 20 px | 80–100% | Use bright and vibrant colors Use Glow layer style |
| Text headlines | 6 to 15 px | 100% | Use high contrast with the background for readability |
Conclusion
Well, as you see, it is not a very hard task to create an outline in Photoshop. But its effect is greater. It helps to create clean and professional outlines in Photoshop. Ultimately, it makes your images look clear.
All you need to do is ensure the right technique to get the best result. If you are outlining images for your business, you should consider professional editing from experts like Clipping Path CA. They provide expert services that can save you time. Moreover, they can ensure precision in your images. So, of course, it is worth considering!


