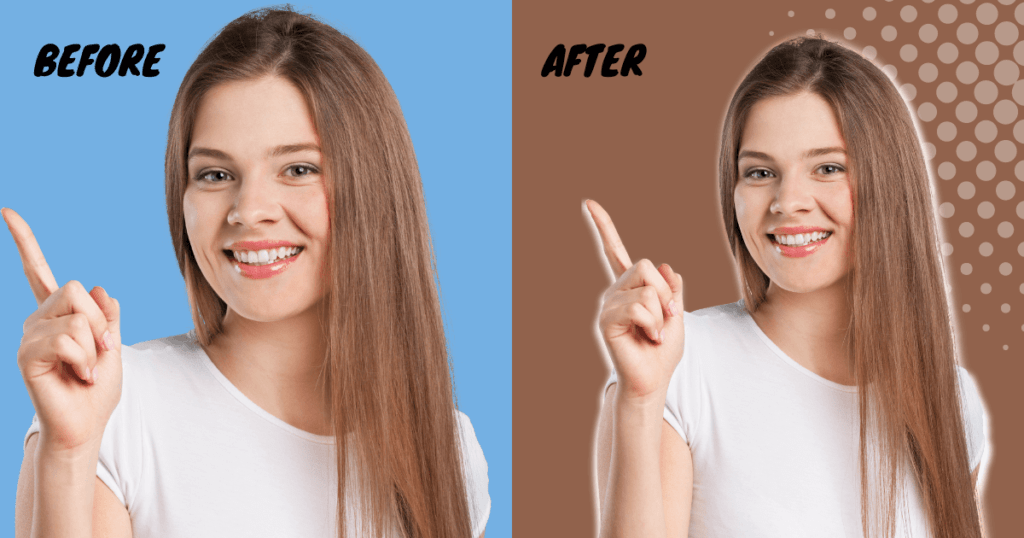
Creating a clipping mask isn’t a difficult task to do when you have enough knowledge about how to create a clipping mask in Photoshop. But in contrast, if you don’t have enough ideas, this task may seem confusing while working.
Therefore, today we’ve come up with a Photoshop clipping mask tutorial that will give you a specific idea about how easily, quickly, and perfectly you can do masking in photoshop.
However, you may find a variety of Photoshop masks tutorials on the internet. Still, I can assure you this tutorial will be unique and powerful.
We make the tutorial as useful as it is easy so that beginners can especially benefit and the experts can get something new and special.
In this tutorial, we are also going to figure out ideas on how to make a clipping mask in Photoshop, use photoshop clipping masks, add a layer mask in Photoshop, and so many important things regarding the topic.
So, after following the guidelines provided in this tutorial, we hope you will be able to create clipping masks fluently and accurately, like professionals.
So, let’s get started with what is clipping mask.
- What is a clipping mask?
- Why are clipping masks essential?
- How to create a clipping mask in Photoshop?
- How to use a clipping mask?
- What is masking?
- Difference between a clipping mask and a layer mask?
- How to create a layer mask in Photoshop?
- How to make a layer black and white in photoshop?
- How to add a layer mask in Photoshop?
- FAQs
- Final Thoughts
What is a clipping mask?
In short, a clipping mask is a combination of two layers or a group of layers. In this way, it is a sort of layer mask, but not exactly a layer mask.
It allows you to control the layers’ visibility in Photoshop and create a particular effect on it.
In Photoshop, a minimum of two layers is needed to make it. You can also add multiple layers to get more than one clipping mask in a single file.
In a photoshop clipping mask, the image layer is portrayed on the upper layer, and the shape is placed at the bottom layer.
The mask which controls what can be seen will only be visible within the borders of the layers it’s clipped into.
Why are clipping masks essential?
Clipping masks are one of the essential features for graphic designers and photographers while working in Photoshop. In addition, they come with a number of benefits while working.
Let’s check out the major benefits of masking in photoshop, for which they are essential to edit pictures.
- A clipping mask is a unique and non-destructive way to control the visibility of a layer.
- It uses the content and transparency of a layer to control the visibility.
- You can move or add any content within it.
- Besides, the most memorable thing is that it allows you to expose adjustments using the Adjustments Layer to a specific layer instead of the entire image.
- Moreover, they’re also very favorable to cut out within a composite image, remove purls in an object, or add texture to smoothed skin regions.
Now let’s have a look at how to make a clipping mask in photoshop.
How to create a clipping mask in Photoshop?
Creating a clipping mask is one of the best tools that Photoshop has provided.
This tool is as creative as useful to the designers to make beautiful typography or custom photo layouts and create new albums for images.
However, making photoshop clipping masks is quite simple once you have an idea about Photoshop’s Layer Panel option.
Because Photoshop provides a way to create masking on the images by using the Layer Panel option.
However, to know the process in more detail, let’s look at the following steps given below.
This example teaches you how to create a mask in Photoshop using two layers. This tutorial is also divided into two parts. One is masking on the image, and another one is masking on text.
So, let’s get started.
Clipping mask image
Step-1: Open the image
First of all, open the image you want to use to do masking. But then you will see the Background Layer is locked automatically.
So, now you have to unlock the layer. To open the layer, press the lock button. And then, it will be unlocked and automatically be converted into Layer 0.
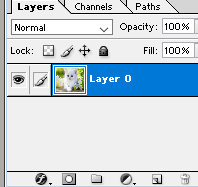
Moreover, you can also double-click on the background layer to unlock the layer and make it Layer 0.
Step-2: Select the shape
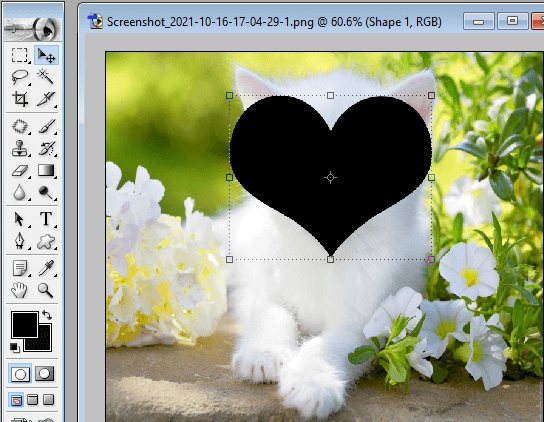
After creating a new layer, you have to select a shape you want to use for masking the image.
In order to select the shape, at first, go to the Rectangle tool from the toolbar and select the Custom Shape Tool option, as you can see in the picture below.
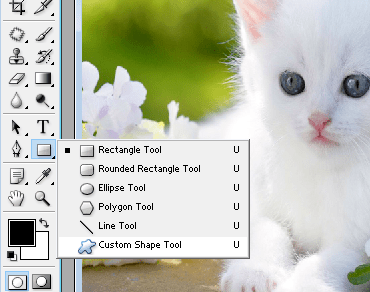
Now go to the Selection tool and choose your own shape to clipped into the image.
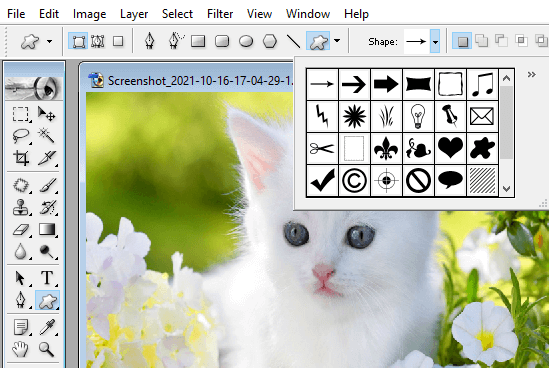
Once you select the shape, you are suggested to draw the shape on the image layer. To draw the shape, you can use the Shift key from the keyboard. On the contrary, you can also use the Move tool from the left tool panel to draw the shape on the image.
Step-3: Change the position of the layers
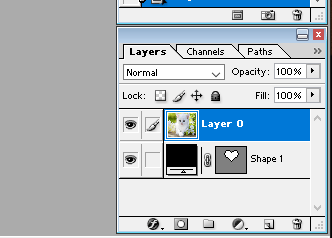
When you select the shape, you’ll notice that the image or background layers are placed under the shape layer.
But remember, while making a clipping mask, the image layer or background layer works as the upper layer, and the shape layer stays under the image layer as the bottom-most layer.
So, in this step, you have to change the position of layers. To do that, drag the shape layer and place it under the image layer.
Then, it’ll look like the photo has been attached here.
Step-4: Get the clipping mask
This is the final stage, where the processing will be done, and finally, we will get our desired image after editing from the original image.
To get the mask, now right press on the Image menu. By doing this, a drop-down menu will open, and click on the “Create Clipping Mask” option.
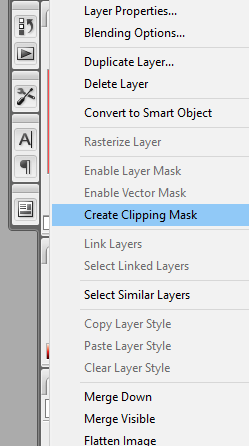
After clicking on the option, Layer 0 will automatically be converted into the mask like the picture given below.
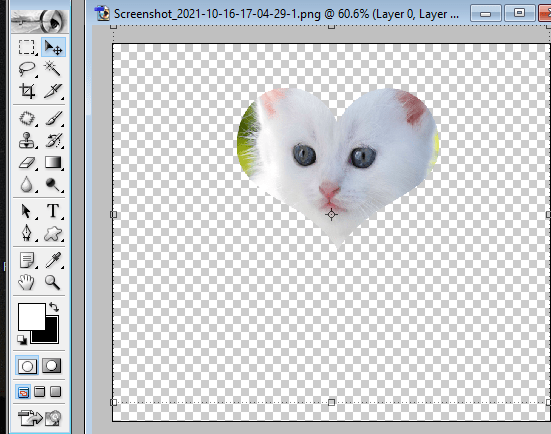
After following all the steps mentioned above, your desired mask will be ready for use.
You can also add more layers in the background if you want and can change the position of the image inside the mask when you want by using MOVE TOOL.
Clipping mask text
We’ve already learned about how to do masking on images in Photoshop using any image and shape.
Now we are going to learn how to show any image within a text via a clipping mask.
So let’s get started.
Step 1: Select your image
In the starter, select your image like before starting your editing. Then, you can choose any pictures that you want to mask. Here we’re using the photo we used before.
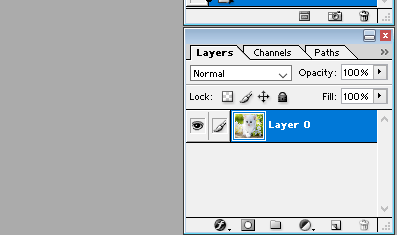
Step 2: Write down your text
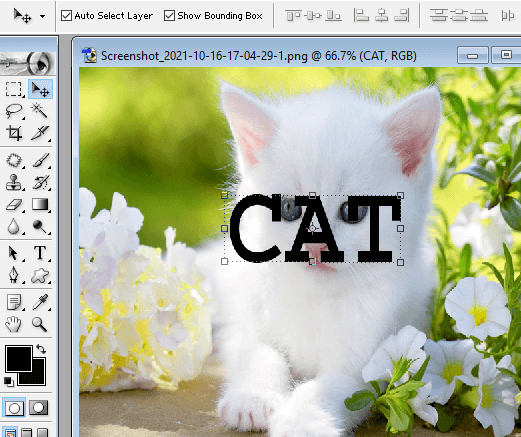
Now, in this step, Select ‘T’ from your keyboard or from your left toolbar. After doing that, write down any text on the image you want. For example, you can see in the image attached here, we write ‘CAT’ on the image layer.
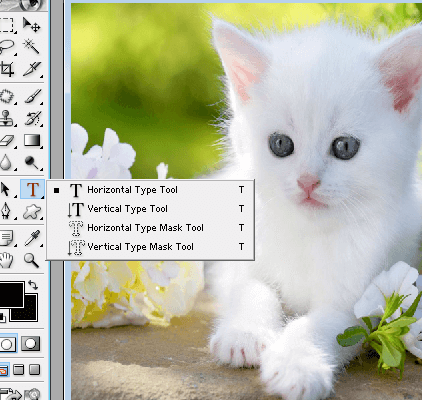
After writing the text, you can change the position of the text anywhere on the image you want. You can use the Move tool from the toolbar or the Shift key from the keyboard to do this.
Step 3: Change the position of the layers
To create a text clipping mask, you should now change the position of layers you are using.
You’ll notice the background layer is locked like before when we were making an image mask. So now unlock the background layer how you did it while making the image mask.
As we know, it’s time to change the place of the image and text layers. While creating a text mask, the image layer should be used as the upper layer, and the text layer should work as the bottom-most layer.
So changing the position, drag down the text layer, and place it under the image layer. On the other hand, you can also drag the image layer and put it upper the text layer.
Step 4: Create mask and get the result
Finally, we’re going to get our desired clipping mask text. Now we need to go one step further.
After changing the position of layers, press on the top layer in this step, and you will see a drop-down menu appearing on the screen. Now select the “Create clipping mask” option like before.
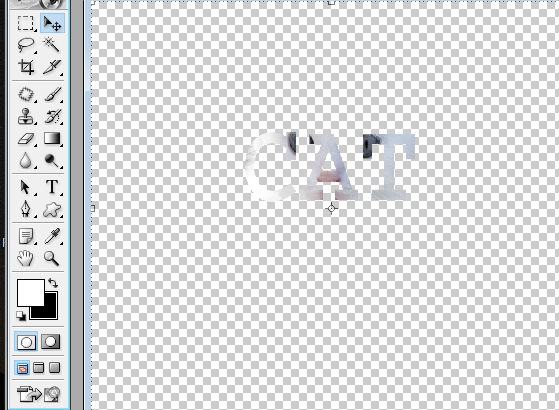
By selecting the option, you’ll be able to get your text clipping mask that should look like the image given below.
How to use a clipping mask?
A clipping mask is one of the most essential tools for graphic designing. As a graphic designer, you can use a clipping mask in many powerful ways to speed up your workflow and make your design more beautiful and meaningful.
The simplest and the best use of masking on images or texts is to assemble two different layers into a single layer. Among two layers, the bottom layer works as the mask that you have to create with the upper layer.
Since the shape of the upper layer is more individual than the mask, you have to select a specific portion of the bottom layer to use as a mask. By doing this, you’ll bring a different look, like one image is inside another.
You can also use them to clip different layers into a single mask, and the process is already mentioned above.
The major advantage of using a clipping mask is that you can see multiple layers move within your clipping shape. That means you’ll be able to move the objects clipped into the mask by selecting their layers.
Creating typography is one of the best uses of masking in photoshop. Here, you can choose any image and stylish font you like.
To create trendy typography, you first have to write the text on the base layer and then place the base layer beneath the image layer.
What is masking?
Masking is a powerful way to remove or reveal the region or background of an image.
In other words, masking in Photoshop is a process by which certain things can be added to a specific portion of an image.
However, it is a great thing about masks that you can bring the hidden parts back or refine the marge at any time. But if you use the eraser tool and once save the image to the file, it will be done forever.
Difference between a clipping mask and a layer mask?
In some ways, a clipping mask and a layer mask might look similar. But these two essential features of Photoshop are very much different.
A layer mask is generally used to remove or hide some parts of a layer. In contrast, a clipping mask is used to show the text or transparency of multiple layers in one layer that is called a mask.
Besides, a layer mask uses only black or white pixels on the mask to define the regions of transparency. On the other hand, a clipping mask uses visible pixels of a fundamental layer to create a mask for a layer or a group of layers.
Besides, it is used to prescribe the shape of a clipped layer when a layer mask is mainly used for refining the visible areas of a single layer.
Though there exists quite a dissimilarity between a layer mask and a clipping mask in photoshop, you can also apply them together for any Photoshop purpose. This will enable you to create something new or different in Photoshop.
However, both of them are very powerful as well as valuable Photoshop tools for any masking job. So, it will be better to think of them as a masking duo rather than finding their differences.
How to create a layer mask in Photoshop?
A layer mask is the most effective and non-destructive way to mask any images in photoshop.
Because you can initially use an eraser tool to erase or edit an image, but once the image is saved to the file after editing, you can never get back the original image that’s edited.
Meanwhile, the layer mask tool allows you to edit any image at any time, even though it is saved.
So we said using a layer mask is non-destructive, whereas using an eraser tool is destructive.
So, let’s take a look at how to create a layer mask in Photoshop.
Before using or adding a layer mask in Photoshop, you have to create a layer mask. Creating a layer mask is very simple, and once you understand the method clearly, you can do it in no time.
To create a layer mask Photoshop, follow the following instructions given below:
Step-1: First of all, select a layer in the “Layers Panel.”
Step-2: Now click on the “Add Layer Mask” button at the bottom of the Layers panel.
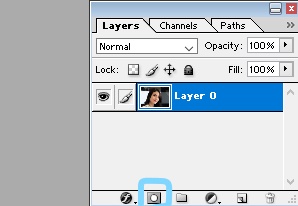
After doing this, you’ll see a white layer mask thumbnail come upon the selected layer and reveal everything on the selected layer.
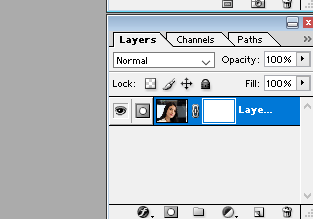
Now, you can add this layer mask to masking or editing any images in photoshop.
At this point, you should know that you can change the color of the layer mask you created as your needs.
You may notice that the color of the created layer mask is always white. But why only white?
It’s because a layer mask uses White to show the image or contents when it uses black to hide the image or contents, and Gray to partially reveal or conceal them.
However, you may now have questions like how you can change the color of a layer mask. So, now we are going to learn about how to change the color of a layer mask.
Make a layer mask black
1. In the beginning, select the layer mask thumbnail in the layer panel.
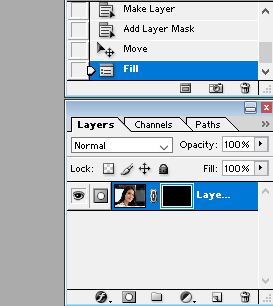
2. Then, fill the layer mask with black. To do that, go up to the EDIT menu and click on the FILL option.
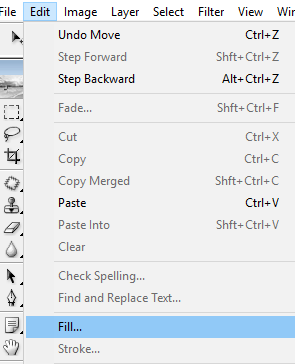
3. Now, you’ll see Photoshop’s Fill Dialogue box. In the box, select the CONTENTS option and convert the added color into the background color.
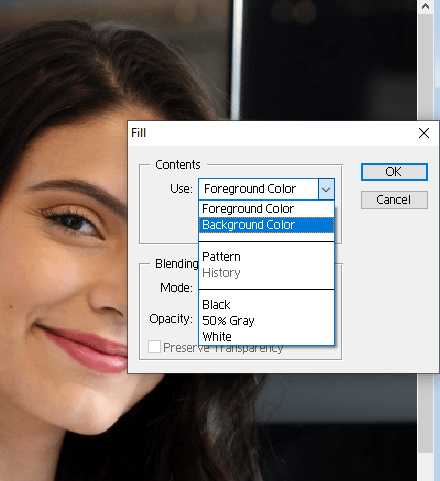
4. Then, press the OK button.
5. Now go back to the Layers panel and see that the layer mask thumbnail is filled with BLACK.
Make a layer mask white
1. In the beginning, go to the EDIT menu and select the FILL option like before we explained.
2. Now, the dialogue box should appear. From the dialogue box, convert the Contents option to Foreground color and click on the OK button.
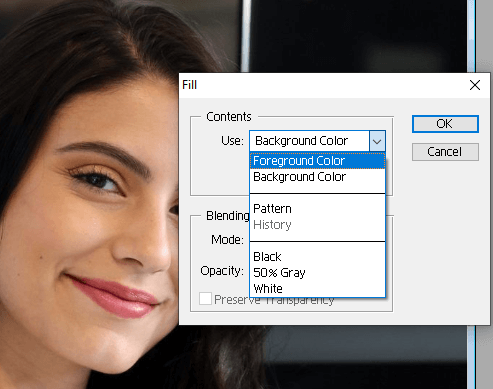
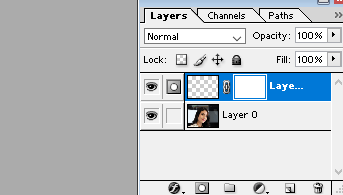
3. Now, look at the layer mask. It’s changed like it was originally.
How to make a layer black and white in photoshop?
We already know how useful photoshop is, filled with various features and tools to edit images in different manners.
Photoshop allows you to make your image layer black and white to give it a unique appearance. You can also change the color intensity of any image by sharpening it.
In this section of today’s tutorial, we will discover the easiest and fastest way to make a layer black and white in photoshop.
So, let’s see how we can make a layer black and white in photoshop.
Step 1: Open an image
In the beginning, you have to select an image and open it in Photoshop to make the image black and white.
In order to open the image, go to the File menu and click on Open. Now you’re required to select the image you want to open in photoshop.

Step 2: Duplicate the image you opened
Now, in this step, create a duplicate layer of the original layer. To do that, scroll to the layer feature on the right of the screen, click on the background layer and tap Ctrl + j.
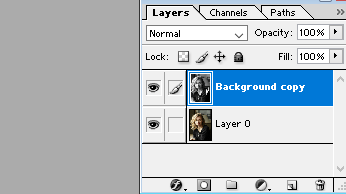
You can also choose another way to copy the original layer, like dragging the background layer and then dropping the layer into the New Layer button. The copy layer is named Layer 1.
Step 3: Black and White mode activation
After making a copy of the background layer, now activate the black and white mode to make the layer black and white.
To get this, go to the Image menu. Here you will find a drop-down menu where you are required to click on the ADJUSTMENT as your next command.
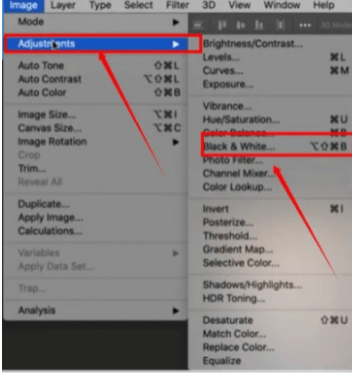
After doing this, another drop-down menu will appear soon, and there you are required to press on the Black and White option.
Step 4: Work on the image
Upon clicking on the Black and White option, a dialogue box will appear on the screen.
This dialogue box allows you to change the color’s intensity, like making a color darker or brighter. To do this, slide the color bar to the right or the left.
Step 5: Black and White Layer set
Finally, your desired layer is now in black and white. If you follow the guidelines appropriately, you’ll get the upper layer that means Layer 1 with its image in black and white.

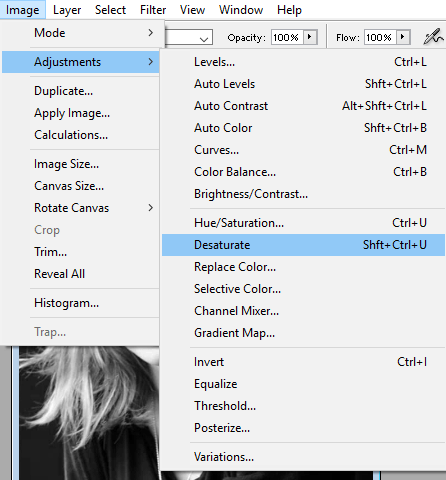
There is also another way to do this. In this way, you have to go through Adjustments>Desaturate to make the layer black and white. But the thing is, you will not get more space here to work on the image like before.
How to add a layer mask in Photoshop?
You can add a layer mask in Photoshop for different purposes. This feature will make your composition more effective and meaningful.
Adding a layer mask is very useful to make a poster. For example, look at the picture below and see how we added layer masks to create the poster.
You can also use a layer mask to SHOW any layer or content and HIDE any layer or content.
The black color of a layer mask represents the layer is 100% HIDDEN, and the white color of a layer mask represents the layer is 100% VISIBLE.
The best use of a layer mask is to make compositions of multiple images. There’s no way as useful as using a layer mask.
However, using a layer mask to make composition is fairly simple. Follow the steps we’ve mentioned through the pictures below and learn how to use layer masks to do the composition of images.
FAQs
1. What are clipping masks used for?
Clipping masks in photoshop are generally used for graphic design to create image layouts, to make frames for images or typography or photo composites. For example, you can use them to clip an image beneath a shape or text or another image.
2. How does a clipping mask work?
Generally, a clipping mask or Photoshop mask allows you to use a base layer to mask multiple layers above it.
3. What is the shortcut key of the clipping mask in Adobe Photoshop?
The fastest way to make image masks in photoshop is the use of shortcut keys on your keyboard.
To create a clipping mask, the shortcut key is COMMAND + Alt + G ( Windows) and COMMAND + OPTION + G (macOS).
4. Why can’t I create a clipping mask?
You can’t create a clipping mask except for more than one layer. We’ve already mentioned that you must have two layers or a group of certain layers to create a clipping mask. Besides, make sure the base layer is also filled with pixels where the top layer should appear.
Final Thoughts
A clipping mask in photoshop is a very useful thing, especially for graphic designers and photo editors.
We made this tutorial to help you to know how to create a clipping mask in photoshop. In addition, we also added various institutions regarding masking in photoshop, such as layer masking and clipping masking.
But remember one thing, one specific task can be done in Photoshop in many ways. It just depends on your knowledge and experience.
So keep practicing and learning, and in this way, you will gradually be a specialist in Photoshop designing or masking.
If you have any questions or comments, feel free to put them below and let us know them and answer them.


