Photography is an incredible work of art, and there is no denying that. It captures the true essence of moments and weaves memories for future appreciation.
Photography also gives us a way to cherish our precious moments permanently, and it truly gives distinct meaning to each individual moment captured on camera.
Photographers are true artists who execute their praiseworthy talent into their work and produce beautiful shots.
Each photographer has their own area of interest for taking photos, different styles, angles, and different editing skills. Some may opt for nature, some may opt for human subjects, and some may take photography wholly as a profession, but at the end of the day, each photographer is gifted in their own way.
Even though photography is a work of art in its way, photographers still need to use the assistance of editing tools like Adobe Photoshop, Snapseed, VSCO, etc.
Editing apps can aid in highlighting the photos or give them a different perspective or remove any noticeable flaws on them.
Although every editing app has its own editing skills, Adobe Photoshop has been prevalent for a long time and is known for its spectacular editing tools and techniques.
Photoshop can provide drastic and subtle changes to photos depending on the user’s needs. Photoshop is one of the most widely used image-editing software, and it greatly assists those who use it professionally. In this post, we are going to look at 40 different Photoshop techniques that can be of great help to photographers.
40 Must-Know Photoshop Tricks for Photographers

Today we’re going to discuss 40 Photoshop tricks that you want to keep under your sleeves to enhance the quality of your images and stand out from others. Photoshop has become an essential tool for photographers, and it has gained much popularity in recent years. Everyone likes to make a splash with their own work, but sometimes it becomes hard for photographers to finish up their images. In such cases, Photoshop will provide your picture with that extra touch to make it look stunning to the viewer’s eyes. Not only that, but Photoshop will also save you valuable time that you can use to snap some more awesome photos.
Here are 43 Photoshop tips and tricks that’ll be helpful to photographers while working with Photoshop, and you will see them one by one. So take your time and follow along with this article, and you’ll definitely learn something new that will help increase the quality of your images.
1. Cropping and Resizing
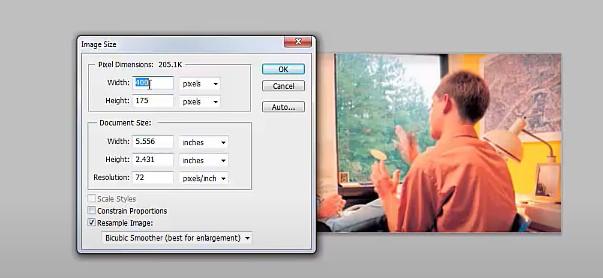
While working with Photoshop, one of the most frequent things we encounter is cropping and resizing. It’s a very useful technique to present your picture at a proper size. Cropping an image to appropriate dimensions often seems to be a difficult task for photographers. We mainly use cropping for two reasons.
- To change the width and length (commonly known as aspect ratio) of the photo.
- To keep the focus on specific parts of an image.
The crop tool can be selected from the toolbar or by simply pressing the C key. It will immediately show you the boundaries which can be selected and moved as required. You can constrain the shape by holding the Shift key. Width, height, and resolution can be set from tool options at the top at W×H×Resolution. You should remember to mention your desired units for width and height. This will ensure keeping a constant area size no matter where we want to crop. The final resolution is usually kept at 300ppi for print. You can make your own custom crop preset from the settings, which will save you time in the future.
2. Healing Brush
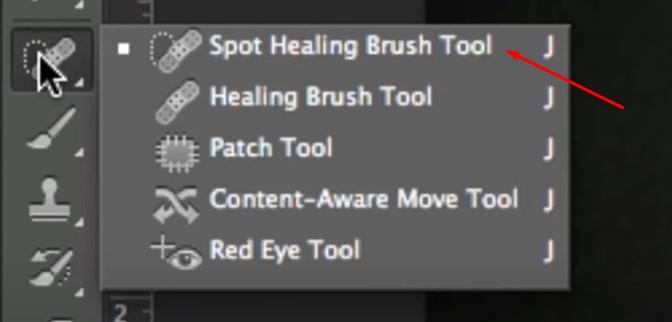
The healing brush is a lifesaving tool for photographers when it comes to performing various retouching tasks ranging from simple spot removal to much more complicated object removal. To use this tool, first, we need to select it by pressing down the Alt/Option key and clicking the area we wish to touch up as a sample for healing. Then click and drag the tested pixels to the parts we want to correct. The trick is to take samples from two or more places rather than only one to enhance the quality of the result and make it look more natural.
3. Adding Vignettes
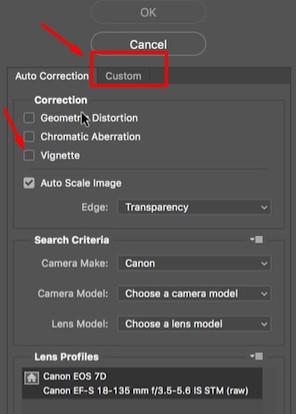
Vignette is a well-established Photoshop technique to draw the attention of the viewer to a particular portion of your image. It’s a simple trick where you make the edges of the frame darker. This naturally forces the viewer to focus on the brighter parts of the photo. The easiest way to make a vignette is to select Filter and then go to Lens Correction. From there, click on the Custom tab and go to the Vignette option. From here, adjust the Amount according to the requirements of the image. A midpoint can also be used to change the area of the vignette.
4. Removing Reflections

While taking photos of people with glasses, the reflection on the glasses can be a problem. To solve this, go to Filter and select Camera RawFilter. Zoom into the part with reflection and select the Adjustment Brush. Click the mask, overlay on, and push the Feather, Density, and Flow to 100. Turn off Overlay and Mask. Make necessary adjustments. Go to adjustment brush and select Reset Local Correction Settings. Make sure to adjust the selected area to match the skin of the person. Afterward, move Dehaze to 100.
You need to clean up the edges using the Healing Brush. Take a new Layer and select the Clone Stamp tool (all layers are needed to be selected for this). Press Alt+Ctrl+Shift+E to make a Composite. With the help of Quick Selection, you can make a rough selection of the photo around the glasses. The selected area is needed to be copied to a new layer (Use Ctrl+J). Slightly enlarge the selected area so that it covers up the seam. Press Ctrl+T for free transformation. Now use the flipped version of this for the other eye, and you’ve removed the reflection.
5. Selecting Colors
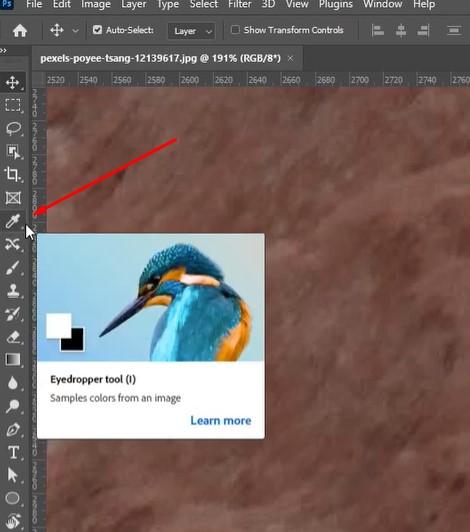
We all know how tedious it is to screenshot screens only to obtain colors from them. You can eliminate this process by using the Eye Dropper tool. After selecting it, minimize Photoshop and click the dropper onto your desired canvas. Then you can drag it anywhere outside Photoshop and work as you wish.
6. Using Refine Edge

Sometimes Quick Selection tool is just not enough, or you don’t have the time or patience to extract everything manually. Here’s a trick that can help you immensely. After performing a quick selection around the object, add a Layer Mask and double-click it. Choose Select and Mask. From there, you’ll get the Refine Edge Brush. Make sure to check the Smart Radius Box, and afterward, do your brushing. This Photoshop technique will refine the edge to almost 100% accuracy.
7. Creating a Custom Photoshop Brush
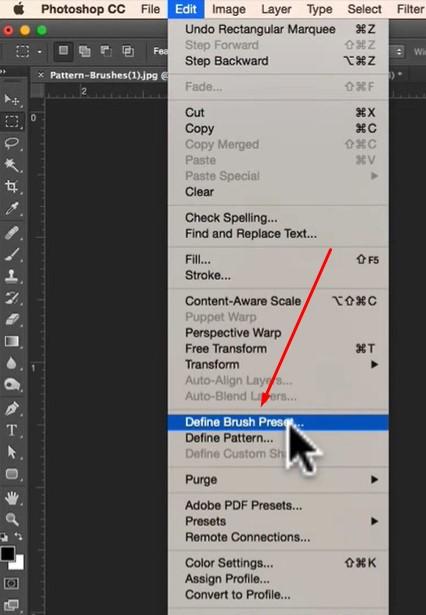
Sometimes the brushes available in Photoshop are not enough to meet your demand. Then what would you do? Make your own custom brush! You can take a black-and-white image and turn it into a brush. First, grayscale your image and then crop it down to a suitable size. Now go to Edit and select Define Brush Preset.
8. Installing Custom Photoshop Brushes
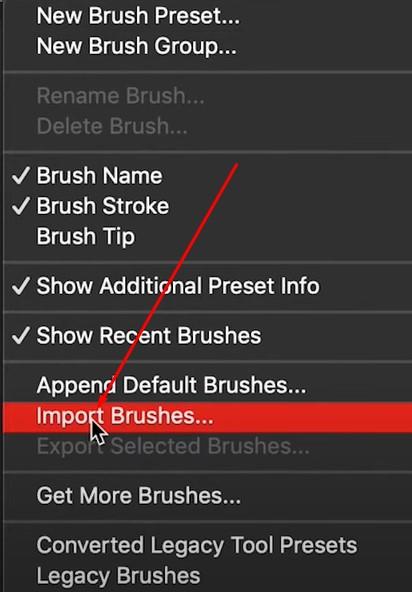
If you don’t want to go through the hassle of making your own custom brush, you can always import them. You can install thousands of brushes on the internet. Go to your brushes and click the Gear icon. From there, select Import Brushes, and it will take you to more brushes.
9. Creating a Rain Texture
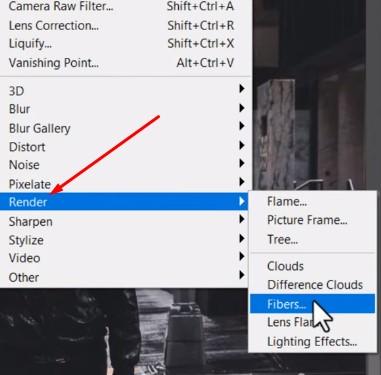
Rain always makes for a dramatic scene and gives an extra dimension to your photo. To produce artificial raindrops in your image, create a layer and fill it with black. Add some Noise and then a slanted Motion Blur. Afterward, set the layer to Screen and give some contrast to it. This will bring a rain effect to your picture.
10. Double Exposure Effect

It’s a simple yet very effective Photoshop trick to enhance your image. First, collect a black-and-white image with relatively high contrast. Then clip another image into it. The later image should be set to Screen. This clever Photoshop hack will give you a trendy double exposure effect.
11. Using Motion Blur
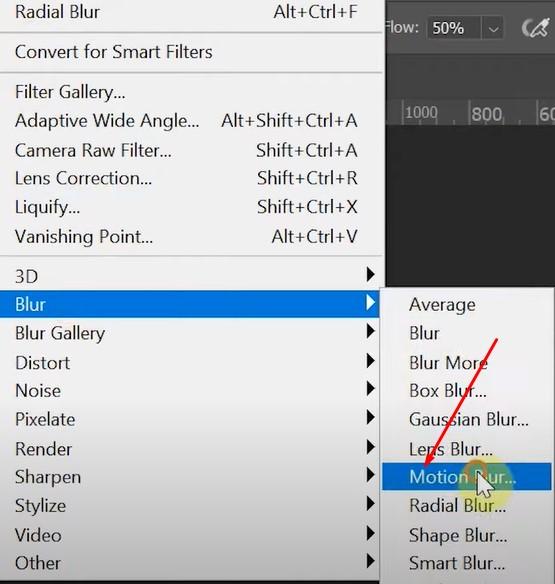
This tip will provide speed to any selected object by making a feathered selection around the edges of the object in the photo. Then you need to add a bit of subtle Motion Blur from the Filter option. This is an easy hack, yet many don’t know about this.
12. Creating a Light Bleed Effect
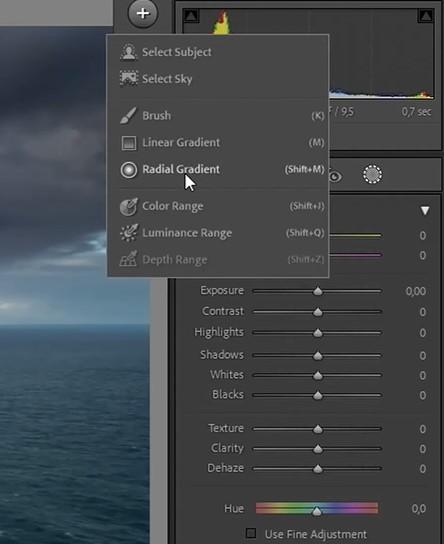
A great way of blending an image easily is to add a subtle light bleed effect to the image. To do it, first, create a new layer and paint white toward the top of your photo. You can use a big fluffy white brush for this. Lastly, lower the opacity of the layer, and you have a quick light bleed effect.
13. Copying Layer Styles
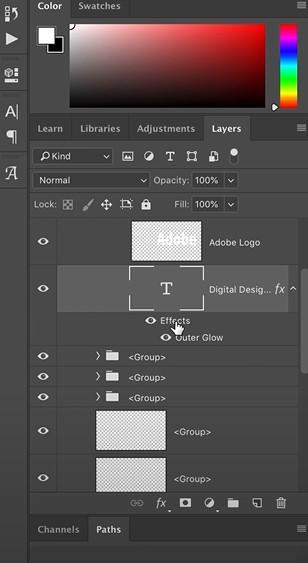
In Photoshop, we sometimes need to apply a specific layer to many other layers. This can be tedious. You can do it quickly by dragging the FX icon from the original layer to your targeted layers while holding down the Alt key. This will instantly apply the layers styles to your targeted layers and save you valuable time.
14. Painting Make-Up
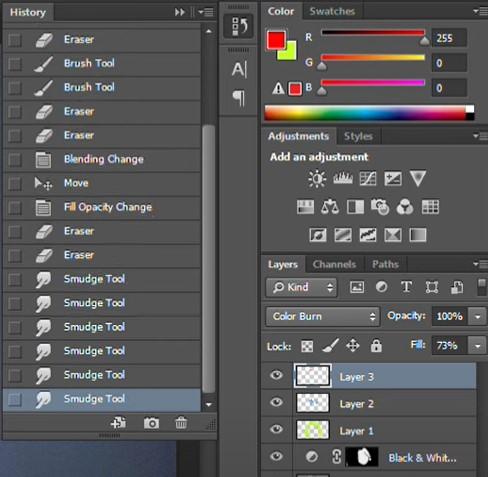
We know how hard it is for you to get the perfect make-up for your photo shoot. Worry not; Photoshop has you covered. Just create a new layer. Set it to Soft Light and make all the adjustments you want in make-up using paint. Soft Light and Overlayer layer modes are very powerful Photoshop tools when it comes to helping you with the makeup in post-processing.
15. Frequency Separation Photoshop Action
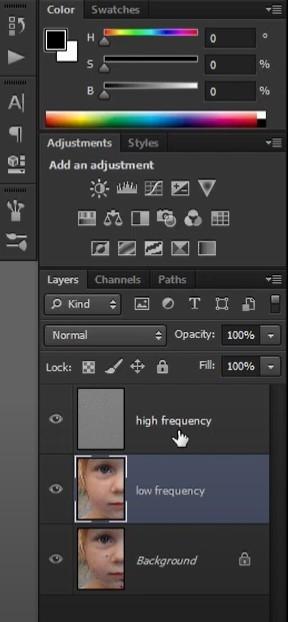
This is an effective procedure used by photographers around the world to get the perfect high-fashion skin. Now you can also learn it apply to your photos. Split your picture into two separate layers. Use Gaussian Blur on one of them and use the High Pass filter on the other. Then select Linear Light. You can use the blurred layer to fix the color and skin tone as per your requirement to get that perfect texture.
16. Color Lookup Layer
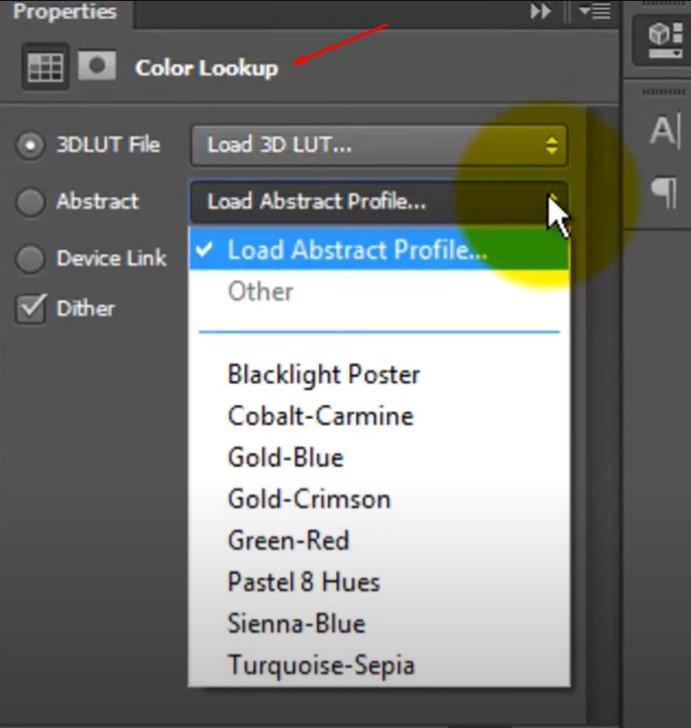
Sometimes as a photographer, you would want to use an instant color grade for your photo. For this, you have Photoshop’s very own Color Lookup adjustment layers. There are dozens of presets from which you can choose your preferred one, and this will provide an instant color grade to your photo.
17. Removing Color Banding
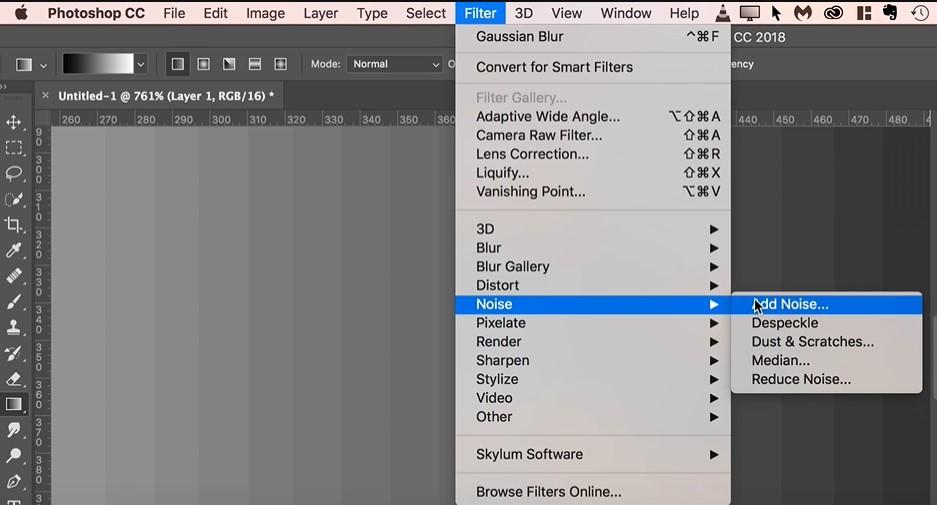
While working with photos, you might encounter color banding. Worry not you can remove it simply using a new layer. Fill it with black and add a little bit of Noise filter. Set the layer to screen. What it does is that it disperses the colors and simplifies the banding of color.
18. Blending Modes
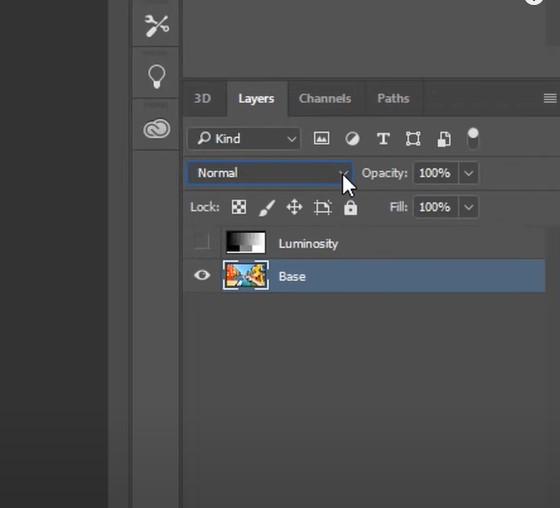
Blending is a very important tool to control the way one layer interacts with the layer below. You can apply it to any layer to obtain brightness, color, and contrast effects. The possibilities are endless. All you need to do this experiment with it for a while, and you will get the grip of this tool.
19. Dodge and Burn
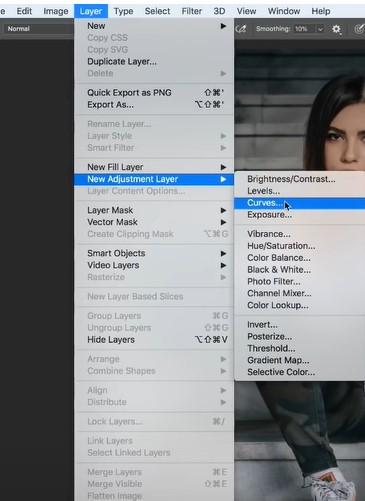
Dodging and burning is a very popular techniques for adjusting the brightness of specific parts of your pictures. The Dodge tool lightens the pixel, whereas the Burn tool darkens it. To use the Dodge and Burn tools in Photoshop, first, you need to create a Background layer or a copy of it. Now you can brush over your predetermined area with the Dodge Tool or Burn Tool. The tools can be set to target Shadows, Midtones, or Highlights in an image. This ensures that only pixels within the selected range that fall under the brush stroke are modified. It’s always preferable to work with low exposure, such as 4-8%, and gradually build up the desired effect without making any rapid change.
20. Creating Chromatic Aberration

We all miss the good old days of 90s glitchy computer effects. Now you can bring back those effects to your pictures with the help of Photoshop. You need to duplicate your layer first. Now double-click it and uncheck the R channel. Now all you need to do is move the layer over by 2-4 pixels. There you have a picture with your desired effects.
21. Turning Photos Black and White
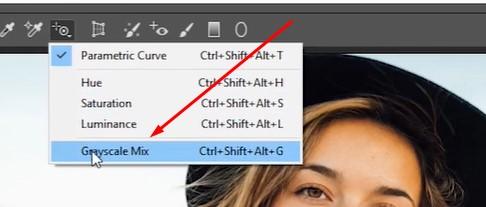
Black and white photos provide a different aesthetic and are trending right now among the new generation. Instead of opting for vibrant photos, most people nowadays prefer a much somber and artistic mood to their images; hence photographers can incline more into this Photoshop tool to enrich their works.
22. The Double-Light Effect
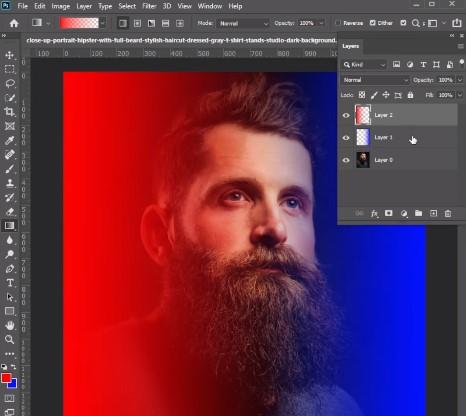
Just as much as black and white photos are in demand, so are photos with the fusion of different colored lights. The double-light effect can illuminate pictures and create an artistic glow.
This feature of Photoshop may come in handy for those photographers who are working in the fashion industry, as this effect brings about a vibrant and distinct theme in images.
23. Power of Retro 3D Effects

Let’s face it: we are currently in 2022 and proceeding toward 2023. This modernized generation loves different themed photos, from aesthetics to retro vibes.
As our society is now mostly inclined towards social media and digital platforms, it is no surprise that everyone loves mixing up and producing different themes to enhance their pictures.
The retro 3D effect in Photoshop is a must-learn technique for photographers in 2023 because retro style is always in demand, especially among the new and modernized generation!
24. Get Playful with Pop Art

This is another different yet magnificent tip for photographers to use in Photoshop. This comes in handy when someone wants their pictures to be edited into something dynamic yet old-fashioned.
With this effect, different patterns can be created on the image, and the perfect picture can be produced with the right splash of colors. This feature might help photographers work on taking pictures for something eye-catching like billboards, posters, sign boards, etc.
25. Significance of Blending
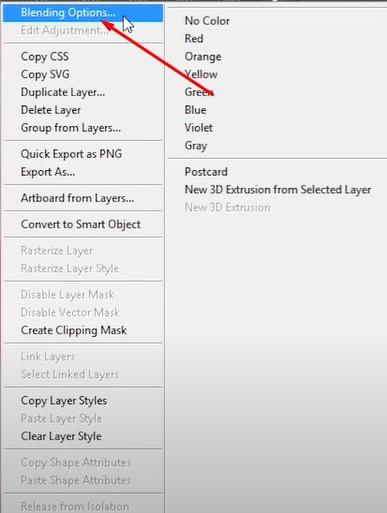
Like Cropping, this feature might sound very basic, but it is also vital in editing photos as Blending can fix anything. Blending can give a new vibe to the picture and give it a more artistic outlook.
First and foremost, this skill should be known to any photographer because Blending can turn even the blandest of pictures into something very creative.
26. Shape Merging
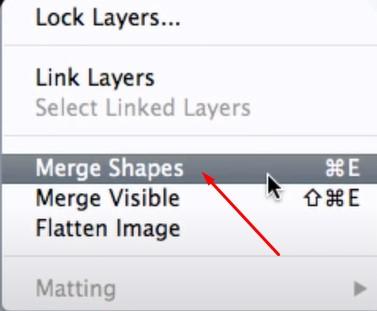
This feature of Photoshop can benefit photographers when making brochures or pamphlets, and they have to make them eye-catching.
Shapes are usually added in photos to throw in quotes or headlines, and when we have multiple shapes, this feature can easily assist us in fusing the shapes together to get a new shape. To achieve this, photographers can select their shapes and click the option ‘Merge Shapes.’
27. Importance of Frequency Separation
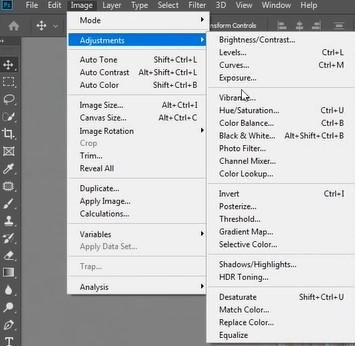
Portrait photography is very high in demand right now for influencers and people working in fashion. Portrait photography requires the separation of frequency because portrait photos usually focus solely on the close-up shots of the subject.
This feature of Photoshop can help separate the high and low frequencies of images and, therefore, edit to the customers’ needs because many might want photographers to edit out tiny imperfections on the skin, hair, clothes, etc.
28. The Superb Droste Effect
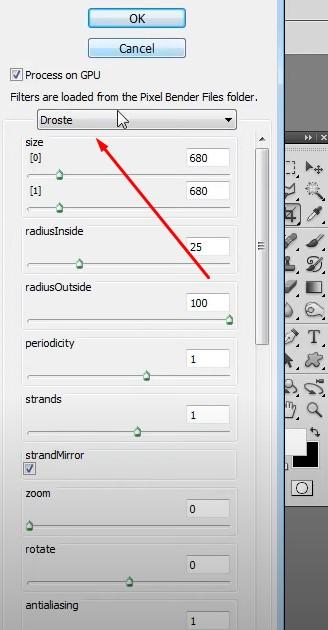
We have often tried various ways to make our picture different and stand out uniquely. The Droste effect can aid us in doing that because it often produces a mesmerizing picture from the fusion of the same picture. The outcome is a bizarre and hazy image artistically. To achieve this, photographers must keep in mind that the image has to have a frame of some sort, and then they are good to go for editing!
29. Tranquil Bokeh Effect
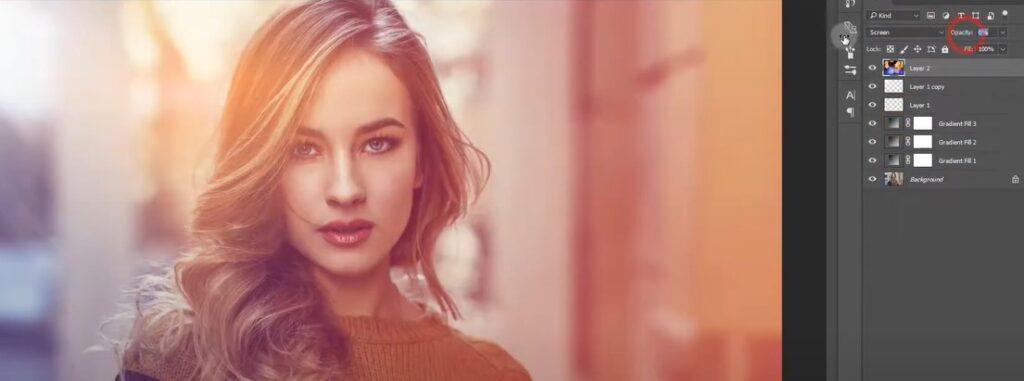
It is no wonder that in this era of digitalized photography and social media, people tend to want to try different ways of taking and editing pictures; hence it is pressure on photographers to think of new ways to edit pictures for the benefit of their customers or their work.
It would be a huge advantage for them if they learned different features of Photoshop and implemented those skills in their work. The Bokeh effect creates a tranquil vibe in your pictures and can be added to those photos where the background is blurred, but the subject is mainly focused on getting the best results.
30. The Warp Tool
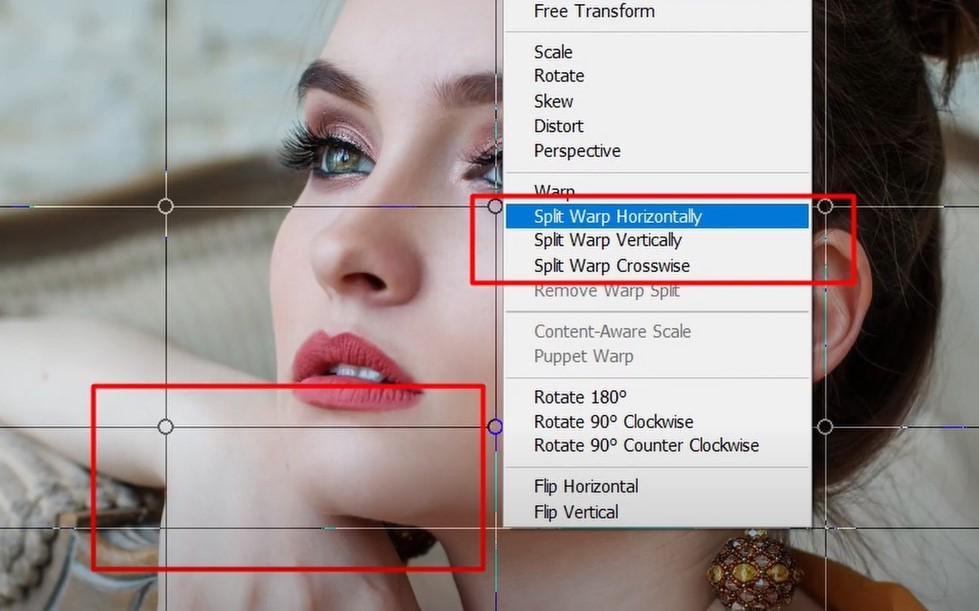
Like Cropping and Blending, the Warping tool often comes in handy and should be learned by every photographer and Photoshop user as a basic backup skill. Warping is bending or twisting any portion of the picture if necessary. To do this, photographers can go to the ‘Edit’ section, click on ‘Transform,’ and then ‘Warp.’
31. The Infrared Effect
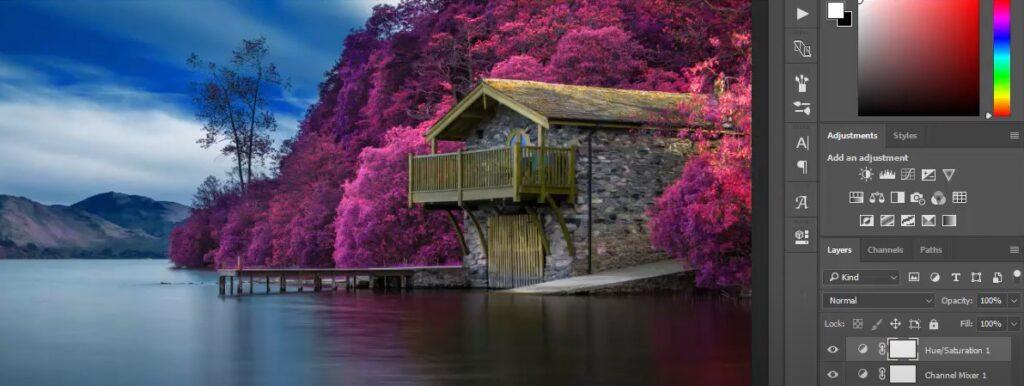
Ever felt like creating a dramatic picture with drastic heated effects and vibrant colors? That is where the infrared feature will help photographers to achieve that effect. The infrared effect can make pictures look otherworldly by producing ethereal colors. It can give images of nature bright unearthly hues that will cause them to stand out among other general photos. This effect is very useful for those photographers taking pictures of nature.
32. Importance of Contact Sheet
Photographers do give in a lot of hard labor behind their fantastic work; therefore, they need space to store their work and look at the progress they made overtaking and editing a photo. That is where the use of a contact sheet comes, and it is very significant for photographers to learn this feature because that way, they can look at the efforts and progress they made as a whole and might even get further inspiration from their work. A contact sheet is also a great way for photographers to share their work with others. To do this, you must go to ‘File,’ then ‘Automate,’ and finally, ‘Contact Sheet II.’
33. Easy Instagram Filter

Instagram is one of the leading social platforms for this generation, with all its photo filter options, reels, stories, and highlights. It is one of the most trending apps where all influencers, fashionistas, and vloggers focus on posting their content. Instagram benefits from numerous photo and video filters, stickers, and songs.
Everyone loves instantly clicking a picture with an Instagram filter, but is there a way to achieve that filter-like photo with Photoshop? In Photoshop, this can easily be attained by creating a yellowish ‘Color Fill’ layer and then selecting ‘Multiply.’ This will create a filter-like effect on photos and give them that unique Instagram vibe.
34. Create Cute Animations
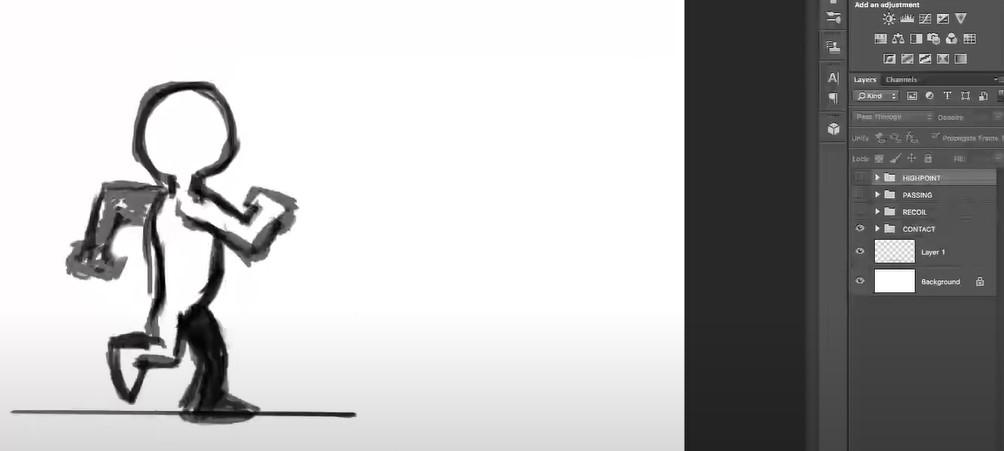
Who doesn’t love GIFs and animations? Everyone does! GIFs are so common these days and are generally used on Instagram or Facebook stories to bring in a little bit of a fun vibe. Photographers can also invest their time in photo editing to create cute and fun GIFs and animations for these social media apps. To do this, they must go to ‘Windows,’ ‘Timeline,’ and then ‘Create Video Timeline.
35. The Makeup Effect
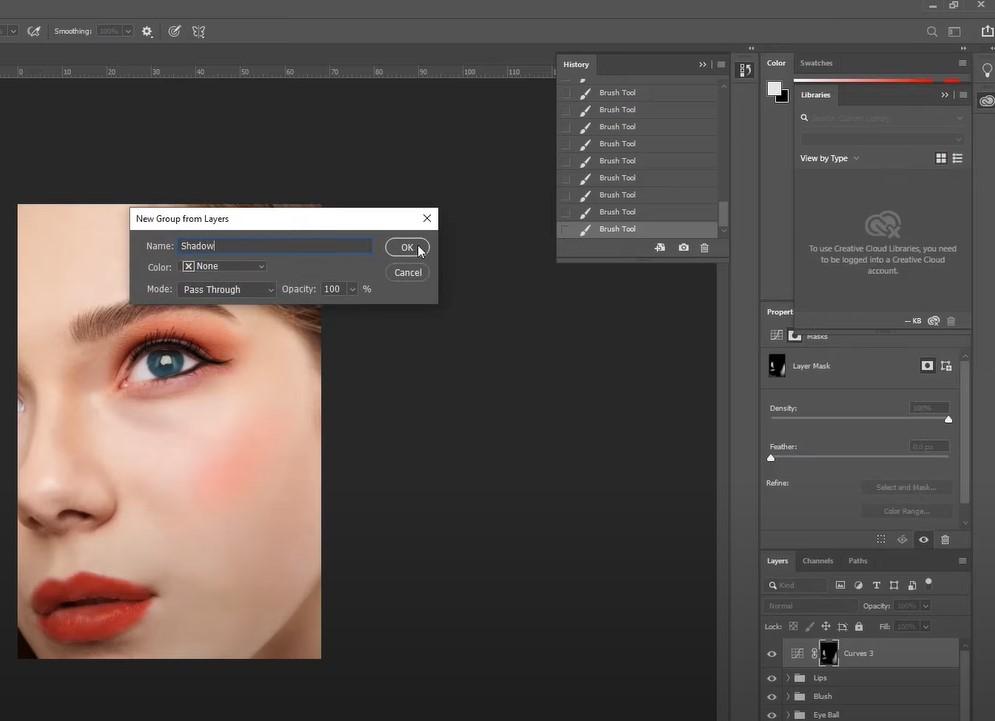
This technique will be extremely useful for photographers as makeup is so popular nowadays. Almost everyone loves a little edit on makeup, and photographers can give pictures a whole new outlook by creating a makeup-like effect. To do this, they should create a new layer and select ‘Soft Light.’ What is so good about this technique is that the eyeshadow can be added on by the user, thus allowing exploring different ways of putting on makeup.
36. Chromatic Aberration

Even if we are living in a modern era, we still love old and vintage-style photos and videos when we had blurry and sketchy VHS cameras. This Photoshop technique will assist in bringing about aesthetic vintage-style photos with retro vibes. Photographers can follow this simple process to achieve this chromatic effect: duplicate the layer and then double-click it, uncheck the R channel, and then the layer should be moved by 3-5 pixels.
37. Watercolor Paint Effect
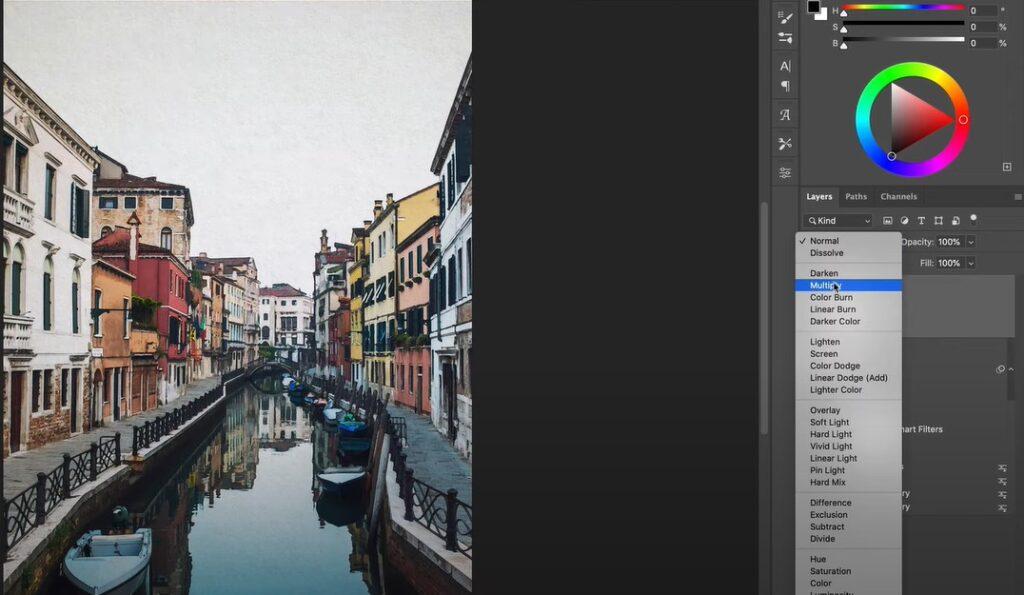
Watercolor pictures can bring nostalgic vibes from the past or even give them a feeling of being painted by hand. Pictures with watercolor effects can be fun to experiment with. Even though this technique might be challenging, photographers should still learn it to broaden their skills. This effect can be achieved by using watercolor brushes and adding some textures.
38. Brush Organization

If photographers are constantly working with Photoshop, they need to keep their brushes organized to manage and progress their work more efficaciously. This organizing feature of Photoshop quickly helps to sort brushes into groups. To do this, photographers should go to ‘Brush Panel’ and right-click ‘Create Group.’
39. The Art of Cinemagraphs
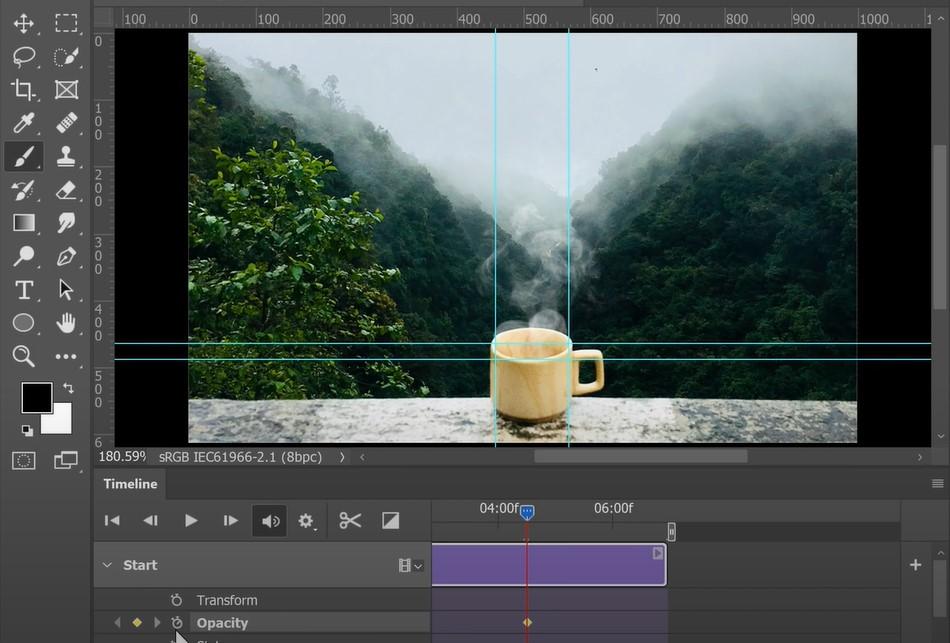
Cinemagraphs are a fantastic way to create unique pictures with motion. The pictures can be of a moving river, falling rain or snow, the sailing of clouds, etc.; this feature will help us add motion to a specific portion of the picture, for example, the sailing clouds. Even if the picture is still, the clouds will sway repetitively, giving the picture a very exceptional and ethereal vibe.
40. Miniature Portraits
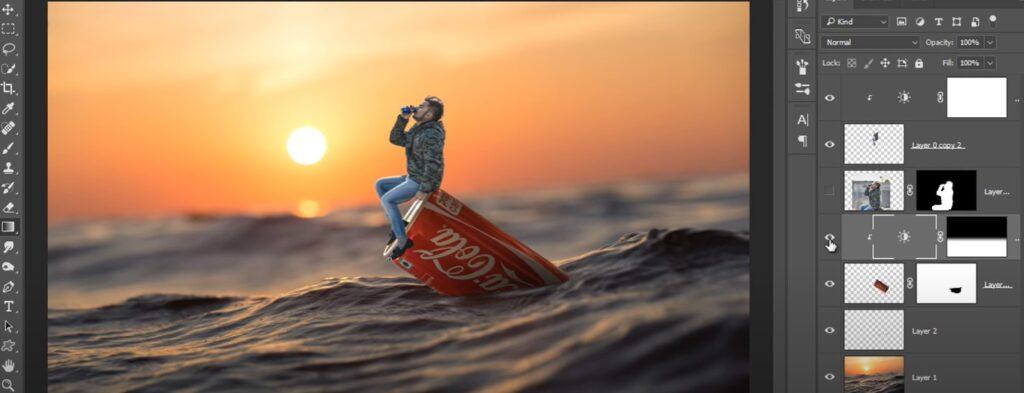
Everyone loves creating fun portraits, and who would not love making miniature portraits of themselves? Even if this is an advanced technique, photographers can still learn this to boost their editing skills and further their professional work. Miniature photo editing will give them many opportunities to make posters, book covers, magazine covers, etc.
So, we have looked at 40 different fantastic techniques that photographers can learn and implement in their work. Learning new things every day is always a good idea to upgrade oneself.
Suppose any of you are wondering or are new to the field of photography and need to learn editing skills. In that case, you can head over immediately to our photo-editing service company Clipping Paths CA.
Clipping Path CA provides excellent and fast services in photo editing by expert editors at affordable and cheap prices. To learn more about their services or contact them, you can visit clippingpathca.com
Wrap Up
Now that you have all these Photoshop tricks and tips, you may feel a bit overwhelmed, which is completely okay. Some of them may be completely new to you but don’t worry. All you need to do is that practice each of these tricks a few times. You can make adjustments or modify it according to your need and requirements. I can assure you with these hacks under your sleeves; you can easily increase the quality of your work and produce some stunning photographs with the slight help of these tricks.


