Photography is more than just a hobby. Photography is a form of art where a photographer communicates with his or her audience through photographs. They can convey a lot of information without saying a single word. This is the power and aura of photography.
The photography industry worldwide is one of the fastest-growing industries. According to some market research, it was estimated that the global digital photography market last year was nearly 45 billion USD. It is also expected that the market will grow to over 55 billion USD by 2030.
Why Touch-Up Photographs?
So professional photography has become more and more popular, and it has also become much more accessible to people due to advanced technologies. The number of photographers is increasing at a healthy rate each year.
More photographers will result in more competition. This also means that you have to work more effectively to stand out from the rest. Gone are the days when you only needed to click the photos and be done with them. Now you have to work as much during the post-processing session as during the photo sessions.
In recent years, editing and retouching photos have become an integral part of photography. Knowing how to touch up your photos is a must, no matter what type of photography you do.
When you’re taking photos, everything is not going to be perfect despite your efforts. Taking the same photo over and over again is not the solution, as it requires both time and effort. In such instances, knowing how to touch up a photo comes in handy.
Best Photography Touch-Up Software
The touch-up and editing of the pictures during the post-processing session are done using different computer software. At present, there are many such programs that would provide you with assistance in your touching-up process. Some of the well-known software programs are:
-
Adobe Photoshop
-
Adobe Lightroom
-
Skylum Luminar AI
-
Corel Paintshop Pro
-
Canva
-
GIMP
-
Pixlr Editor
-
PicMonkey
-
DxO PhotoLab 4
-
ON1 Photo RAW
-
Serif Affinity Photo
-
Snappa
-
Capture One
-
PortraitPro
-
Inkscape
All of the software mentioned above can help you edit your photos with varying results. Each of them has its strengths and weaknesses. Professional photographers use one or more of these software programs for their photo touch-ups.
How to Touch-Up a Photo in Photoshop
Adobe Photoshop is one of the more familiar software programs and is used globally for editing and retouching. In this article, I’ll be providing you with a step-by-step guide to touching up a photo using Photoshop. So I’d suggest you go through the steps and at the end, you will also be able to touch up your images.

Ace Your Photo Shoot
A perfect snap has fewer imperfections. Thus, it requires less touching.
If you are taking care of small details when clicking photos, you have to do way less when you are retouching them in post-processing.
This saves you a lot of time. The things to look for while taking photos are:
-
Give the shot proper exposure and focus first, and only then frame the shot.
-
Focus on the eyes.
-
Take multiple photos of the same expression to minimize errors.
-
Always be ready to take pictures.
-
Use a broader aperture to make your subject pop.
-
Avoid blurry photos by matching the shutter speed to the focal length of the lens.
-
Ensure proper natural and artificial lighting.
-
Minimize the shaking of the camera.
-
Proper positioning of the subject.
-
Light should be directed in a way that complements the setup.
If you can follow these, you can reduce your work in post-processing by a significant amount. There will still be some issues that cannot be addressed during the photo session. For this type of issue, you need to make touch-ups on the picture.
Step 1: Open Photoshop and Import the Photo
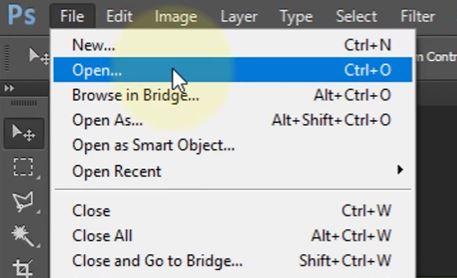
Firstly, open Adobe Photoshop on your computer and select File. From here, select ‘open’ and select the photo you want to touch up. You can also drag and drop your image into Photoshop Canvas, which is a way more efficient way to do it.
Step 2: Cropping and Resizing
Cropping is one of the most common tools used in Photoshop. You must understand that cropping is not required for every photo you touch up. But in some cases, when you want to resize your image, cropping comes into play.
The Crop tool can be selected from the toolbar or by simply pressing the ‘C’ keyboard shortcut. It will immediately show you the boundaries, which can be selected and moved as you need. You can constrain the shape of the cropped area by holding the Shift key.
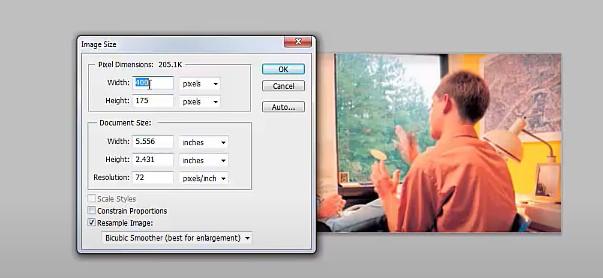
Width, height, and resolution can be set from the tool options at the top at W×H×Resolution. Keep in mind to specify your preferred width and height units. This will ensure keeping a constant area size no matter where you want to crop. You can also rotate the cropped area by moving the mouse cursor and hovering outside the rectangle.
The final resolution is generally kept at 300 ppi for printing. You can make your own custom crop preset from the settings, which will save you time in the future.
Step 3: Duplicate the Background Layer
Here, you create a duplicate of the background layer. This is done to prevent the image from getting damaged by chance during the post-processing sessions.
Right-click on the background layer. Now select “Duplicate the layer” and name it. I’ll be naming it ‘brightness’.
As Photoshop works in a destructive way, meaning that it makes permanent changes to the image, it’s always recommended to duplicate layers before editing to prevent unwanted changes.

Step 4: Adjust Brightness and Contrast
After you’ve created a duplicate of the background layer, you need to adjust the brightness and contrast first. Just like Cropping in Step 2, this is not a compulsory step for every image. This adjustment is only performed on images that are too dark or too dim.
You can enhance the quality of the image by applying proper brightness and contrast to it. It is much easier to find imperfections in a photo with improper brightness.
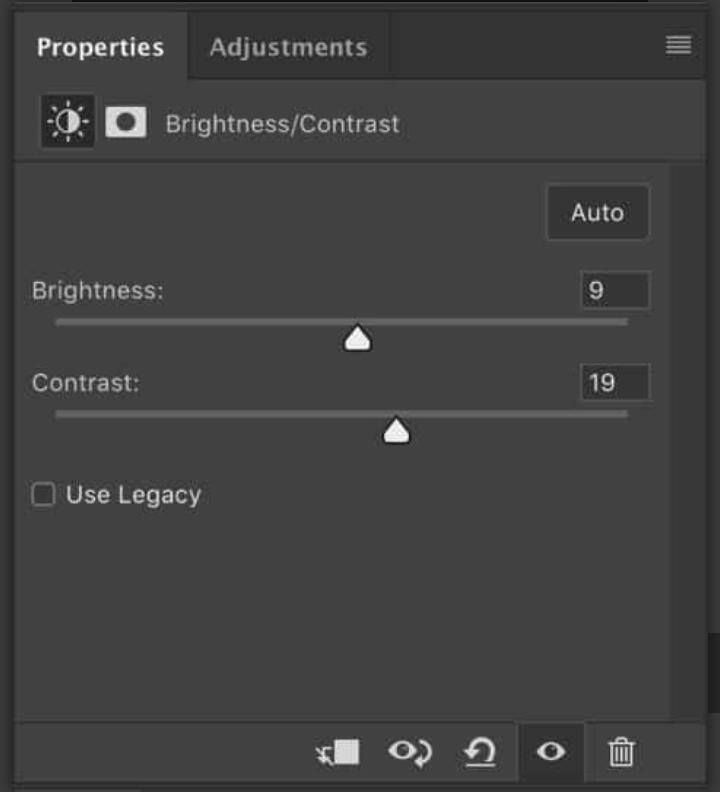
Set a proper value for Brightness and Contrast. This will vary from image to image. So experiment with it with different values and settle on the one you think is the most appropriate.
Go to Image, select Adjustments, and again select Brightness/Contrast. This can also be done from the ‘Create new fill or adjustment layer button’. This is located below the layers panel.
Step 5: Apply the Gaussian Blur Filter
In Photoshop, there are different Filter options that can be used to provide quick effects to an image of your choice. Gaussian Blur is a commonly used filter in Photoshop. It produces a quick effect and is very easy to use. It’s a useful filter that can be implemented in different situations.
Gaussian Blur reduces noise and grain considerably. You can apply a Gaussian filter to soften the picture and control what should be in focus and what not.
Before applying this filter, duplicate the ‘brightness’ layer and name it the ‘gaussian’ layer. The filter will be performed on this layer.
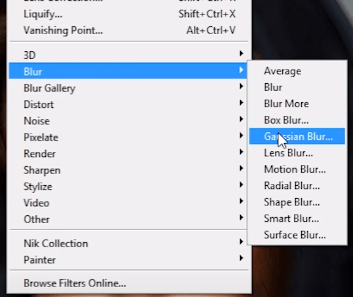
First, go to Filter and select Blur. From there, again select Gaussian. This will take you to another tab where you can select the level of blur you want to apply. You should be applying a blur level that matches the subject tone of the image.
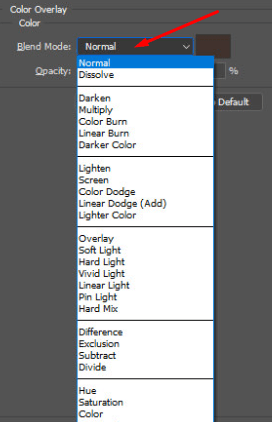
Step 6: Proper Blending Mode
Blending Modes are nothing but a few mathematical equations used to blend layers on the basis of their hue, saturation, luminosity, or a combination of these elements.
They are an effective method for creating non-destructive effects. The Blend Modes only change the visual output and not the pixels. They can be used without worrying about changing the image.
First, you need to perform ‘Apply Image’ on the photo. Afterward, you need to change the blending mode to see its effects on the photo. Change the Blending Mode from ‘Normal’ to ‘Linear Light’. This will provide you with better results.
You can see how the overall picture looks and compare it to your results. You can also experiment with different blending modes to see their effects.
Step 7: Remove Spots
From this step onwards, I’ll discuss the cosmetic modifications that you can make to the photo. I’ll begin by removing spots and impurities.
The picture you have taken might contain spots and impurities in different parts. This can be eliminated using Photoshop. This would make the image more appealing to the viewer.
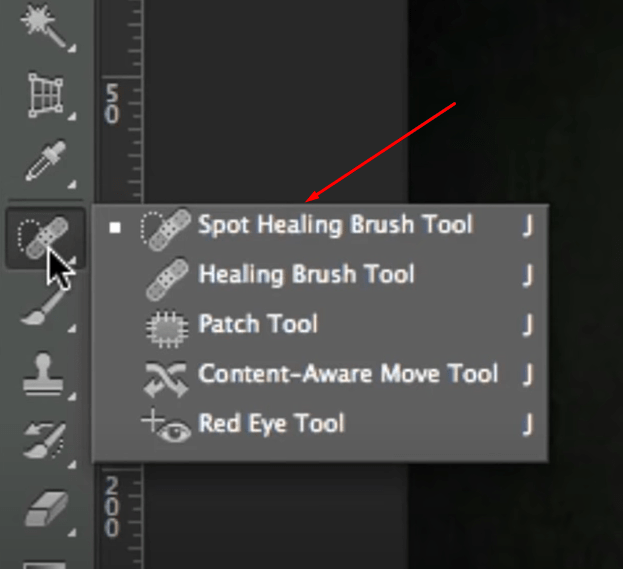
To get rid of the spots, you can either use the Healing Brush Tool or the Clone Stamp Tool. I prefer the Healing Brush Tool over Clone Stamp Tool, as it allows me to select my sample area from wherever I want.
Before starting, make a duplicate layer of the ‘gaussian’ layer and name it ‘spots’. The healing will be performed on this layer.
Press and hold Alt to select the area of your choice. Remember to choose an area that has the same color tone as the area that has the spots. Brush over the area that has spots. This will remove the impurities.
Step 8: Get Rid of Blemishes
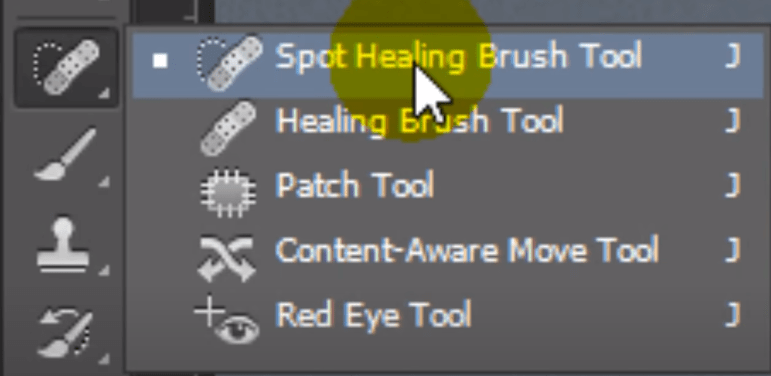
Blemishes are similar to spots and they should be removed when touching up photos. The procedure to remove them is similar to Spot Removal. The key difference is that you will use the Patch Tool instead of the Healing Brush.
First, make a duplicate layer of the ‘spots’ layer and name it ‘blemish’. This layer will be patched using the Patch tool.
Then select the Patch Tool and draw the area that you want to select. Always select small areas instead of large chunks. This helps to make the picture look smoother.
Then drag the selected area to the sample area. This will make a copy of the sample area in the selected area. Repeat this again and again, and you will get a blemish-free photo.
Step 9: Make Adjustments to Eyes
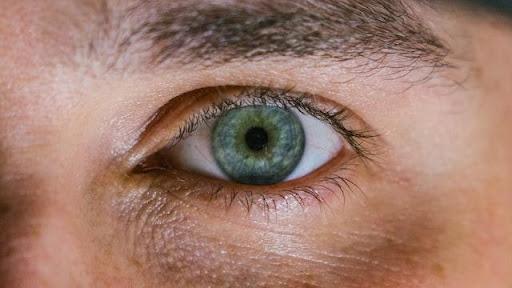
The eyes are an important aspect of image enhancement. You have to give considerable attention to them while making adjustments. The adjustments that you have to consider for eyes are:
-
Using Healing Brush tools to remove black lines under the eyes.
-
Adjust the pupil or make edits to the eyes to make them look more pleasing.
-
Adding or removing hairs from the brow as needed.
-
Using layer blending to change the color of the pupils.
If you perform one or more of these adjustments, create separate layers for each one.
Step 10: Whiten the Teeth
Yellowish teeth are a common problem when working with images. You don’t want to keep the teeth yellow, as this would make the photo look less appealing. So you need to whiten your teeth with the help of Photoshop.
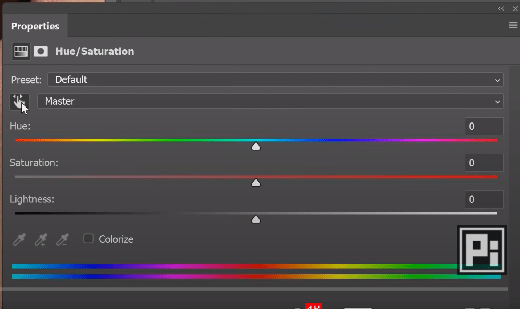
Create a layer called ‘teeth’. Select the Lasso Tool and make a selection around the edges of the teeth. While doing that, you may select some parts of the lips as well. Don’t worry about that.
Select Hue/Saturation from the Adjustments menu. This will convert the selection into a layer mask. From the properties of Hue/Saturation click Master and select Yellows. You want to adjust it to whiten the teeth. Decrease the Yellows by changing the saturation slider.
This will solve the yellow teeth problem in your picture and enhance the quality.
Step 11: Make Adjustments to the Hair
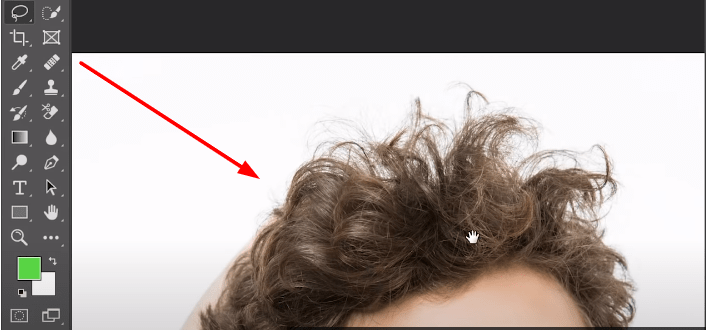
You have to take the client’s hair into account in the photo as well. The adjustments that you have to consider for hair are:
-
Using the Spot Healing Tool to fix stray or flyaway hair.
-
Fill in the sections of hair that may be missing.
-
Adding volume to the hair where required.
-
Changing the contrast of the hair to control the shine.
You may need to perform one or more of these adjustments. Make sure to create separate layers for each one.
Step 12: Include a Vignette
Vignette is a well-established Photoshop technique to draw the viewer’s attention to a particular portion of your image. It’s a simple trick and very easy to perform.
To do this, you make the edges of the frame darker. This naturally forces the viewer to focus on the brighter parts of the photo.
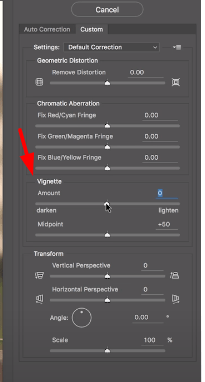
The easiest way to make a vignette is to select Filter and then go to Lens Correction. From there, click on the Custom tab and go to the Vignette option. From here, adjust the Amount according to the requirements of the image. A midpoint can also be used to change the area of the vignette.
If you see that the vignette is too distracting, you can just soften it by decreasing the opacity of the vignette.
After this, all you need to do is save the image and you’re done with it.
Closing Thoughts
Now that I’ve talked to you in detail about touching up your images easily in Photoshop, it is safe to say that you have a very good grasp of these concepts. You can now follow these steps to get that perfect photo.
You have to remember that you don’t have to use all the steps in a photo. Some images may require them all, some may not. So use your own discretion when working with your picture.
I’m again telling you that this is not the only way to touch up photos. If you look online, you will find that different people use different methods. But if you look closely, more than 90 percent of the steps are similar in all the cases.
So if you can follow through with these steps that I’ve talked about, I can guarantee that you will come back with some fabulous photos that will grab people’s attention.
How does Clipping Path CA help photographers to touch up their images?
Clipping Path CA, is a professional photo editing and retouching company. They have 120+ expert designers of their own. They can provide photo touch-up services to clients who have difficulty touching up their photos.
Clipping Path CA is a photographer-friendly platform that provides its services at a reasonable price and with a quick turnaround time. Client satisfaction is always kept in mind. Photo Retouching is a service that makes images perfect and flawless and makes them attractive with the Photoshop Service by removing unwanted objects and shadows from the photos. It is one of the most demanding services in photo editing services. Images become more appealing and focused with the addition of photo retouching.


