When it comes to creating a 3D and hollow look for the apparel images, ghost mannequin editing comes at the top. Here, the technique removes the visible mannequin while keeping the exact shape of the garment.
But how do you do ghost mannequin editing?
In the ghost mannequin editing process, you need to combine multiple images for a professional final image. It includes editing
- Editing the neck joint
- Editing the sleeve joint and
- Editing the bottom joint.
Tools And Software For Ghost Mannequin Editing
Tools and software come first for the ghost mannequin editing. You need to choose the right tools and software to get the best results. However, it depends on you whether you want to use manual tools or AI-powered tools for quick edits.
Here is a quick overview table highlighting the tools and software professionals use for ghost mannequin editing.
| Category | Software/Tool | Key Features | Suitable For |
| Manual | Adobe Photoshop | ‣ Advanced masking ‣ Layer blending ‣ Pen tool ‣ Smart objects ‣ Extensive tutorials | Professionals and detailed editing |
| GIMP | ‣ Open-source ‣ Layer manipulation ‣ Background removal ‣ Customizable tools | Beginners | |
| Affinity Photo | ‣ One-time purchase ‣ Advanced selection tools ‣ HDR support ‣ Non-destructive editing | Intermediate editors | |
| AI-Powered | AutoRetouch | ‣ Automated mannequin removal ‣ Background removal ‣ Fabric texture retouching ‣ Batch processing | High-volume editing and automation |
| ZMO.AI | ‣ AI-driven mannequin removal ‣ Virtual model selection ‣ Style customization | Quick edits for e-commerce platforms | |
| Remove.bg | ‣ Instant background removal ‣ Simple interface ‣ Batch processing | Quick background removal | |
| Free | Pixlr | ‣ Web-based ‣ User-friendly ‣ Basic editing tools, cloud storage | Beginners |
| Fotor | ‣ Online editor ‣ Background remover ‣ Basic retouching tools | Social media content and quick edits | |
| Canva | ‣ Drag-and-drop interface ‣ Background removal ‣Design templates | Marketing materials and simple edits |
Notes:
- You will require more skill with Manual Tools
- You can get faster results with AI tools. However, you need to manually edit some parts
- If you just need basic ghost mannequin editing, free tools will be most suitable for your needs.
Preparing Images For Editing
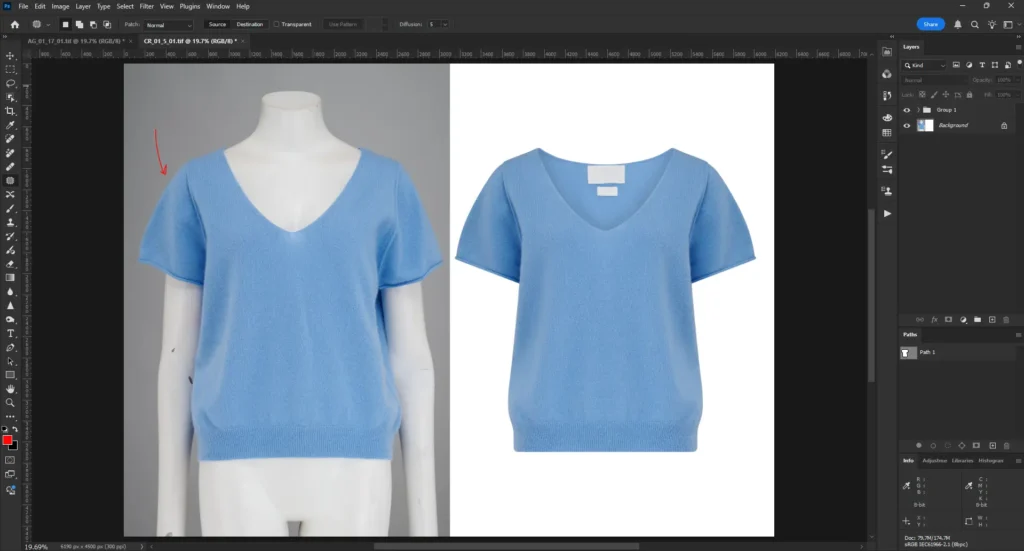
After you select the right tool according to your ghost mannequin editing needs, move ahead to prepare your images. It is an essential step.
Here are the steps:
- Upload the mannequin and inner images into your editing software.
- Next, you have to ensure images are from the same angle and lighting conditions.
- Now you have to apply crop and white balance corrections.
- Check for the details like shadows or wrinkles that may need removal during editing.
- At last, you have to label your images like neck or bottom.
| Tips: ✔ You should take the images of your apparel from multiple angles. It will add flexibility when you mask each joint. ✔ You should use a neutral or white background to reduce extra work during background removal. |
Comprehensive Guide on Ghost Mannequin Editing Process
Now, let’s move ahead to our editing process. When you are doing ghost mannequin editing, you have to focus on three main areas. They are
- The neck joint
- The sleeve joint
- and the bottom joint.
Here is a comprehensive step-by-step guide for joint editing:
① Neck joint editing
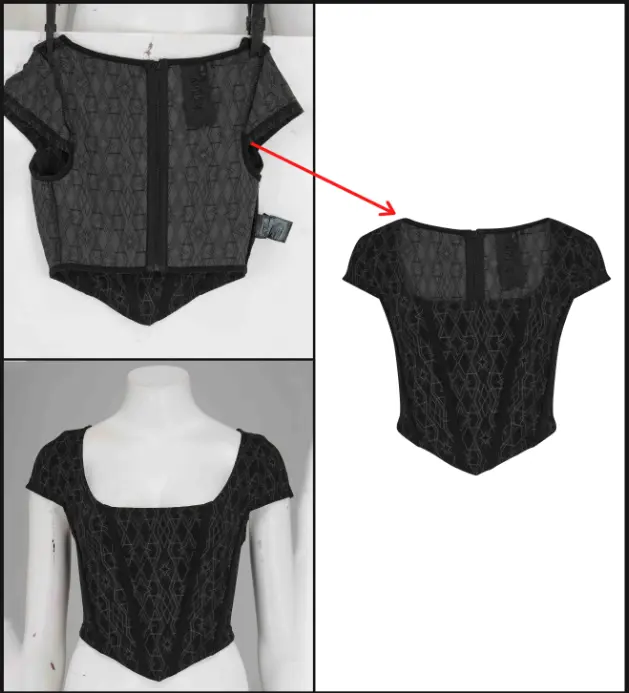
When you are doing ghost mannequin editing, you have to pay great attention to the neck joint editing. That’s because you can get the ghost mannequin effect mainly from the neck of the apparel, right?
Below are the steps.
- Upload the mannequin image and neck image into your editing software.
- Now you have to use the Pen Tool or Lasso Tool to carefully trace the neckline of the apparel.
- Next, you have to delete or mask the mannequin area and expose the inner layer.
- You have to keep the image under the main garment to maintain shape.
- You can use Layer Masks and soft brushes for transitions between layers. You can also use Feathering edges.
- At last, you need to ensure the inner neck matches the garment in brightness.
| Tips for a flawless neck joint ✔ You should zoom the image to 100%. Thus, you will be able to have an accurate control over edges. |
B. Sleeve joint editing
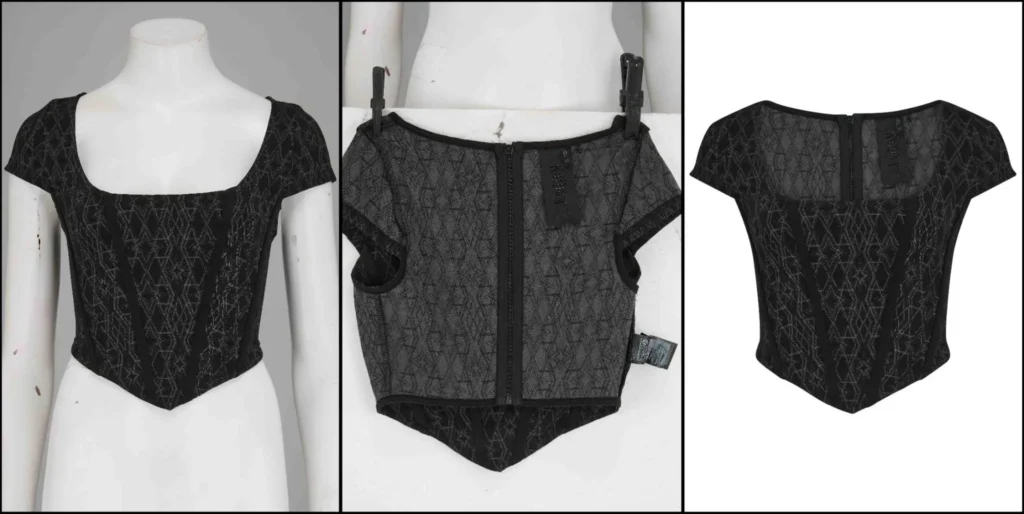
Next, let’s come to the sleeve joint editing.
It is a very crucial step if your apparel has unique sleeves. Here is how you can ensure the best editing results in the sleeve joint.
- Upload the garment image and the sleeve image in the editing software.
- You have to use the Pen Tool or Lasso Tool to select the sleeve area from the sleeve image.
- You can use the Transform Tool to adjust the size and rotation of the sleeve.
- Next, you should apply a Layer Mask to the sleeve layer.
- You can use a low-opacity soft brush to blend the edges.
- At last, adjust the lighting and color balance.
C. Bottom joint editing
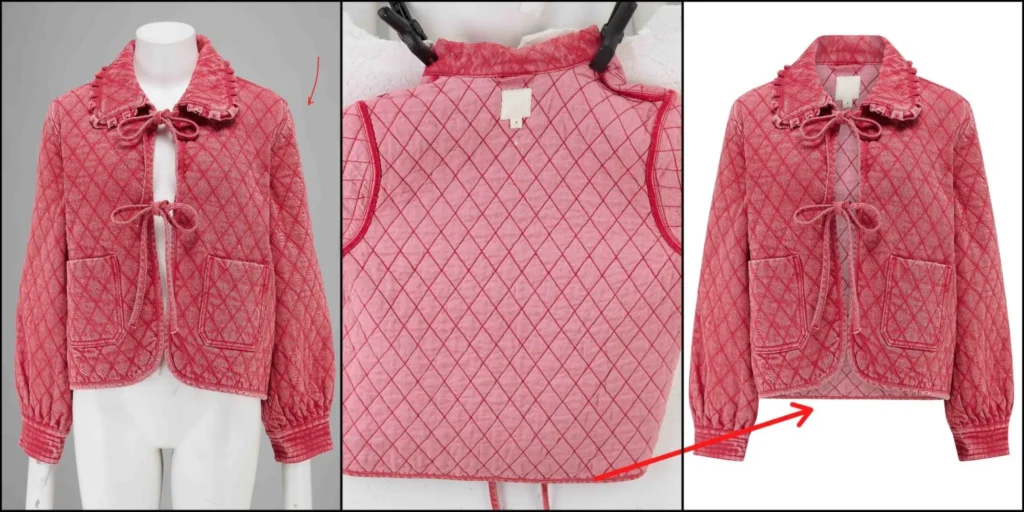
The bottom joint editing completes the ghost mannequin editing. The step ensures the hem or lower edge of the garment appears natural.
Moreover, if you are editing pants, skirts, and dresses, this step is a must. That’s because in these garments, we often need to photograph the lower portion separately to capture the interior details. You have to follow the same steps for the bottom also. Like uploading, using the pen tool, layer masking, and adjusting at last.
Final Retouching and Refinement
Well, we are done with the main editing. Now let’s make the final retouching. Here, you have to focus on the image to make necessary improvements. They take the small wrinkles or minor color non-adjustments into consideration. Moreover, you have to ensure the shadows are balanced and a white background.
Exporting the Final Image
As for the last step, you have to export your final edited image. There are multiple formats you can use to export images. They are,
- JPEG and PNG
- JPEGs and TIFFs
- PNGs.
You have to pay careful attention to resolution and color profiles to ensure consistency in different platforms. You should organize files with clear naming. That’s especially when you are handling multiple products.
Overview of Image Formats for Ghost Mannequin Editing
| Format | Primary Use Case | Advantages & Considerations |
| JPEG | E-commerce product listings | ‣ Widely supported on different platforms ‣ Efficient compression for faster loading ‣ Suitable for images without transparency |
| PNG | Images requiring transparency | ‣ Supports transparent backgrounds ‣ It’s lossless compression preserves image quality ‣ Larger file sizes compared to JPEG ‣ It is not suitable for complex images |
| TIFF | High-resolution archives and print materials | ‣ It’s lossless compression preserves all image data ‣ Supports multiple layers and channels ‣ Large file sizesIt is not supported on all platforms |
| PSD | Working files during the editing process | ‣ It retains layers and adjustment layers ‣ Suitable for ongoing edits and revisions ‣ Not suitable for direct publishing |
| WebP | Web optimization for modern browsers | ‣ Superior compression techniques reduce file sizes ‣ It maintains high image quality ‣ Most modern browsers support this format ‣ However, it has limited support in older browsers |
| AVIF | Emerging format for high-quality web images | ‣ Advanced compression methods ‣ High image quality at smaller file sizes ‣ May not be compatible with all browsers and devices |
Common Mistakes to Avoid in Ghost Mannequin Editing
When you are doing ghost mannequin editing, it is bound to face challenges. Believe it or not, even experienced editors face challenges with ghost mannequin image editing.
First, the most common mistake in the ghost mannequin editing is the misaligned joints. You know, even a small misalignment can affect the natural shape of the garment. It makes the final image look unprofessional.
That’s why you have to be careful with positioning and precise layer alignment to maintain a natural appearance.
The second most common one is the inconsistent lighting or color between the main garment and inner layers. By chance, if there are differences in brightness and shadows, it can immediately break the illusion of a mannequin-free image. So, you should often use adjustment layers or color matching tools for the best results.
Last but not least, you always have to be careful of excess retouching. Of course, sometimes you may think that removing every wrinkle or texture imperfection. But don’t edit too much. It will make the image look flat. That is why you have to edit only what’s necessary.
Conclusion
All in all, you can ensure a high-quality ghost mannequin editing with the steps I’ve mentioned above. You may have to practice more to get the results you want. However, you can also always get help from a professional editor. It is always the last best choice. You don’t have to take all this hassle and get the high-quality results at an affordable price.
Also of interest:
- What is Ghost Mannequin Photography? Beginner’s Guide 2025
- Ghost Mannequin vs Model Photography – Which is Best?
- Proven Ghost Mannequin for Ecommerce Tips to Boost Sales in 2025
- Ghost Mannequin Editing for Clothing & Apparel Brands
- Ghost Mannequin Editing Price Guide 2025 – Cost Explained
- Ghost Mannequin Service Outsourcing: Pros, Cons & Tips


