In today’s corporate world, a professional headshot is a must when it comes to visibility and exposure on an individual level. A perfect headshot can dramatically improve your first impression and increase your chances of getting hired for your desired position. On the other hand, a below par headshot can leave a not-so-good first impression.
Because of the high demand for headshot images in recent years, the photography community has labeled them as a genre of professional photography. Different corporate entities, small to large business owners, renowned celebrities, and public figures use this kind of image to increase their presence in different social media and community settings.

Importance of Headshot:
A study published in the Cognition and Emotion Journal in 2012 revealed fascinating information on facial features. The study found that people make their decision to trust someone within 100 milliseconds of seeing them.
This emphasizes the importance of first impressions. As a professional, your headshot may be the initial impression that a company has of you. Therefore, it’s crucial to have an amazing headshot that conveys a positive impact. Even as a student, you can seek writing help from Viva Essays to manage your time and edit headshots in Photoshop.
Remember, “a picture is worth a thousand words.” If you can put your face out there and maintain relative exposure, it can prove to be advantageous. A headshot can serve as a visual reminder for potential customers or employers, making it crucial to have an online presence.

Editing Headshot:
Sometimes a professional headshot may not be in your budget, or you may be a photographer who is just starting in this genre of photography. In either case, you might not get the perfect snap that you are looking for.
In these moments, photo editing tools come to your rescue. With the help of tools like Photoshop and Lightroom, you can retouch your image and get that perfect piece of photo that you want.
Here I’m going to show you how you can edit headshots in Photoshop and Lightroom. So be patient and go through these steps with me, and I can assure you that you’ll be able to edit your photos in no time.

There are some key differences between editing a picture in Photoshop and Lightroom. In Photoshop, you can retouch your photos in a more detailed manner. This is not the case for Lightroom. Even though the result is less accurate, you can use Lightroom for pictures that require less editing.
How to Edit Headshots in Photoshop?
Firstly, I’m going to show you how you can easily edit your images using Adobe Photoshop. But before beginning, you first need to take a few snaps of your client. The points you should remember before or during the photo session.
- Selecting the right attire
- Creating separation from the background
- Appropriate positioning of the model
- Getting the right expression
- Adequate lighting on the set
- Directing the light properly
If you can keep these factors in mind during the photo shoot, there will be fewer things you need to worry about once you are in the post-processing session.
Step 1: Opening the Image in Photoshop
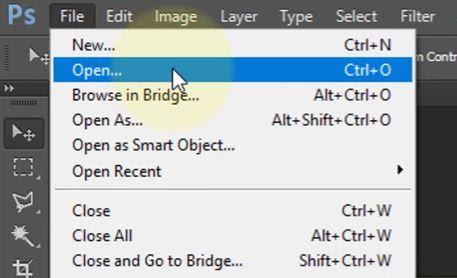
First, open Photoshop on your computer. Then select File. From here, select ‘open’ and choose the image you want to edit. You can also drag and drop your photo into Photoshop Canvas, which is much faster.
Step 2: Duplicate the Background Layer
Here, you need to make a duplicate of the background layer. This is done to prevent the image from getting damaged by chance during the processing sessions.
Right-click on the background layer. Now choose “Duplicate the layer” and give it whatever name you want. I’ve named it ‘lighting’ It’s always recommended to give these layers relevant names.
This will be used many times throughout the editing process.

Step 3: Adjusting Brightness and Contrast
After you have opened your image, you need to adjust the brightness and contrast first. This is not a compulsory step for each and every image. It should only be performed where it’s required.
By applying proper brightness and contrast, you are enhancing the quality of the image. It is challenging to find imperfections in a photo with improper brightness.
Some people often make the mistake of using Hue & Saturation in this step. This is not required in the initial stages. Set a proper value for Brightness and Contrast. This will vary from image to image. So it’s recommended to experiment with it for different values and settle on the one you think is appropriate.
Go to Image, select Adjustments, and again select Brightness/Contrast. This can also be done from the ‘Create new fill or adjustment layer button’. This is located below the layers panel.
Step 4: Removing Spots & Impurities
The picture you have taken may have spots and impurities in different areas of the face. This can be removed using Photoshop. This would make the picture look more appealing to the viewer.
To remove them, you can either use the Healing Brush Tool or the Clone Stamp Tool. I personally prefer the Healing Brush Tool, as it gives me the freedom to choose my sample area from wherever I want.
Before starting, make a duplicate layer of the ‘lighting’ layer and name it ‘healer.’ You will perform the healing on this layer.
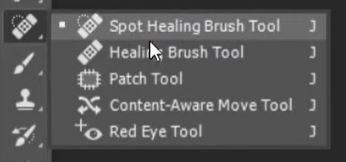
Press and hold Alt and select the area of your choice. Remember to choose an area that has the same skin tone as the area that has the spots. Brush over the area with spots and you will be able to remove the impurities.
Step 5: Applying Gaussian Blur Filter
Gaussian blur is a frequently used filter in Photoshop. It’s quick and very easy to use that can help you in different situations. This reduces noise and grain considerably. You can use a Gaussian filter to soften the image and also to control what should be in focus and what should not.
Before applying this filter, duplicate the ‘healer’ layer and name it the ‘filter’ layer. The filter will be applied to this layer.
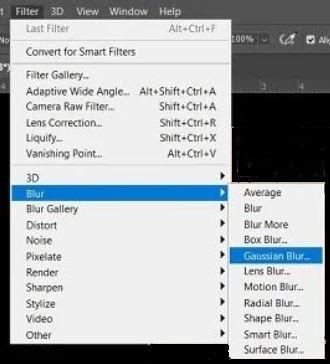
Go to Filter and select Blur. From there, again, select Gaussian. This will take you to another tab where you can choose the amount of blur you want to apply. You should be applying a blur level that matches the skin tone.
Step 6: Implementing ‘Apply Image’
Apply Image’ is a powerful tool in Photoshop that you can use to obtain a dramatic background, make your photo pop out, or create a double exposure in your picture. You have to use it in this step.
First, duplicate the ‘healer’ layer and name it ‘color.’ You will perform the ‘Apply Image’ on this layer.
Select the ‘color’ layer and go to Edit. From there, select ‘Apply Image.’ There, again select ‘Blur Layer’ from the layers option and make sure that the blending is on subtract. The ‘color’ layer is going to aid you immensely in showing the textures in the image properly.

Step 7: Applying the Correct Blending Mode
Blending Modes are basically a few mathematical formulas that are used to blend layers on the basis of their hue, saturation, luminosity, or a combination of these elements.
They are a useful method for creating non-destructive effects. As the Blend Modes are responsible for changing the visual output and not the pixels, they can be used without worrying about damaging the image.
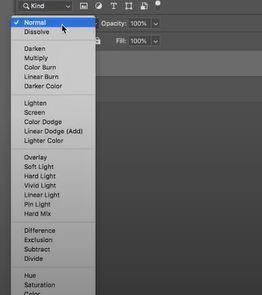
After using ‘Apply Image,’ you need to change the blending mode to observe the effects on the image. For this, change the Blending Mode from ‘Normal’ to ‘Linear Light,’ and you are good to go. You can see how the overall texture looks and compare it to your desired results.
Step 8: Drawing on Headshot Using Soft Brush Tool
Soft Brush Tool is used to present a soft or dim look on the edges of your image. In this step, you would want to give the same effect to your headshot.
Create a layer mask on top of the ‘color’ layer. You’ll be using this layer to give that smooth effect on the skin of your headshot photo.
Take the Soft Brush Tool and set its opacity between 35 and 45%, depending on your photo. Now you need to draw on the rough patches of the face in your photo. This will make these portions seem smooth. Remember not to get carried away too much. Only apply as much as necessary.
Step 9: Fixing the Contrast
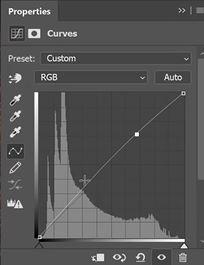
This is the last step, and in this step, you have to fix the contrast of your image to enhance the quality. Just like other steps, create a curve adjustment layer and name it ‘contrast.’
Drag the curve from the center a little bit upwards. This will provide an amazing contrast to your headshot.
Now that you’ve followed all the steps, you just need to save the image on your computer, and your editing is complete. And if you haven’t followed them, go edit a headshot before continuing to talk about how to edit a headshot in Lightroom.
How to Edit Headshots in Lightroom?
If you’ve come this far, then you are probably aware of how to edit headshots in Photoshop. But you may only require a little bit of touch-up, and you don’t want to go through the hassle of using Photoshop. In such cases, Adobe Lightroom is your go-to tool.
In Lightroom, you have the added benefit of a non-destructive workflow. When you make a change to your image, the original file is never altered. You can always go back to the original copy at any stage of your processing.
Just like in Photoshop, before editing in Lightroom, you need to keep in mind certain factors while taking your headshots. This will reduce your post-processing burden and save you time.
Step 1: Opening the Image in Lightroom
First, open Lightroom on your computer. Then, click Import and navigate to your image location in your folders. From here, select your image and click on Import. This will take the photo to your Lightroom.
You will see that the image is tiny. Don’t worry about it. Just click on the photo, and it will come back to its original size.
Step 2: Ensuring the White Balance
An essential part of dealing with headshots is achieving a good skin tone. You should always make sure to keep making color adjustments until you can see visible evidence that a good skin complexion has been achieved.
Make sure that your monitor is calibrated properly, or you can get a different result than what you want due to the screen of your computer.
You can ensure no color cast in your picture using White Balance Selector Tool. This is found on top of the Basic panel. You can also press the ‘W’ keyboard shortcut to enable it.
After selecting this, hover it over an area that is fairly neutral. You don’t want to select an area that is too bright or too dark. This is due to the fact that these areas may be saturated. These areas will yield incorrect results.

Now, if you select the ‘Show Loupe’ box, a grid of pixels will be displayed with the sample pixel in the center. The primary color values will be displayed below the grid.
If the value of RGB is very close, then you can say there’s no color cast. To adjust the color and force the RGB value to be identical, click on it.
When you select a good neutral point, White Balance Selector will readjust your color temperature and tint smoothly.
Step 3: Calibrating the Tonal Distribution
When it comes to making adjustments to ‘Tone,’ the first thing people go to is Exposure and Contrast. But if your image is not at the extremes (Over or underexposed), you should not touch them.
Increasing the Exposure will smear the whole distribution to the right of the histogram, and decreasing it will take it to the left. You always need to come to a place where you can increase the shadow without affecting the mid-tones and highlights.
For further optimization, you can adjust the shadows and highlights first and then make exposure adjustments if necessary.
Step 4: Cropping & Resizing
Cropping is not always necessary, but it has its place if you want to resize your headshot. As I did not talk about it in Photoshop, I’m going to be covering for both here.
This step is almost the same for both Photoshop and Lightroom. The key difference is that in Photoshop, cropping is done at later stages of editing. But in Lightroom, you have the luxury of cropping and resizing in earlier stages due to the non-destructive property of Lightroom.
The Crop tool is located on the dedicated toolbar. You can click on it or press the ‘R’ keyboard shortcut to access it. Once selected, you can lock or unlock the aspect ratio by clicking on the padlock.

You can drag the fixed aspect ratio and place it on your desired area to crop out the area outside. You can also rotate it by moving the mouse cursor outside the rectangle. After you are happy with your area, click on the Crop icon or press ‘R,’ or hit the Enter key to finalize the crop.
Step 5: Removing Spots
From this point onwards, I’ll be talking about the cosmetic modifications that you can make to your headshot. I’ll begin with removing spots. I’ve already talked about the importance of removing spots from your image.
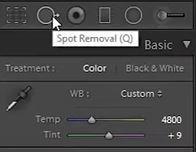
Select the Spot Removal Tool. You can select it by clicking the icon or pressing the ‘Q’ keyboard shortcut. These bad spots can be overwritten by sampling from good areas of the image.
Zoom into the image to point out the unwanted spots. When you click on the spot, Lightroom will take an area similar to that of the area with the spot. This is the area that will replace the spotted area.
Lightroom generally provides very good suggestions for areas to replace. So you can accept its suggestion with relative accuracy. Now, if you want more accuracy, you can manually select an area of your choice.
To perform it manually, take the center of the source that you want to relocate. Then press Enter if you are happy with your choice.
To get better results for your edit, always keep your Spot Removal Tool to ‘heal’ instead of ‘clone.’
Step 6: Smoothing Out Lines & Wrinkles
In the previous step, I showed you how to remove spots. Instead of clicking, if you click and drag, you can refer to a specific area. This is used in line removal, wrinkle reduction, etc.
After selecting the area, to replace it, you can use the Lightroom suggested area or manually select an area. The procedure for manually selecting is the same as the previous step.
To prevent too much editing, always set the opacity between 45 and 55%. This will reduce the skin instead of completely removing it.
This same step can be repeated for any shiny area of the picture which is brighter than normal.
Step 7: Applying the Adjustment Brush
Adjustment Brush is used when you need to give specific attention to some specific areas of the photo. To activate the Adjustment Brush click on its icon or press the ‘K’ keyboard shortcut.
To check which areas will be modified because of the Adjustment Brush, select the ‘Show Selected Mask Overlay,’ and Lightroom will display it by overlaying a red mask. From this mask, you can get an idea of where your changes will be applied.
There are 19 sliders on the Adjustment Brush control panel. You can choose between two brushes labeled ‘A’ and ‘B.’ You can also do it a faster way by selecting the Auto Mask box. Lightroom will do it automatically and try to avoid overlapping at high-contrast edges.
You can also perform it manually just by unchecking ‘Auto Mask’ and then painting it with your mouse cursor. Make sure to cover the intended area properly. The masking effect can be minimized by reducing density.
Turn off the sunburn effect by unchecking ‘Selected Mask Overlay’ and keeping the ‘Clarity’ slider to the left. Just like that, you can experiment with all the sliders and get the hang of it after a few tries.
You have to remember only varying sliders won’t give the best edit, and also varying all the sliders won’t give you the best edit. You have to find your middle ground.
Step 8: Adjusting Eyes
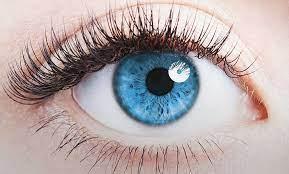
An important aspect of the image is the eyes, and you have to give considerable attention to editing them. Typical adjustments that you have to make on eyes are:
- Removing black lines under the eyes.
- Removing bright spots on the eyes created by flash.
- Adjusting the position and performing some skin tone modifications.
- Removing unwanted hairs from eyebrows.
Step 9: Making Adjustments to the Mouth
In some cases, the subject may not have perfect teeth, and you may need to make changes in post-processing. Among the imperfections, yellowish teeth is the most common.
To fix this problem, select the Adjustment Brush and use the ‘Teeth Whitening’ preset. This will remove any yellowish effect from your image.
Another thing you can do is make changes to photos with lipstick. For this, increase the saturation on the lips using the Adjustment Brush. You can remove spots from lips using the Spot Removal Tool.
Step 10: Making Adjustments to Hair
You might get lucky and get a client with no hair (just kidding!), but most of the time, you have to account for the client’s hair in the photo as well.
First of all, you need to remove any extra hair that has entered the face during the photo session. This can be done with the Spot Healing Tool.
If the hair is too shiny or less shiny, you can change the contrast of the photo and adjust it to a suitable one.
Now that you have completed all the steps, all that remains is for you to save the photo and your editing of the headshot is complete.
End Thoughts
Now that I’ve talked about editing the headshots easily in Photoshop and Lightroom in detail, you have a very good grasp of these concepts. You can now use these steps to get that perfect headshot. I’m again telling you these are not the only way to edit headshots. But if you can follow through with these steps, I can assure you that you will come back with a headshot that will catch people’s attention. But if you still need any help, you can always take help from Clipping Path CA.
Questions and Answers for edit headshot
How do I turn a picture into a headshot?
If you want to turn your picture into a headshot manually, use Adobe Spark. Here you can turn your ordinary picture into a headshot in a few simple steps. But if you don’t want to go through the hassle, then I recommend you to use Snappa or Profile Pic Maker.
How can I make my headshot look better?
Here are some tips you can follow:
➜ Wear solid color clothes and iron them before using
➜ Have multiple expressions at your fingertips in case one of them fails
➜ Ensure proper lighting
➜ Use a tripod or a camera stand
➜ Have a proper background
➜ Make eye contact with the camera
How long does it take to retouch a headshot?
Initially, when you are starting out, it may take time to edit one headshot (25-35 minutes). But once you’ve done some editing, then you can edit them considerably faster. Sometimes some headshots will require less editing than others, and you may need less time.


