Want to speed up your workflow in Photoshop? Then, Photoshop tool presets can be your real assistance. Whether you’re a designer or digital artist, Photoshop presets can save you time and offer you full control over your tools.
But here comes the main question: what are Photoshop tools presets? Moreover, how can you create it or how can you use it, right? That’s why here we are to help you. In this guide, we will comprehensively discuss the Photoshop tools presets, covering every detail you may want to know. Just keep on reading.
What Are Photoshop Tool Presets?
In simple words, tool presets in Photoshop are a saved version of a tool with your preferred settings. For example, imagine you are using the Dodge Tool at 30% exposure and soft edges every time.
Now, you can save that setup at a preset instead of manually setting those options every time you are working in Photoshop. You will just need one click with the presets, and Photoshop will instantly load all the settings for you.

Tool Presets vs Brush Presets, Actions, and Workspaces
Well, it is the most common confusion among Photoshop users. They often wonder what makes the difference between tool presets, brush presets, and action and workspaces.
Let’s check out the difference between them in the below overview table below:
| Preset Type | What It Saves | Example Use | File Extension |
| Tool Preset | Tool + its specific settings | Dodge tool with 30% exposure and soft edge | .tpl |
| Brush Preset | Brush tip shape and dynamics only | Soft Round 5px brush | .abr |
| Action | Sequence of recorded steps | Auto-retouch workflow | .atn |
| Workspace | Panel layout and tool visibility | Retouching layout | — |
Why Use Tool Presets?
Want to ensure faster workflow or save hours while working in Photoshop? Then you must take advantage of the tools’ presets. It not only makes your work faster but also offers many other benefits.
Check it out below:
I) Faster Workflow
When you save the tool’s setup as a preset, you don’t need to adjust the slider manually. Moreover, you won’t need to blend modes or brush sizes every time. You can save your specific tool setup as a preset and use it whenever you need it with just one click. Ultimately, it speeds up setup and keeps your focus on the work.
II) Consistency Between Projects
With tool presets, you can ensure the same settings are used every time. It can be helpful when you are working on a brand with recurring settings. Moreover, if your team uses shared presets or you revisit a project later, preset tools can help you out.
III) Professional Use-Cases
Photoshop tool presets can even help you with professional use cases. For instance, you can create presets for healing or frequency separation for Photography retouching. Moreover, you can have selection or path tools with specific feather settings for UI/UX design. Tool presets can also help you with Digital painting or illustration.

How Tool Presets Look in Older Versions
In Photoshop CS6 or early CC versions, Tool Presets had their own dropdown menu at the far left of the Options bar. It is right beside the tool icon. You can click the small arrow to open your list of saved presets or choose “New Tool Preset” from the menu.
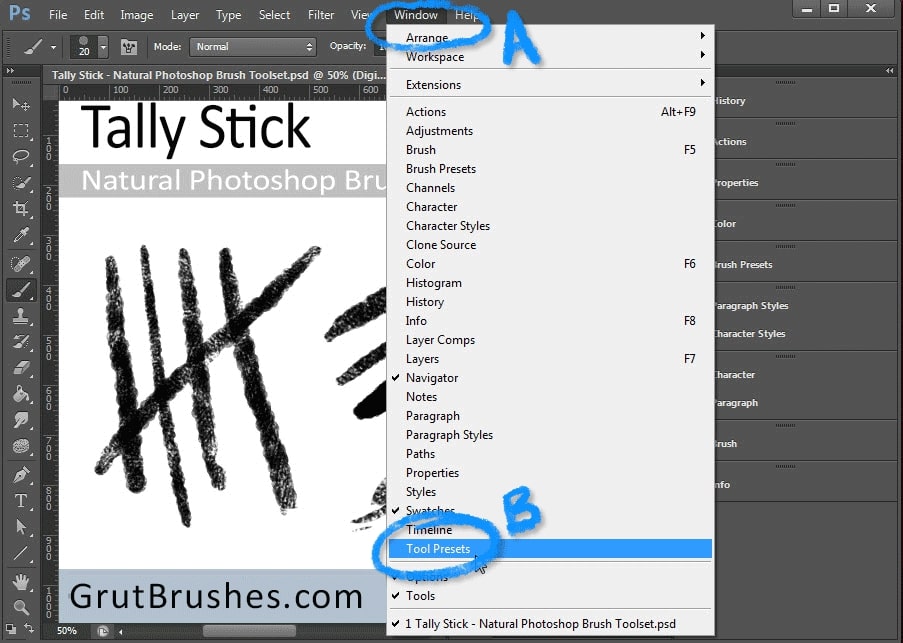
In the older Photoshop version, there is also a separate Tool Presets panel that you could open by going Window >> Tool Presets. These older versions used the Preset Manager window to export or import tool presets.
How It Works in Modern Photoshop
Starting from Photoshop CC 2026, you can access all types of presets from the Presets Panel.

Here’s what changed
- The Preset Manager is gone.
- Tool presets are now found inside the Brush Settings or Presets interface.
- You can load, rename, or delete them directly from the Preset Panel flyout menu.
- Tool presets are saved automatically as you work.
How to Create a Tool Preset in Photoshop?
Well, now you must be wondering how you can create presets to make your work faster in Photoshop, right? Honestly speaking, creating presets in Photoshop is not a hard nut to crack. You can easily create it by following some easy steps.
Here is how you can create Photoshop tool presets.
Step 1: Pick Your Tool
First of all, you need to choose which tool you want to save. After you select your required tool, set all the options according to your requirements from the Options Bar. It is wise to test your settings on a small area of your image first. Thus, you will be able to tweak anything before it becomes a permanent preset.
Step 2: Save Your Settings as a Preset
After you have perfectly set up the setup with your chosen tool, it is time to save it. Go to Window >> then Choose Tool Presets.
Here, you will see a list of existing presets. Look at the bottom. There, you will see a little icon to create a new preset.
Now give your present a clear name. If Photoshop asks whether to include tool settings, always select yes. Click OK.
That’s it! Your preset will be saved in Photoshop.
Step 3: Test and Use Your Preset
After saving, try switching to another tool and then back to your new preset. Every setting should be applied automatically. If something doesn’t feel quite right, do not stress out. Just right-click the preset and select “Replace Tool Preset” to update it.
Step 4: Organize and Share Your Presets
If you have created more presets, you may need to organize them to use them efficiently. To do so, you can group similar presets together in the panel and delete old ones. You can also keep a master list of your favorites.
You can also share your presets as a .tpl file if you are working in a team. It will allow everyone to work with the same settings.
Exporting And Sharing Tool Presets
As we have already mentioned, you can export or share your presets in Photoshop if you want. In this section, we will comprehensively discuss how you can do so. Just keep on reading.
How to Export Tool Presets in Photoshop?
Follow the steps below to export the tool preset in Photoshop.
- Go to the Window >> Then choose Tool Presets.
- Click the flyout menu in the top-right corner of the panel.
- Select “Save Tool Presets” or “Export Tool Presets”.
- Choose a location on your computer to save the file.
- You should name the file descriptively. For example: Retouch_ToolPresets_v2_2026.tpl
- Click Save.
Your presets will now be packed into a .tpl file and are ready to import anywhere.
Quick overview of the process
| Action | How-To |
| Open Tool Presets Panel | Window >> Tool Presets |
| Export Presets | Panel Menu >> Save Tool Presets |
| File Format | .tpl |
| Backup Location | Any local or cloud folder |
| Import Presets Later | Panel Menu >> Load Tool Presets |
How To Share Presets with Others?
You can also easily share your presets with others. Here is how you can do so.
- Email or Cloud
You can send the .tpl file via email, Google Drive, Dropbox, or any file-sharing service.
- Team Workflow
If you are working in a studio, you can maintain a master preset library in a shared drive. Here, you should name files consistently and update version numbers to avoid confusion.
How to Install Or Load Tool Presets?
When you have collected or created a set of tool presets, the next thing is installing or loading them into Adobe Photoshop. It will help you to access them instantly.
Here’s a comprehensive guide on how to load tool presets. Depending on your version of Photoshop, choose the methods.
Method 1: Via the Tool Presets Panel
Follow the steps below to load presets using by Tool Preset Panel.
Step 1: Open the panel by going to Window >> Tool Presets.
Step 2: In the panel, click the menu icon.
Step 3: Choose “Load Tool Presets” or, in older versions, “Load…” from the dropdown.
Step 4: Navigate to where your preset file is saved
Step 5: Select it and then click Open.
Step 6: The new presets appear in the list.
Step 7: If you don’t see them, un‑check the panel option “Current Tool Only”.
Method 2: Via the Preset Manager for older versions
If you are using older Photoshop versions, here is how you load the presets.
Step 1: Choose Edit >> Presets >> Preset Manager…
Step 2: In the “Preset Type” dropdown, select “Tools”.
Step 3: Click Load… or Replace… if you want to swap the entire set.
Step 4: Select your .tpl file and press Open.
Step 5: Click Done.
File Format Basics
In Adobe Photoshop, tool presets come in different file formats. You should understand these file formats as they can help you manage, share, install, and store them efficiently.
Let’s check out the main file format below.
| Extension | Use Case | Contains or Stores |
| .tpl | Tool Preset Library file | Saved tool + tool settings |
| .abr | Brush Preset Library file | Brush tip shapes, dynamics, etc. for the Brush Tool |
| .pspreset | Unified Preset Package | Can contain tool presets, brush presets, maybe other preset types |
| Others: e.g., .aco, .grd, .pat | Related presets, but not for tools | When you manage “all presets”, you’ll see these listed too |
Organizing Photoshop Preset Library

If you’ve been using Photoshop for a while, you know how quickly your preset library can spiral out of control. That is why you will need to manage your presets for efficiency and performance.
One of the easiest ways to stay organized is with naming conventions and folder structures. Here is how.
| Element | Example | How does it help? |
| Prefix | Sel_, Brush_, FX_ | It immediately tells you the tool type |
| Project / Client | ClientA_, ProjectX_ | It keeps presets grouped by job |
| Version / Date | _v1_2025, _2024-09 | It tracks updates and avoids confusion |
| File Type Tag | _TPL, _ABR | It helps to differentiate between file formats |
Performance and Startup Optimization for Preset‑Heavy Works
Now, let’s say you have built a sizable library of tool presets in Adobe Photoshop. Of course, it makes the workflow faster. However, sometimes it can make the software start working more slowly. It is not because the presets are bad, but. It is more likely because of how Photoshop manages it. In this section, we’ll go through how you can optimize your Adobe Photoshop, even with a large number of presets.
I) Memory and RAM Allocation
You can increase your memory allocation to Photoshop. You just need to go to Preferences >> Performance. However, you should not exceed about 85% of your system’s RAM. Adobe states that setting it too high can lead to “out‑of‑RAM or out‑of‑memory” issues.
II) Cache Levels and Tile Size
Under Preferences and then Performance option, you will find Cache Levels and Cache Tile Size. You can lower cache levels 1 to 2 for smaller files with many layers. For high‑resolution images like 50 MP+, you can set Cache Levels higher, 4‑6. You can also use larger tile sizes for faster redraws.
III) Disable or Reduce Thumbnail Previews
The UI draws thumbnails for layers and presets. If your preset panel is full of thumbnails, it adds overhead. You should minimize or turn off panel preview thumbnails.
Troubleshooting Tool Presets
Well, when working with the tool preset in Adobe Photoshop, sometimes you may face some issues. For instance:
| Problems | Description |
| Preset disappears | You open the Tool Presets panel, and your custom preset is gone |
| Wrong tool settings | The preset loads, but the settings aren’t what you expected. |
| Incompatibility after update | You upgraded Photoshop, and some presets won’t load, or they load but misbehave |
| Panel not showing all presets | You loaded a file, but only default presets appear, or only the current tool’s presets show |
| Performance or crash issues | After loading many presets, Photoshop runs more slowly or throws errors. |
Here is how you can check for the tool preset problems and solve them efficiently.
Step 1: Check “Show All Tool Presets” and “Current Tool Only”
If you don’t see a preset you expect, open the Tool Presets panel. From the panel menu,
- Ensure “Show All Tool Presets” is selected.
- Un‑check “Current Tool Only” if it’s selected.
Step 2: Reset the Tool or Toolbar
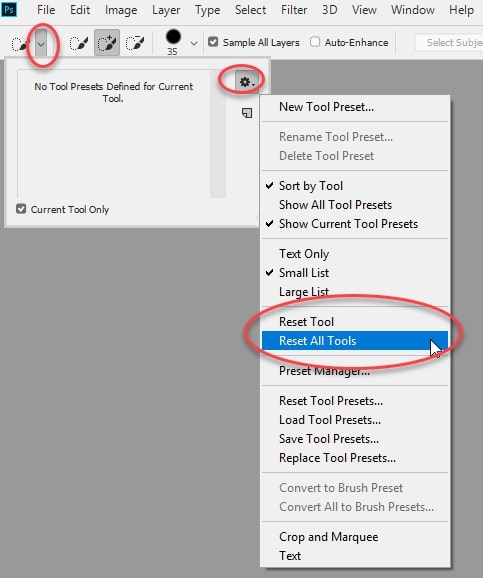
Sometimes, a corrupted tool or hidden toolbar setting can interfere. That time, you may need to reset the tool presets. To do so,
- Right‑click the tool icon in the Options bar.
- Choose the Reset Tool when just one tool misbehaves
- Choose Reset All Tools when many tools or presets are wrong.
Step 3: Check File Version & Compatibility
You should check if your Photoshop version has changed recently. Keep in mind that some .tpl/.abr files may not load properly in newer versions. You should refer to Adobe’s migration article on what to do after version upgrades, and it will give guidance on moving/copying settings.
Step 4: Clear Corrupted Preferences or Plugins
If your presets still don’t behave, a corrupted preference file or a conflicting third‑party plugin could be to blame. Reset preferences to restore default settings. You will need to hold Ctrl+Alt+Shift on Windows or Cmd+Option+Shift on Mac while launching Photoshop. Disable or move third‑party plugins temporarily to see if they are interfering with preset loading.
Step 5: Reload or Replace Preset Files
If a specific preset file (.tpl) is causing trouble, export your backup. Then load it again via the Tool Presets panel. If loading fails, you should consider using the Replace Tool Preset or recreating the preset manually.
How To Use Photoshop Tool Presets In Different Apps?
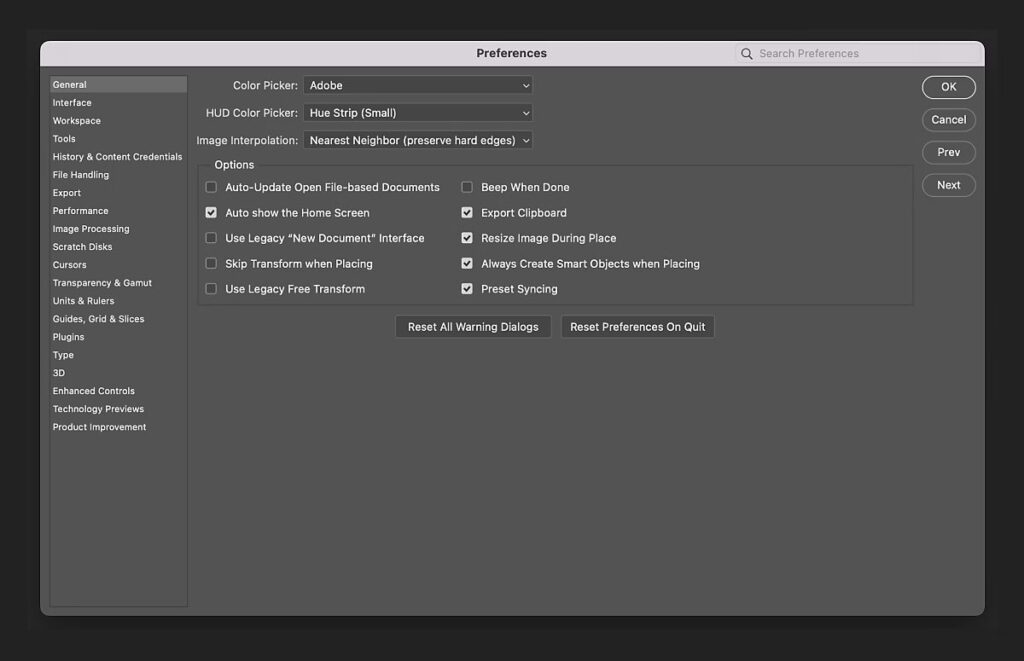
With the Adobe Photoshop tool preset, you can work between multiple apps or devices. In this section, we will comprehensively discuss how to move or share your presets in different apps and platforms.
First of all, keep in mind that not all presets can be moved smoothly between apps. Here is a quick breakdown.
| Type of Preset | Transfer Possibility |
| Brush or tool presets created in Photoshop | Partial. Brushes (.abr) often transfer to Illustrator/Fresco, but tool presets (.tpl) may not work identically |
| Vector tools in Illustrator | Limited when brought into Photoshop |
| Presets on mobile/tablet apps | Dependent on app support |
| Synced presets via Creative Cloud | Previously easier.Sync may be discontinued for some types. |
Now, follow the steps below to move your presets to different apps or platforms.
Step 1. Export the Preset from Photoshop
- For brush/tool presets, open Window >> go to Tool Presets
- Save or export the set as a .tpl, .abr, or whichever format is supported.
- Ensure you use a clear file name including app‑destination. For example, ProjectX_Brushes_ForIllustrator_v1.abr.
Step 2. Prepare the Target App
Now, let’s say you are moving your preset to the Illustrator app. In Illustrator, open Window >> Brushes >> Brush Libraries >> Other Library… and load the .abr file. In After Effects, import layered PSDs or compatible sets. Tool presets may not import exactly, but you can reinterpret settings. In tablet or mobile apps, use the “Import Brushes/Presets” option if available.
3. Adjust and Test
After the presets are imported, test on a sample document. You should rename or organise imported presets inside the target app to match your naming in Photoshop. It will keep the workflow consistent.
Best Practices and Tips for Maximizing Your Tool Preset Efficiency
| Focus | Key Tip | Quick Note |
| Think Strategically | Define the purpose before creating | Use only what’s needed and consider frequency and workflow |
| Naming & Grouping | Use clear names & categories | Prefix tool type, purpose, parameters, version/date |
| Grouping for Speed | Keep the active list lean | Sort panel, archive less-used presets |
| Workflow Integration | Use presets immediately and assign shortcuts | Combine with workspaces; standardize for teams |
| Performance | Avoid UI lag | Keep <200 active presets, load project-specific sets, and hide thumbnails if needed. |
Conclusion
All in all, Photoshop tool presets are not just shortcuts. They are powerful work accelerators that save time and maintain consistency, right? On top of that, it unleashes your creative potential. All you just need to do is start small and stay organized. Moreover, you should scale your preset library thoughtfully. With these strategies, you can make your Photoshop not just a tool, but a workspace perfectly customized to your creativity.
Ready to Master Photoshop? Browse This Photoshop Category for Everything You Need


