Photography is not just a hobby, and it’s more than that. Photography has become a form of art through which a photographer tries to communicate with his or her audience. They can convey thousands of pieces of information without saying a single word. This is the power and impact of photography.
Besides being an art form, photography has also become an integral part of business ventures nowadays. Pictures are used to sell services, promote businesses, and showcase products to a wider audience. Every company or organization wants to show its presence through digital media, mostly images of their businesses. This is where professional photography comes into play.
World Photography Industry:
Professional photography has become an attractive career opportunity for many people. In recent years, this industry has seen gradual growth, which has made professional photography a viable career choice. A massive market is based around photography, and the number of people entering the market has rapidly increased.
A study carried out by market experts came up with some interesting numbers. It was estimated in the study that the digital photography industry globally was around 45 billion USD last year. This is estimated to increase in the coming years, and it’s predicted to be over 55 billion USD by the time we enter the next decade.
More than 30% of the total photography market worldwide comes from commercial photography, according to a study conducted last year. Since 2017, the industry has been growing at a rate of 1.7–1.8% per year. This kind of number and growth shows the potential of this market and the opportunities to explore as a photographer.
Why Do You Need to Stand Out?
With the growing number of professional photographers entering the market every year, the competition to provide quality photography to clients has also become very challenging. Everyone wants to make a splash and grab viewers’ attention with their work. However, this is not always the case. Most of the time, it becomes an uphill climb for photographers.
A good photographer should always have a few tricks and tips up their sleeves that they can apply to stand out from the rest. This will grab the attention of their potential clients and will also increase their exposure.
There’s a saying, “A photo tells more than a thousand words.” This is also true when you are trying to stand out and make your space in this industry. You need to be able to take eye-catching pictures to create a buzz around your work.
Why is Editing Necessary for a Photographer?
Capturing the perfect image is not an easy task for a photographer. There are so many factors to take into account when you are trying to click a photo. So any kind of assistance in such a situation is a blessing. Photo editing is a blessing for you, which can get rid of much of your stress during photo shoots.
Photo editing is typically a post-processing procedure used to remove imperfections from an image that occurred during a photo session. Not only that, but you can also make many additions to your photo to enhance the quality of your picture.

For all these reasons, it’s so important now for a photographer to know picture editing for his own sake. Photo editing will reduce your workload and save you valuable time. Photo editing will give you that extra boost to your image to enhance its quality.
Why Do You Need to Change the Dress Color of an Image?
Suppose you are a professional photographer for a client who is a designer, a model, or someone from the fashion industry. One day, the client comes to you and asks you to take pictures of some models wearing dresses that they want to advertise for a certain company.
So, as usual, you take pictures of the models wearing the dress and show them to your client. Your client is delighted with the images you’ve clicked. Now they want to make some modifications and want you to change the color of the dress in the photo. What should you do in this kind of situation?

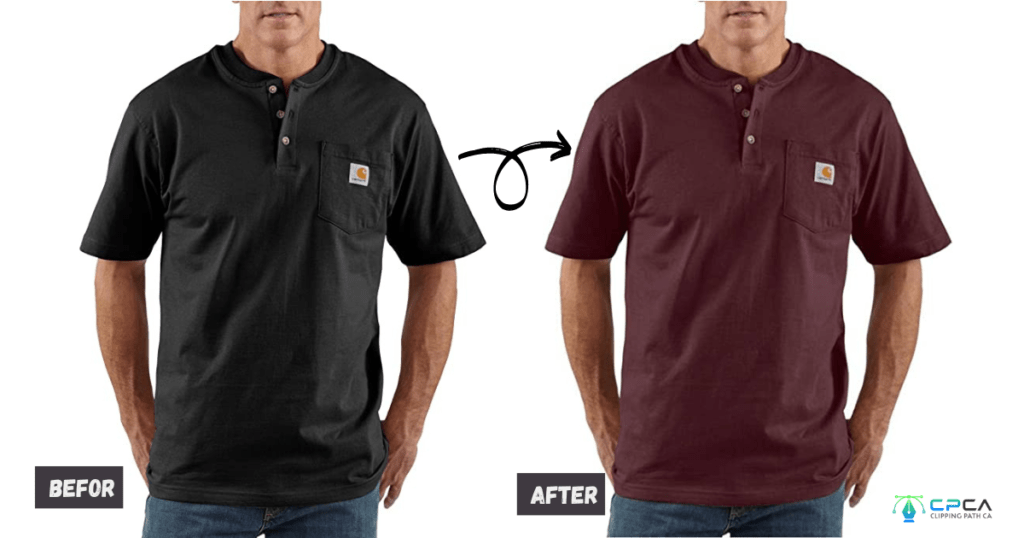
These are the times when Photoshop comes in handy. With Photoshop, you can easily change the color of the dress, make changes in the brightness or contrast of the dress, and so on.
Now that you know why you need it, you still have a question. “How do I do it?” Don’t you worry! This article has the solution to this answer. In this article, I’ll tell you how to change the dress color in Photoshop so that you can put a new color of your choice on the dress in your image.
Changing Dress Color in Photoshop:
The dress color of an image can be changed using various computer software programs during the post-processing session. Adobe Photoshop is a widely used software program for editing and retouching pictures globally.
You can use Photoshop to change the color of the dress in a picture. Photoshop can also be used to change the brightness and contrast of the dress in an image. All of these topics will be discussed here in detail. So, I’d suggest you go through the article to the end, and you can also change the dress color of your pictures.
How to Change Dress Color in Photoshop?

I’ll walk you through the process of changing the image’s dress color in Photoshop. I’ve taken a simple image of a shirt for this tutorial so that you can follow the steps easily. Once you’ve got a firm grip on the steps, you can change the dress color in complex images.
Step 1: Open Photoshop and Import the Image
First, open Adobe Photoshop on your computer. Now, select File and again select ‘Open.’ Browse and select the image you want to work with. You can do the same by dragging and dropping your photo into Photoshop Canvas, which is a quicker way to do it.

Step 02: Unlock the Background Layer of the Image
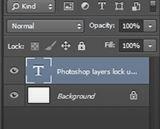
After you’ve opened the targeted photo in Photoshop, you will see on the right-hand side that there’s a Background layer. Right-clicking on the layer to select ‘Layer from Background’ will open a new tab. Now click ‘OK.’ You can also rename the layer in this step before clicking ‘OK’ if you want to.

Step 03: Use Manual Selection Tools to Select the Dress Area
This is the most critical and time-consuming step of this process. In this step, you are going to select the dress area of the image that you want to change color. In Photoshop, there are many tools that can be used to select an object. Some of them are automated, and others are manual. I recommend you use the manual selection tool for better precision. Some manual selection tools are:
➜ Lasso Tool:
Automated tools are used to make the selection in a photo with little to no help. But the Lasso Tool is different from those tools as it requires your manual input to make the selection.
The Lasso Tool mainly makes selections based on the movement of your mouse cursor. There are three types of Lasso Tools in Photoshop. Apart from the Primary Lasso Tool, there are the Polygon Lasso Tool and the Magnetic Lasso Tool.
The Polygon Lasso Tool selects an area by drawing a straight line from one point to another. This works much faster than the normal Lasso Tool.

The Magnetic Lasso Tool provides you with automatic assistance near the edges of the cursor. It works based on color contrast and makes adjustments accordingly. It is faster than both of the other Lasso Tools.
The Lasso Tool is sometimes used as a secondary trimming tool after using one of the automated tools primarily. This helps make the selection more precise.
➜ Pen Tool:
Just like the Lasso Tool discussed before, the Pen Tool is also used for making a selection manually. The core difference between these two tools is that Pen Tool uses a vector-based path instead of pixel-based one. This allows for resizing without taking aliasing into account.
The Pen Tool can be a very powerful tool for you once you master it. Mastering the Pen Tool is worth your time, as it helps you in all sorts of situations. Be patient and take your time while working with this tool.

You can use either of these two selection tools as you wish. If you are already familiar with one of these tools, then it’s better to go with that tool. Otherwise, go with any tool you want.
Step 4: Apply the Brush Tool to Adjust the Corners
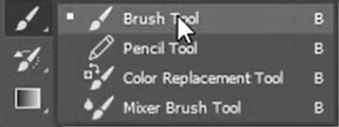
Once you’ve made the selection, you may want to apply the Brush Tool to make necessary adjustments to the edges of the selected area. This will eliminate possible errors that occurred during the selection and make the edges of the selected area smoother.
Use the B keyboard shortcut key to select the Brush Tool. The alternate way to select the Brush Tool is to select it from the toolbar on the left-hand side.

Step 5: Adjust Hue and Saturation to Change the Color
After you’ve applied the Brush Tool, you need to adjust the hue and saturation first. This is the step where you are going to change the color of the selected area.
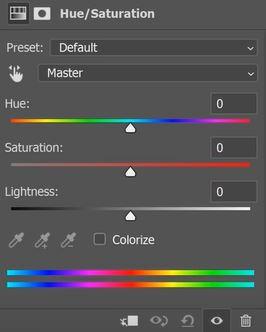
Hue/Saturation lets the user adjust the hue, saturation, and lightness of a certain range of colors in a photo or adjust all the colors in a photo simultaneously. This adjustment allows for fine-tuning colors in a CMYK photo so that they are within the gamut of the output.
Set a proper value for Lightness, Hue, and Saturation. This will vary from image to image. Experiment with it with different values and settle on the one you think is the most appropriate. You can change these values by moving the slider from left to right or vice versa.
Click on the Image, select Adjustments, and again select Hue/Saturation. You can also do this from the ‘Create new fill or adjustment layer button’. This is located below the layers panel. Once you have selected the Hue/Saturation, a new tab will open.
Check the Colorize and move the slider as per your requirement. You may need to play with the sliders a bit to get your desired output. If you are only looking to change the brightness of the dress area, you don’t need to check the Colorize.

When you are happy with your adjustments, select Ok. Save the image file, and you are finished with the edits.
Once you’ve changed the dress color, you can repeat the same steps to change the color again and again. Save your changes for each case, leaving you with multiple copies of the same image with different colors.
Final Thoughts
Now that I’ve discussed with you changing dress color in your photos easily in Photoshop in detail, it is safe to assume that you have a very good idea about these concepts. You only need to follow these steps to perfectly change the dress color in your pictures.
You need to understand that you won’t be able to change the color of the dress with absolute perfection from the get-go. You would require some practice before getting used to this.

Again, this is not the only way to change the dress color in photos. If you go online, you will find hundreds of tutorials and guides that do the same thing using different methods. But if you look closely, more than 90 percent of the steps are similar in all of them.
So if you can follow through with this procedure that I’ve discussed, I can assure you that you will come back with fabulous photos that will grab people’s attention.
If you still face challenges and require any help with your photos to changing your dress color, you can always get assistance from Clipping Path CA.
Who is ‘Clipping Path CA’?
The Clipping Path CA is world-leading outsourcing image editing and pro photo editing company based in Canada. They help you grow your business and ROI. They expertly handle your photo editing solutions in a timely and cost-effective manner. They have helped thousands of clients worldwide and here in North America. Nine out of ten people who have used their service have recommended them.
How does ‘Clipping Path CA’ help photographers edit their images?
Clipping Path CA is a professional photo editing and retouching company. They have 120+ expert designers of their own. They can provide photo touch-up services to clients who have difficulty touching up their photos. Clipping Path CA is a photographer-friendly platform that provides services at a reasonable price and with a quick turnaround time. Client satisfaction and happiness are always kept in mind.
Photo Retouching is a service that makes images perfect and flawless and makes them attractive with Photoshop Service by changing dress colors from the photos. It is one of the most demanding services in photo editing services. Images become more appealing and focused with the addition of photo retouching.
Questions and Answers for Edit Photo Dress
Can I change the color of the dress in the photo?
Yes, you can. The color of the dress can be changed easily from the photo using photo editing software programs. The steps that should be followed in Photoshop are discussed in this article.
How long does it take to change the dress color from an image?
When you are new to this type of editing, it may take time to change the dress color of a single image (around 10–15 minutes). But once you’ve had some experience with background removal, you can work very quickly (in 7–8 minutes). Some images will take more time than usual if they have more edges and curves.
Is there any app to change the color of the dress?
Yes, there are apps that can change the color of the dress. Some of these apps are:
➜ YouCam Makeup
➜ Facetune Editor
➜ Picsart
➜ Recolor Dress & Clothes Colour
➜ Change Dress and Clothes Color
Which selection tool should I use?
In the article, I’ve discussed two possible ways to manually select an object in an image. Depending on the characteristics of your photo and your preference, you should select one of these tools that you are comfortable with.
What If I Don’t Get the Desired Color On My T-Shirt?
There may be cases where you won’t find the desired color with the Hue/Saturation dialog box. In such cases, use blending mode. You can experiment with different blending modes to determine which works best.


